New Team Explorer in TFS 2011
 Probably many of you have already seen screenshots of the new Team Explorer in a post telling about improvements in the area of source code control. In this topic, I would like to focus on general updates Team Explorer.
You remember that Team Explorer in Visual Studio 2010 has a tree structure, and is very similar to the project browser (Solution Explorer). For a long time we within the team believed that this model would be enough, although it imposes some restrictions. But when I created Team Members Power Tools a couple of years ago, I wanted more features that, for example, would show pictures, lists of users. Team Explorer with his tree limited or did not allow to do such things. As soon as we began to design TFS 11, including planning to include the functionality of the review code, it became clear that we needed a new approach. Including we received a lot of feedback from people using our product with requests to implement new additional functionality.
Within the team, we decided to rework the Team Explorer interface. Now this window is a frame containing many other functional windows (or on the other - pages), and providing navigation similar to the browser. We got the feeling that this makes it easier to access the necessary functions, and we don’t overload the IDE with these ten additional windows.
As soon as we started the design, there were several new problems that we wanted to solve. This is not a complete list:
- Interface without modality. All modal dialogs that we use lead to a poorly layered interface.
- Move towards asynchronous experience, and make the usual method of showing progress and canceling long-running operations.
- Improve start time and service connections without taking all the data for Team Explorer all at once (documents, reports, work items, assemblies, ...) while starting work and only show this information when it is really needed.
- Make more obvious the main usage scenarios.
- Update the appearance of Team Explorer.
- Add even more features for third-party extensions.
- Add scenarios focused on the experience of the organization, without imposing common process approaches that we have implemented.
To refresh your memory, here is an image of the interface of the old Team Explorer in TFS 2010
Meet: Home Page
The new Team Explorer in TFS 11 uses page navigation, providing much more functionality in one window. Root or in other words, the home page has a tab in the form of a house on the toolbar. Also on this page are links to basic actions. Also, we now support the usual back-to-back scenario, remembering the history of your work. Additionally, the window has an input field for the search.

')
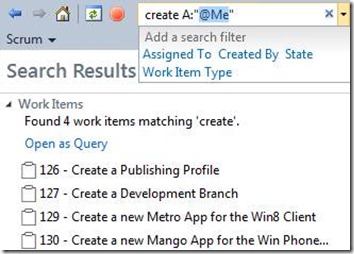
Search capabilities are similar to how they are implemented in Outlook or Team Web Access (2010). In this example, I am looking for a work item containing the word “Create” and assigned to me. The drop-down list below the search bar additionally displays some filtering options for the fields. Double-clicking opens a work item, or you can open a query (“Open as Query) for editing and saving. For now, the search only works for work items, but we hope to add new data sources in the future.
Manage Your Work
In TFS 2010, your workflow might look like this:
- Opening Solution
- We make some changes
- We are looking for work items and, if necessary, associate them with changes in the code.
- We enter comments for changes.
- Make a check-in
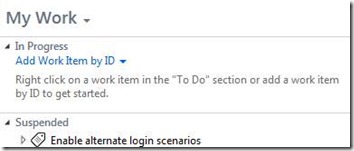
In TFS 11 we had a little tuning of this process. The “My Work” page gives you the opportunity to see your tasks, and keeps track of what you are doing.
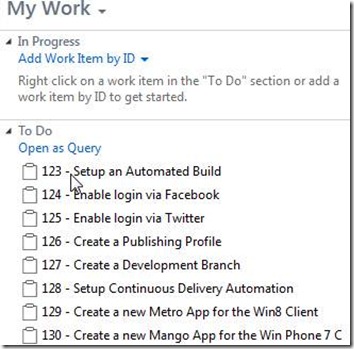
Once you have decided which task you will be performing, in the context menu there is an opportunity to assign this work item as “Work in progress”.

These two work items are now marked as current. While you still have no changes in the code, you will see the “Finish” menu item, but as soon as they appear, there will be a “Check In” item. The developer preview will associate your current code changes with these work items. In the first beta, functionality will also be added that takes these work items to the next state step. For example, if you use a scrum process template, the status of these work items will be translated from “To Do” to “In Progress”. And this change will also be visible in the web dashboard. Of course, you can remove work items from the “Work In Progress” list using the context menu. In the beta version, the status of these work items will also be returned to the previous step.

As soon as you make some changes to the code, you will see other links:
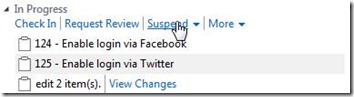
If you have current code changes, the following options will be available:
- Make Check In
- Request code review for these changes.
- Postpone these changes to the "shelf" (Shelveset).
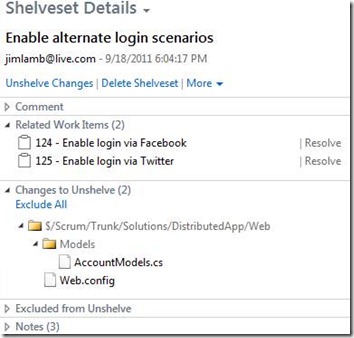
Let's start with the last option. You are probably already familiar with the concept of “shelves” (Shelvesets) which allow you to save the current changes in the code on the server separately and optionally roll back these changes. This is a very convenient opportunity to work on the changes and postpone them "for later." In this case, you have the opportunity to view these changes on another computer with another programmer from your team. Based on this functionality, we created the Suspend command, which saves to the server not only changes in the code, but also the current settings of your IDE (open Solution, toolbar settings, bookmarks, breakpoints, and so on). This allows you to return to the same context that you were engaged in when creating the code, but which you had to postpone. This significantly reduces the cost of interruptions in work.
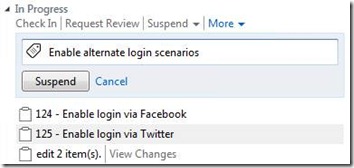
As soon as you call Suspend, you will have the opportunity to make a brief description of what you did before you really postpone this work. If you are concerned about the size of the input field for this description, it can be vertically and horizontally expanded. After clicking on the Suspend button, the current status of the project on your workstation is rolled back, and a new entry will appear in the pending work section.
In expanded form, you will see the work items and code associated with this deferred work.
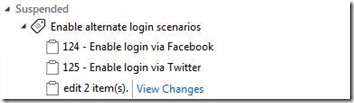
The View Changes link allows you to view details where you can review changes, work items, etc.
Another great new feature is the list of unread work items. If you are assigned to work items but you have never looked at their contents, or have made changes that you have not yet seen, they will be highlighted in bold, by analogy with unread messages in Outlook. For me, this is a great opportunity to quickly understand what has appeared new and with which I have not had a deal, to see new comments on the code, etc.
Review Code
Let's continue to see what can be done in the new version of Team Explorer. Request a review of the code for deferred work. In the options on the pending changes page there is a “More” item and in the menu that appears there is a query review review item.

On the New Code Review page, you can designate a person from the team who will conduct the review. Additionally, you can set a name, a project area, an iteration, and make some comments so that the reviewer has a complete picture. In the View Changes section there is a link to exclude some files from the list of changes so that the reviewer focuses on exactly what you need. After the Submit Request command, the code review request will be registered and will go to the My Work section in the Code Review & Requests section. There you can later see the current status and see details and reviews.

If the reviewer has set up email notifications, he will immediately receive a letter stating that he received a request to review your code. In any case, he will see this request in his My Work section.

Double clicking on the query will bring you to the Code Review page where the reviewer can see the details.
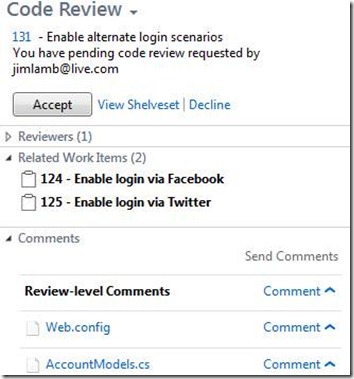
At this point, the reviewer may decide whether he will make a review and click the Accept button. Or abandon this task and send it to someone else. To do this, in the Reviewers section, just add a new person and click Decline. In this case, you can also add comments.
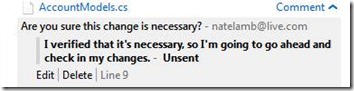
The reviewer can add comments, both to the request and to specific code files associated with this request. As noted above, the comment input field can be expanded to accommodate a larger description.

As soon as the reviewer has finished analyzing the code in one of the files, he can give a comment by clicking the Send Comments button. In this new comments will be highlighted in bold, to make it more clear that they are most relevant. The exchange of these comments can be in the form of a chat, giving the reviewer and the author an opportunity to quickly discuss the details. The final step is the completion of work on all requests and the Finish team is used for this.

After the end of the review, you have the opportunity to further discuss the usefulness of the review with the author of the request. If you have added at least one comment, the With Comments option will be enabled by default. Alternatively, you can simply note in the request that the changes are “Looks Good” and that you agree that they fall into the main branch of the source code. The item “Needs Work” is obvious and indicates that the code is not all right in the opinion of the reviewer, and some changes are required before they can be checked into the main branch. Of course, you can mark all your comments in detail for each file in the comments.
As soon as the review is completed and the “Finish” button is pressed, the request disappears from the Coder Reviews & Requests list on the “My Work” page. In a future beta version, the reviewer will also be able to view a list of recent requests to add some additional comments to them.
As the author sees the request for a code review.
As soon as the reviewer comments on any file, the author of the request sees these comments as unread and bold in the “My Work” section.

Here is what the moment looks like when the reviewer has completely finished his work and clicked on the “Finish” button and provided his feedback:
Before analyzing the feedback, the author of the request recovers deferred work from the "Shelf". The Resume command is available from the context menu, in the future beta version you can also simply drag the “pending work” to the “In Progress” section while the environment, its context (open files, settings, breakpoints) “from the shelf” will be restored automatically.

After analyzing the comments of the reviewer, the author can make the necessary changes and close the request for review, which indicates the complete completion of work on this task.
After that, you can make a check-in - put these changes in the main branch of the source code in the version control system. In this case, you will receive a notification that everything went well.

Build (Builds)
We added even more features related to assembly management. Starting with simple things like the fact that you no longer need to open the “Builds” branch and watch the status of the recently launched process. This information will be available immediately on the build page in the “My Builds” section. Of course, this does not replace Build Explorer, but it simplifies the work. We also received a lot of feedback on the inconvenience of managing a large number of assembly definitions. One of the simple solutions that we were offered was to make folders in this section. While we still have not made a final decision on how to do it better.
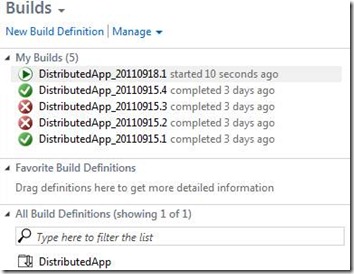
The “My Builds” section contains those assemblies that you initiated or that were initiated based on your changes if you are using the Countinuous Integration mode. The context menu contains the following list of commands:
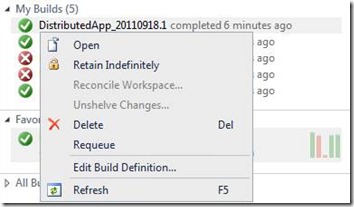
The new Requeue command allows, as you probably already guessed, to restart the assembly with the same parameters. This is handy when the last time it crashed was with the environment.
The “All Builds Definition” section contains definitions of all assemblies (ok, not all but the first hundred). There you will find a filter box to allow you to find what you really need. You can also designate some definitions of assemblies as “favorite”, so that they are always at hand.

For the favorite list, you will see not only the current status of the last build but also the history of previous compilation attempts, in the form of a small histogram. Just like in TFS 2010, you can click on the report link to see the details.
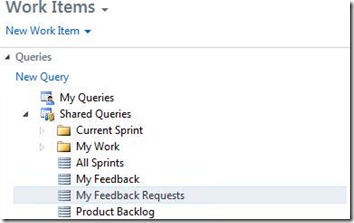
Work items
A page containing requests for lists of work items in the current version of the TFS 2011 Developer Preview looks like it does in TFS 2010. So far, we don’t have any cardinal plans to change anything, except that some commands and actions from the context menu will go directly to this page in the form of links.
Perhaps in Beta TFS 2011 you will see some new changes.
Performance
We put a lot of effort in order to transfer all “long-playing” processes to the background wherever possible. But there are several cases where, due to the interactive interaction with Visual Studio UI, we have to perform these tasks in the current user thread. We continue to optimize performance since the Developer Preview code was frozen, and you’ll see these improvements in Beta.
Extensibility
In TFS 2010, the possibility of extensions for Team Explorer was limited. You could add new nodes to the tree, change the context menu, and handle the activation event (double click). In TFS 2011, extensions have been enhanced with:
- Adding new pages to Team Explorer and linking it with the general navigation structure
- Adding a new section to an existing page
- Adding links to the main page (Home)
- Adding Sublinks on the Main Page
If you decide to create your own Team Explorer page, we recommend that you structure it according to our approach. But still, you have complete control over how to make this page. Soon we will tell you about the Team Explorer extensions in more detail.
Brian
Source: https://habr.com/ru/post/129001/
All Articles