Modding the USB-to-SATA converter for your own needs
The note in an accessible form outlines simple steps to adapt with the help of available tools USB-to-SATA converter to a form suitable for use.

One day, for some (still unexplained) reason, one of the onboard SATA nipples on the self-assembling NAS on miniITX (also part-time AoE server for diskless clients) refused, and since it was in the evening (and even on long weekends ) then it imposed some restrictions on the availability of the solution (although a bullet can be flown to the convenience store, but laziness is known to be an engine of savvy minds).
So, the problem is this: connect the SATA screw to the miniITX system in the absence of free SATA.
')
After a quick revision of computer-related junk, an adapter was found that had been dusting for many years, because it was ordered at the dawn of the popularity of foreign online stores:

As it turned out, the board is not just a USB-to-SATA converter, but intended for devices such as notebook DVD drives that carry on board the counterpart of the slimSATA connector (it features an extra nonstandard power supply). Thus, the adapter failed to connect to ordinary SATA devices and it was permanently thrown into the dark corner of the box.
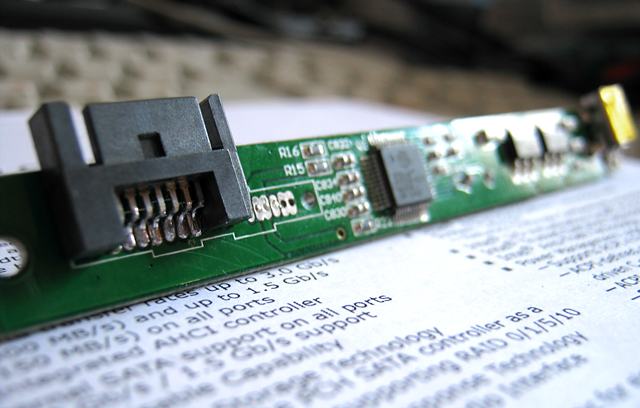
So, the adapter contains a slimSATA connector, which includes the standard SATA 7pin female connector (as on connecting cables):

Even if you bite an extra, non-standard slimSATA power supply from the board, then the adapter will block access to the HDD power connector (SATA 15pin) when inserted into the HDD. Only one output - SATA 7pin connector extension, for which we carefully cut off one of the ends of a standard SATA cable:

Now you can completely bite the slimSATA connector from the adapter board and solder the end of the SATA cable (without mixing up the RX-TX diffpars!):

To impart mechanical strength to the joint of the cable and the board, it was decided to use PVC tape (I refused to fill the initial idea with silicone sealant — it is not known how much it is 1.5 GHz non-conductor):

Now let's do USB: since we need to replace the internal SATA, then a two-meter coil from USB-A to USB-B inside the case will obviously be superfluous. We get rid of USB-B - unsolder a piece of board with connectors and electrolytes (they are needed only when powering a USB DVD drive).
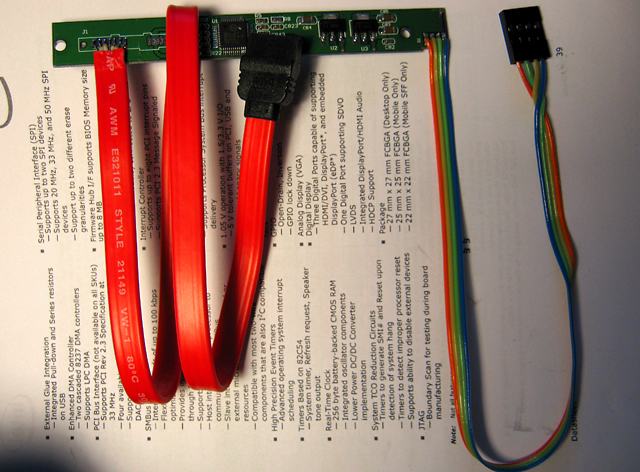
Connect the adapter to the internal USB comb on the motherboard. For what we compress / solder (for 480 Mbit / s - it is better to solder) the connectors of the PLS-4 connector (of course the PLD-10 is more convenient, so that the whole comb is at once, but only PLS-4 is present in the farm):

Having checked the pinout of the comb on the motherboard and the USB pins of the SPIF225A converter chip , we assemble:

So, having spent some time searching for the right pinouts, this type of adapter was quickly built, which allowed us to pick up the fallen off HDD without rebooting, and as a result, thanks to its size and getting rid of atavism, it harmoniously fit into the NASa interior:
After solving problems with the NAS and its upgrade, an itchy craving for perfectionism pushed for adapter modification. What were the necessary connectors ordered for: SATA 7pin male SMD & miniUSB-B SMD . Mark up the seat for the SATA connector, do it in such a way that the holes for the pins-holders do not go through the signal paths on the back side of the board (as they say - try it seven times -cut one at a time):

We clean the copper and solder the pins on the back of the board:

The pitch of the footprint on the board and the SATA connector is the same, as a result we get a neatly soldered connector:

Let's do the USB part. We mark and prepare a place on the board for landing miniUSB-B:

Solder the connector, showing virtuosity when working with a 0.65mm pitch of the miniUSB-B connector:

We need some explanations, so the sequence of actions with miniUSB-B:
Practice is the criterion of truth, therefore we check the correctness of the connections with real inclusion:

The second version of the adapter turned out to be much more aesthetically pleasing:

All is well. And functional, and aesthetics, but not enough zest. After looking through the documentation for the USB-to-SATA bridge SPIF225A , it was also found: " pin 36 - HDD Activity LED output ". Fine:

We solder a 10K resistor (PullUp to suppress interference on TriState-pin?) And solder a chain of series-connected R and LED. A resistor of hundreds of ohms (I took 1 kOhm), the cathode LED to output 36 chips (to be determined by dial or documentation):

On the example of adapting the USB-to-SATA converter, a method of quick revision using a minimum of available materials (operational recovery of diskless clients) was shown, and an approach to a more thoughtful and elegant solution was also demonstrated.
Preamble
One day, for some (still unexplained) reason, one of the onboard SATA nipples on the self-assembling NAS on miniITX (also part-time AoE server for diskless clients) refused, and since it was in the evening (and even on long weekends ) then it imposed some restrictions on the availability of the solution (although a bullet can be flown to the convenience store, but laziness is known to be an engine of savvy minds).
So, the problem is this: connect the SATA screw to the miniITX system in the absence of free SATA.
')
Part I
After a quick revision of computer-related junk, an adapter was found that had been dusting for many years, because it was ordered at the dawn of the popularity of foreign online stores:
As it turned out, the board is not just a USB-to-SATA converter, but intended for devices such as notebook DVD drives that carry on board the counterpart of the slimSATA connector (it features an extra nonstandard power supply). Thus, the adapter failed to connect to ordinary SATA devices and it was permanently thrown into the dark corner of the box.
So, the adapter contains a slimSATA connector, which includes the standard SATA 7pin female connector (as on connecting cables):
Even if you bite an extra, non-standard slimSATA power supply from the board, then the adapter will block access to the HDD power connector (SATA 15pin) when inserted into the HDD. Only one output - SATA 7pin connector extension, for which we carefully cut off one of the ends of a standard SATA cable:
Now you can completely bite the slimSATA connector from the adapter board and solder the end of the SATA cable (without mixing up the RX-TX diffpars!):
To impart mechanical strength to the joint of the cable and the board, it was decided to use PVC tape (I refused to fill the initial idea with silicone sealant — it is not known how much it is 1.5 GHz non-conductor):
Now let's do USB: since we need to replace the internal SATA, then a two-meter coil from USB-A to USB-B inside the case will obviously be superfluous. We get rid of USB-B - unsolder a piece of board with connectors and electrolytes (they are needed only when powering a USB DVD drive).
Connect the adapter to the internal USB comb on the motherboard. For what we compress / solder (for 480 Mbit / s - it is better to solder) the connectors of the PLS-4 connector (of course the PLD-10 is more convenient, so that the whole comb is at once, but only PLS-4 is present in the farm):
Having checked the pinout of the comb on the motherboard and the USB pins of the SPIF225A converter chip , we assemble:
So, having spent some time searching for the right pinouts, this type of adapter was quickly built, which allowed us to pick up the fallen off HDD without rebooting, and as a result, thanks to its size and getting rid of atavism, it harmoniously fit into the NASa interior:
Part II
After solving problems with the NAS and its upgrade, an itchy craving for perfectionism pushed for adapter modification. What were the necessary connectors ordered for: SATA 7pin male SMD & miniUSB-B SMD . Mark up the seat for the SATA connector, do it in such a way that the holes for the pins-holders do not go through the signal paths on the back side of the board (as they say - try it seven times -
We clean the copper and solder the pins on the back of the board:
The pitch of the footprint on the board and the SATA connector is the same, as a result we get a neatly soldered connector:
Let's do the USB part. We mark and prepare a place on the board for landing miniUSB-B:
Solder the connector, showing virtuosity when working with a 0.65mm pitch of the miniUSB-B connector:
We need some explanations, so the sequence of actions with miniUSB-B:
- Contact GND so that it does not interfere neatly (the material of the legs is fragile - at the first connector I broke off the leg when bending) we bend upwards and solder to the body - the body is then soldered to the GND boards;
- Output ID is not used - so it is simply pulled out of the connector with tweezers;
- Now it has become a little looser - there are three outputs left - they need to be carefully pulled apart with tweezers in order to have more space for a maneuver with a soldering iron;
- D-and Vbus pins are soldered with small extension wires, and the inputs themselves are slightly raised so that they do not short on the board after installation;
- The output of D + is left “as is” - physically during installation it falls on the corresponding polygon on the board;
- Now you can mount the connector on the board - we grab the case diagonally, then carefully deal with the D-and Vbus.
Practice is the criterion of truth, therefore we check the correctness of the connections with real inclusion:
The second version of the adapter turned out to be much more aesthetically pleasing:
Little touch
All is well. And functional, and aesthetics, but not enough zest. After looking through the documentation for the USB-to-SATA bridge SPIF225A , it was also found: " pin 36 - HDD Activity LED output ". Fine:
We solder a 10K resistor (PullUp to suppress interference on TriState-pin?) And solder a chain of series-connected R and LED. A resistor of hundreds of ohms (I took 1 kOhm), the cathode LED to output 36 chips (to be determined by dial or documentation):
Total
On the example of adapting the USB-to-SATA converter, a method of quick revision using a minimum of available materials (operational recovery of diskless clients) was shown, and an approach to a more thoughtful and elegant solution was also demonstrated.
Source: https://habr.com/ru/post/128774/
All Articles