ARM Microcontrollers STM32F. Quick start with STM32-Discovery
When studying 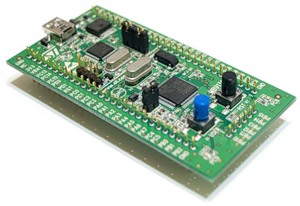 any unfamiliar business, especially when it comes to microcontrollers, the question arises - "Where to start." Articles are being searched for the keywords “Getting Started,” inevitably there is a dilemma for choosing a development environment and a programmer-debugger. To help you determine the answers to your questions, I will share my experience in mastering 32-bit controllers of the STM32F family from ST Microelectronics.
There were essentially two options - STM32F or NXP (LPC1xxx). On the STM32F microcontrollers, my choice fell for several reasons.
First, the cheap STM32VL-Discovery debug board. Some of you, who are engaged in electronics, have probably managed to snatch free Discovery , which is distributed for free when participating in a competition from EBV-Electronik. Those who did not have time to submit an application or did not know at all about such an opportunity are not upset - the fee costs about 500 rubles. The price is more than affordable.
')
Secondly, the controllers themselves are pretty cheap. The simplest stone STM32F100C4T6 with 16 kilobytes on board costs less than 40 rubles (!), While doing so on the characteristics and peripherals of any “Mega”, which, by the way, still costs more. The price of the stones of the older line with USB hardware (STM32F103) is also quite humane, about 120 rubles.
Thirdly, controllers are actively beginning to gain interest from electronics engineers, articles on the development of the STM32 appear on the Internet one after another. If it goes on like this, popularity may well reach the level of Atmel controllers.
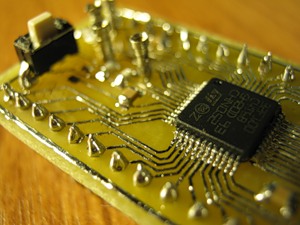 The only disadvantage compared to the same Atmel for the radio amateur is the small case. About DIP you can forget. The only available case is the LQFP with 0.5 mm pitch legs . Nevertheless, it is not difficult to make a fee with a certain skill (we have already read about this), so I do not consider a small package a minus. The photo on the left is my board for the LQFP48 case.
A few words about the STM32VL-Discovery debug board: onboard it has the ST-Link programmer-debugger and the STM32F100RBT6 controller (target) controller (128 kb flash, 8 kb operative). All pins are separated to pins, there are two LEDs and a button. The SWD connector of the debugger is brought out, so the board can also be used as an ordinary ST-Link. This is good for us, you do not need to buy a programmer.
Here is not so simple, as with atmelovskoy AVR Studio. There are several options:
So, we will need:

There is a CMSIS library for the ARM Cortex M3 core, and an STM32 Peripheral Library (a library for working with peripherals from ST Microelectronics), as well as CooCox’s own designs for the selected microcontroller. We need only tick the required libraries and the trick is done. For the simplest LED blinker — namely, “Hello World” on microcontrollers — we need CMSIS Core, CMSIS Boot, RCC (peripheral clock control) and GPIO (general-purpose I / O port control).
Without further explanation I will write the code of the simplest program:
We compile (F7), we observe the executable files appeared in the Debug directory - bin, hex, elf.
We have prepared the program, now we will be busy loading it into the chip. We connect the board (I will not explain the driver installation), run the ST-Link Utility. The controller in Discovery is connected via SWD, so the first thing to do is to switch the mode of the programmer-debugger from JTAG to SWD:

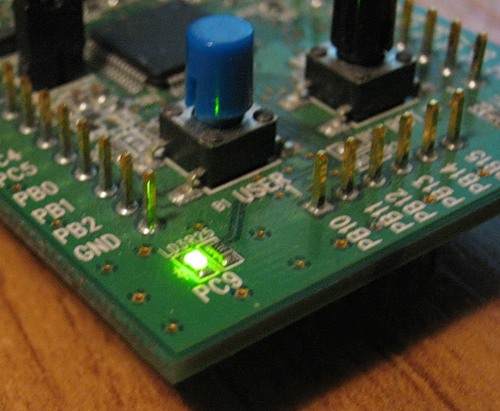
Then everything is transparent: menu Target -> Program & Verify ... select the file hex, click Program and the firmware is completed. It remains only to press the Reset button on the Discovery board - the one with the black cap - and enjoy the blinking LED.
Congratulations. Your first program is written, compiled, flashed into a chip and works successfully. A start has been made, and then it's up to you: we climb into the template code, as usual we change something, we supplement, we study new peripheral devices, we connect new libraries. And do not forget to read the Reference Manual, there is a lot of useful information.
Update: Starting from version 1.3.0, the CooCox IDE development environment supports ST-Link , so programming and debugging can be done directly from CoIDE, without using the ST-Link Utility. Selecting an adapter through the menu Debug -> Debug Configuration (ST-Link, port SWD). Download the program to the controller via the menu Flash -> Program Download.
That's all. I wish you success in the development of ST Microelectronics microcontrollers.
any unfamiliar business, especially when it comes to microcontrollers, the question arises - "Where to start." Articles are being searched for the keywords “Getting Started,” inevitably there is a dilemma for choosing a development environment and a programmer-debugger. To help you determine the answers to your questions, I will share my experience in mastering 32-bit controllers of the STM32F family from ST Microelectronics.Controller selection
There were essentially two options - STM32F or NXP (LPC1xxx). On the STM32F microcontrollers, my choice fell for several reasons.
First, the cheap STM32VL-Discovery debug board. Some of you, who are engaged in electronics, have probably managed to snatch free Discovery , which is distributed for free when participating in a competition from EBV-Electronik. Those who did not have time to submit an application or did not know at all about such an opportunity are not upset - the fee costs about 500 rubles. The price is more than affordable.
')
Secondly, the controllers themselves are pretty cheap. The simplest stone STM32F100C4T6 with 16 kilobytes on board costs less than 40 rubles (!), While doing so on the characteristics and peripherals of any “Mega”, which, by the way, still costs more. The price of the stones of the older line with USB hardware (STM32F103) is also quite humane, about 120 rubles.
Thirdly, controllers are actively beginning to gain interest from electronics engineers, articles on the development of the STM32 appear on the Internet one after another. If it goes on like this, popularity may well reach the level of Atmel controllers.
The only disadvantage compared to the same Atmel for the radio amateur is the small case. About DIP you can forget. The only available case is the LQFP with 0.5 mm pitch legs . Nevertheless, it is not difficult to make a fee with a certain skill (we have already read about this), so I do not consider a small package a minus. The photo on the left is my board for the LQFP48 case.A few words about the STM32VL-Discovery debug board: onboard it has the ST-Link programmer-debugger and the STM32F100RBT6 controller (target) controller (128 kb flash, 8 kb operative). All pins are separated to pins, there are two LEDs and a button. The SWD connector of the debugger is brought out, so the board can also be used as an ordinary ST-Link. This is good for us, you do not need to buy a programmer.
Choosing a development environment
Here is not so simple, as with atmelovskoy AVR Studio. There are several options:
- IAR . A commercial. Restriction on the amount of executable code. Nafig
- Keil . Same. Nafig
- Atollic TrueStudio . Based on Eclipse, but nonetheless commercial. In the free Lite-version there is no limit on the amount of code, but “Buy a PRO version” advertisement regularly pops up. Nafig
- Clean Eclipse with ARM plugin and ARM-GCC compiler. Like here it is, cross-platform happiness, but from nowhere an even more suitable candidate appears:
- CooCox IDE (CoIDE). Also based on Eclipse, but free. It includes everything to work with ARM, allows you to download the necessary libraries without departing from the cash register. It knows how to work with various debuggers (although not with ST-Link, but this costs the GNU Debugger installation). The only negative - the assembly is only under Windows. Linukssyatnikam have to put Eclipse and tune it with his hands. As usual. Well, nothing, we are not used to.
Actually, Getting Started!
So, we will need:
- STM32VL Discovery Board
- Utility STM32 ST-Link Utility
- CoIDE development environment of the latest version (currently 1.3.0).
There is a CMSIS library for the ARM Cortex M3 core, and an STM32 Peripheral Library (a library for working with peripherals from ST Microelectronics), as well as CooCox’s own designs for the selected microcontroller. We need only tick the required libraries and the trick is done. For the simplest LED blinker — namely, “Hello World” on microcontrollers — we need CMSIS Core, CMSIS Boot, RCC (peripheral clock control) and GPIO (general-purpose I / O port control).
Without further explanation I will write the code of the simplest program:
#include <stm32f10x.h> #include <stm32f10x_conf.h> #include <stm32f10x_rcc.h> #include <stm32f10x_gpio.h> void Delay(volatile uint32_t nCount) { for (; nCount != 0; nCount--); } int main(void) { /* SystemInit() startup_stm32f10x_md_vl.c */ GPIO_InitTypeDef GPIO_InitStructure; RCC_APB2PeriphClockCmd(RCC_APB2Periph_GPIOC , ENABLE); GPIO_InitStructure.GPIO_Pin = GPIO_Pin_9; GPIO_InitStructure.GPIO_Mode = GPIO_Mode_Out_PP; GPIO_InitStructure.GPIO_Speed = GPIO_Speed_50MHz; GPIO_Init( GPIOC , &GPIO_InitStructure); while (1) { GPIOC->ODR |= GPIO_ODR_ODR9; Delay(0x1FFFF); GPIOC->ODR &= ~GPIO_ODR_ODR9; Delay(0x7FFFF); } return 0; } We compile (F7), we observe the executable files appeared in the Debug directory - bin, hex, elf.
Controller firmware
We have prepared the program, now we will be busy loading it into the chip. We connect the board (I will not explain the driver installation), run the ST-Link Utility. The controller in Discovery is connected via SWD, so the first thing to do is to switch the mode of the programmer-debugger from JTAG to SWD:
Then everything is transparent: menu Target -> Program & Verify ... select the file hex, click Program and the firmware is completed. It remains only to press the Reset button on the Discovery board - the one with the black cap - and enjoy the blinking LED.
Congratulations. Your first program is written, compiled, flashed into a chip and works successfully. A start has been made, and then it's up to you: we climb into the template code, as usual we change something, we supplement, we study new peripheral devices, we connect new libraries. And do not forget to read the Reference Manual, there is a lot of useful information.
Update: Starting from version 1.3.0, the CooCox IDE development environment supports ST-Link , so programming and debugging can be done directly from CoIDE, without using the ST-Link Utility. Selecting an adapter through the menu Debug -> Debug Configuration (ST-Link, port SWD). Download the program to the controller via the menu Flash -> Program Download.
That's all. I wish you success in the development of ST Microelectronics microcontrollers.
Useful resources on the topic
- My article on STM32 peripherals . Teach you the method of studying the periphery. I recommend reading.
- Setting up the Eclipse bundle + ARM-GCC . It is recommended to read in order for you to know what CoIDE is doing for you .
- Video review of STM32 controller documentation . It will help you figure out how and where to look for documentation on the controller.
- STM32VL-Discovery on ST Microelectronics. Manual, scheme, drivers, ST-Link Utility and everything else that relates to the board.
Source: https://habr.com/ru/post/128734/
All Articles