FreeRADIUS for WPA & WPA2 Enterprise: Windows 7, Android, Symbian, iPhone
This article perfectly describes the configuration of FreeRADIUS for WPA2 enterprice, for it I successfully configured the FreeRADIUS2 + WPA2 + EAP-TLS connection (WIFI WPA / WPA2 Enterprise user authentication using certificates). For this, neither you nor yourself will bother me, I will not translate.
However, the article lacks information on the intricacies of configuring Android, Nokia Symbian, iPhone and Windows 7 clients for the above bundle.
What I'm going to do in this complementary article.
It turned out that Android only understands binary certificates and only with a file extension (* .crt) for a certification authority. If your certificate authority's certificate is in text form, then converting it is quite simple in * nix:
Or use the online converter here .
User certificates (required in the format (* .p12) and with the same file extension) and certificate authority must be placed on the SD card of the device. Go to the Android configuration: "Settings" , go to "Security" , and select the item "Install from SD card . " This is where the certificate authority certificate is installed first and then the user certificate.
You can also do this by sending a letter with attached files, if the mail client is already configured. After downloading letters, their attachments are usually located in the Downloads folder on the SD card. There is no need to move certificates from this folder anywhere.
We return to the Android configuration and go to the “Wireless Networks” , select “WiFi settings” , “add WIFI network” . Here we select 802.1x Enterprise Security , select “EAP method” , “TLS” , select the previously installed certificate authority certificate and user certificate, respectively. We do not forget to enter the user name in the Identification code field (in Nokia, you can simply specify “use the login from certificate” ***), which should correspond to the Common Name "/ CN =" in the user's personal certificate.
Not all Windows 7 files (* .p12) open on click, it is better to install them using certificate manager
The certificate of the certificate authority must be installed before the installation of the user certificate. As in other and everywhere.
The certificate of the certification center is recommended to be installed in the “Trusted root certificates” , and the personal certificate in the “Personal certificates”, respectively.
The screenshots below show the necessary settings:
')


If your certificate of the certification center is not present in this list, then most likely you have the same curiosity as with me, see the last paragraph of the article. or just restart the machine.
Compared to Windows 7 and Android, setting Nokia is much easier.
After copying the user and certificate authority certificates to the device’s memory card, go to the location of these files with the file manager and simply open them. You will be prompted to enter a password for certificates (if any), new names for certificates and a new password for a user certificate (it will sometimes be asked when the device is connected to the network, so don’t make it too complicated).
Entering the WIFI connection settings ** create a new access point Wireless LAN, enter the network name, Select Infrastructure , select Security Settings, select 802.1x , select WPA EAP mode . now select the newly created access point, go to the WLAN security settings , select the EAP plug- in settings , remove the check marks from all, leave only on the EAP-TLS , go to the EAP-TLS and select the previously installed: personal certificate (the one that was p12), Authoritative certificate (the one that was pem or crt or der) and leave all other points as is, including “use the username from the certificate” ***.
** for Nokia E5 is:
Control Panel> Settings> Connection> Destinations
** for Nokia X6 is:
Control Panel> Settings> System> Communications> Connection Manager
Despite the fact that you need an installed iTunes to the USB cable, I don’t know if I can connect a flash card, and I also held the iPhone for the first time in my life, it was the easiest way to configure it.
I set up mail on the phone and sent the root certificate in binary form ( * .DER ) and personal certificate ( * .p12 ). In the mailer, I just opened the attachments, the OS immediately realized what the files were and offered to install them (Accept).
First set root then personal. Then we go to “Settings” , “Wi-FI” , “Other”, enter the Network name, then go to “Security”, select “WPA2 enterprice” in the Username field , enter the user name (which should correspond to the Common Name "/ CN =" in the personal certificate user), in the “Mode” field , select “EAP-TLS” , enter the “Identification” menu and select the personal certificate installed earlier, click “Join” .
When connecting, it can give a message about who we are connecting to (the CN field from the server certificate will be displayed), you need to say “Accept” .
***
In Nokia and Windows 7 (selected from the installed personal certificates, but you can drive in manually) compared to Android and iPhone, it is not necessary to manually enter the login.
You should also pay attention to such a nuance as the validity of these two certificates. The following curiosity happened to me: * nix server was not synchronized with the time server and the certificate generated for the user started its action only an hour after its creation, in fact, as written in the body of the certificate. I did not pay attention to it and for this reason could not connect to the network. Having understood the problem, I just waited one hour.
In Windows, it is possible to use an Ethernet connection using the same authentication principle - with the help of certificates. Most switches even SMBs can authenticate clients using Radius. This increases the level of network security, so that no one can simply stick into it.
To configure a wired connection, you need to enable " Wired AutoConfig " ( Wired AutoConfig ) in Windows services. In the properties of the adapter will appear a similar tab to the wireless connection " Authentication " (Authentication).

Setup is similar to wireless connection.
That's all, good luck to all!
However, the article lacks information on the intricacies of configuring Android, Nokia Symbian, iPhone and Windows 7 clients for the above bundle.
What I'm going to do in this complementary article.
Android:
(tested on version 2.3)It turned out that Android only understands binary certificates and only with a file extension (* .crt) for a certification authority. If your certificate authority's certificate is in text form, then converting it is quite simple in * nix:
openssl x509 -inform PEM -outform DER -in CA-MYCOMPANY.pem -out CA-MYCOMPANY.crtOr use the online converter here .
User certificates (required in the format (* .p12) and with the same file extension) and certificate authority must be placed on the SD card of the device. Go to the Android configuration: "Settings" , go to "Security" , and select the item "Install from SD card . " This is where the certificate authority certificate is installed first and then the user certificate.
You can also do this by sending a letter with attached files, if the mail client is already configured. After downloading letters, their attachments are usually located in the Downloads folder on the SD card. There is no need to move certificates from this folder anywhere.
We return to the Android configuration and go to the “Wireless Networks” , select “WiFi settings” , “add WIFI network” . Here we select 802.1x Enterprise Security , select “EAP method” , “TLS” , select the previously installed certificate authority certificate and user certificate, respectively. We do not forget to enter the user name in the Identification code field (in Nokia, you can simply specify “use the login from certificate” ***), which should correspond to the Common Name "/ CN =" in the user's personal certificate.
Windows 7:
Not all Windows 7 files (* .p12) open on click, it is better to install them using certificate manager
certmgr.mscThe certificate of the certificate authority must be installed before the installation of the user certificate. As in other and everywhere.
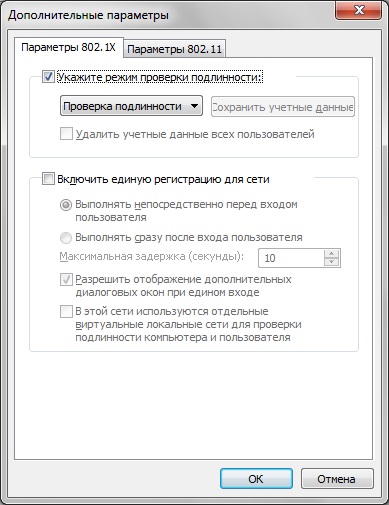
The certificate of the certification center is recommended to be installed in the “Trusted root certificates” , and the personal certificate in the “Personal certificates”, respectively.
The screenshots below show the necessary settings:
')
If your certificate of the certification center is not present in this list, then most likely you have the same curiosity as with me, see the last paragraph of the article. or just restart the machine.
Nokia Symbian:
Compared to Windows 7 and Android, setting Nokia is much easier.
After copying the user and certificate authority certificates to the device’s memory card, go to the location of these files with the file manager and simply open them. You will be prompted to enter a password for certificates (if any), new names for certificates and a new password for a user certificate (it will sometimes be asked when the device is connected to the network, so don’t make it too complicated).
Entering the WIFI connection settings ** create a new access point Wireless LAN, enter the network name, Select Infrastructure , select Security Settings, select 802.1x , select WPA EAP mode . now select the newly created access point, go to the WLAN security settings , select the EAP plug- in settings , remove the check marks from all, leave only on the EAP-TLS , go to the EAP-TLS and select the previously installed: personal certificate (the one that was p12), Authoritative certificate (the one that was pem or crt or der) and leave all other points as is, including “use the username from the certificate” ***.
** for Nokia E5 is:
Control Panel> Settings> Connection> Destinations
** for Nokia X6 is:
Control Panel> Settings> System> Communications> Connection Manager
iPhone:
Despite the fact that you need an installed iTunes to the USB cable, I don’t know if I can connect a flash card, and I also held the iPhone for the first time in my life, it was the easiest way to configure it.
I set up mail on the phone and sent the root certificate in binary form ( * .DER ) and personal certificate ( * .p12 ). In the mailer, I just opened the attachments, the OS immediately realized what the files were and offered to install them (Accept).
First set root then personal. Then we go to “Settings” , “Wi-FI” , “Other”, enter the Network name, then go to “Security”, select “WPA2 enterprice” in the Username field , enter the user name (which should correspond to the Common Name "/ CN =" in the personal certificate user), in the “Mode” field , select “EAP-TLS” , enter the “Identification” menu and select the personal certificate installed earlier, click “Join” .
When connecting, it can give a message about who we are connecting to (the CN field from the server certificate will be displayed), you need to say “Accept” .
***
In Nokia and Windows 7 (selected from the installed personal certificates, but you can drive in manually) compared to Android and iPhone, it is not necessary to manually enter the login.
You should also pay attention to such a nuance as the validity of these two certificates. The following curiosity happened to me: * nix server was not synchronized with the time server and the certificate generated for the user started its action only an hour after its creation, in fact, as written in the body of the certificate. I did not pay attention to it and for this reason could not connect to the network. Having understood the problem, I just waited one hour.
About wired connections in Windows
In Windows, it is possible to use an Ethernet connection using the same authentication principle - with the help of certificates. Most switches even SMBs can authenticate clients using Radius. This increases the level of network security, so that no one can simply stick into it.
To configure a wired connection, you need to enable " Wired AutoConfig " ( Wired AutoConfig ) in Windows services. In the properties of the adapter will appear a similar tab to the wireless connection " Authentication " (Authentication).
Setup is similar to wireless connection.
That's all, good luck to all!
Source: https://habr.com/ru/post/128405/
All Articles