Realistic landscape in Ogre 3D
Hey.
After reading a few interesting articles on Habré about one of the most powerful Ogre3D render engines, I decided to share my experience in modeling using it a realistic landscape with atmospheric effects, water surface and lush vegetation. Under the cut - a recipe for screwing to Ogre all the necessary libraries.
Looking ahead, the end result looks like this:
')
Required libraries include:
As the skeleton of the application, we will use the slightly modified Ogre Wiki Tutorial Framework - a common framework for tutorials from the ogre wiki, since it is flexible enough to create applications of low complexity; In addition, it includes quite a lot of functionality, in particular, camera movement on the WASD keys, mouse browsing, FPS counter and other useful things. For compilation, I used Microsoft Visual C ++ 2008 and the CMake build system (the latter will allow compiling the project under any architecture supported by Ogre).
I posted all the sources on Github (however, in order not to mess with git, you can download them at this address). To compile, you will need to compile the 1.7 and CMake branches prepared in advance by the 2008 Ogre studio; in order for the latter to correctly locate Ogre, you need to add the
In addition, to run the test application you will need two archives: media.zip with textures, models and other necessary things, it will need to be unpacked directly into the project directory; and the configs.zip containing the Ogre configuration files — it needs to be unpacked into the build directory.
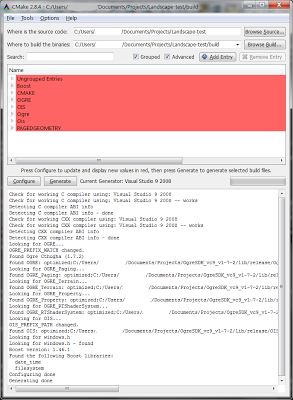
To compile the project, first run the CMake GUI and select the directory with the project in the Where is the source code field, and arbitrary in the Where to build the binaries field, for example, you can select the project directory build subdirectory. Then click the Configure button, select Visual Studio 2008 from the list of compilers, and if everything went fine and CMake didn’t complain about the absence of something, click Generate :
As a result, the Visual Studio LandscapeApp.sln file-solution appears in the build directory, with which you can work directly - make changes to the code, compile and run a test project.
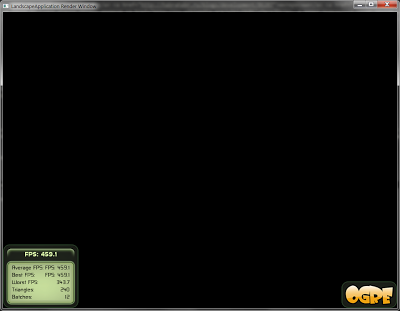
Actually, after compiling and running, we are welcomed by the standard selection window of the Ogre rendering subsystem:
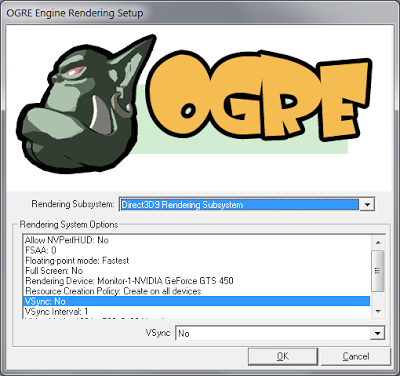
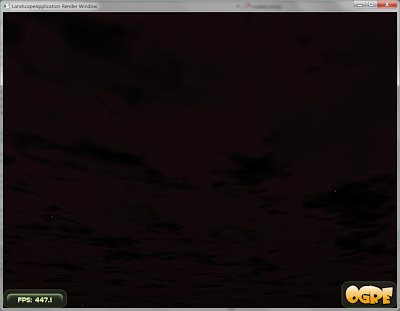
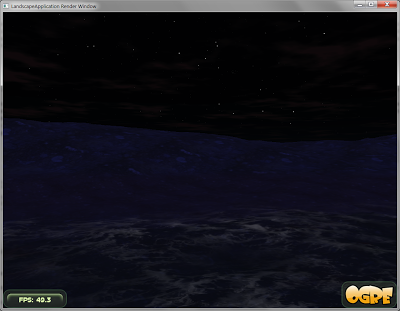
Selecting, for example, Direct3D9 Rendering Subsystem as such, click OK and see a black window with a lonely FPS counter, which is clearly off scale - still, the scene is empty. By the way, the counter can be minimized / expanded with the F key, so as not to interfere.
Well, as one well-known politician said, “The main thing is to begin!”
Caelum is a GNU Lesser GPL-distributed plugin for Ogre to create photorealistic atmospheric effects, such as the color of the sky, the sun, the moon and the stars, taking into account the current time and coordinates of the observer, clouds, weather phenomena (rain, snow, fog), etc. d.
Download the latest version of Caelum from the repository on Google Code , because, judging by the messages on the forum , this project has a new maintainer and some movement is observed - new features are added to the project and the old errors are corrected:
To make it more convenient, I copied all the necessary sources into the test project tree, making small changes to correct the compiler warnings. The authors of Caelum use the CMake build system, so its addition to our build system is limited to the line
in the CMakeLists.txt file, adding the
The code itself will require a bit more changes. First, let's include the Caelum header file in our main header file, LandscapeApplication.hpp:
and include the corresponding namespace in the LandscapeApplication.cpp source file:
Further, Caelum itself is a set of separate components for rendering sky and atmosphere, which are controlled by the root class
And call the constructor in the
The most important is the last parameter, which is a bitmask that indicates which Caelum components we will use.
The final touch - to change the atmospheric effects over time, you need to update the Caelum every frame; all you need to do is add our copy of CaelumSystem to the Frame Listener list and Ogre Render Target Listener list:
Voila - we are greeted by a blue sky with the sun slowly setting for sunset, sparse clouds and gray fog:
Let's tweak some of the parameters of Caelum for more entertainment:
As a result, the sky looks like this:

The time has come to add the surface of the earth to our application so that the sun and moon will have where to go.
We will use the native Ogrov terrain system ( Ogre Terrain System ) subsystem to add a ground surface to our application. This system was created in 2009 by the creator of Ogre Steve Striting to replace outdated terrain rendering add-ons and is a completely separate optional component (however, from version 1.7 included in the Ogre distribution). Ogre Terrain System includes everything you need both to create small test applications like ours, and for huge worlds loaded into memory in individual small pieces of pages - for more information about this you can read on the ogre forum, for example, here ; Moreover, one of the GSoC'11 projects is the improvement of the page load mechanism .
First of all, let's let CMake know about our intentions: in the CMakeLists.txt file, add
Now we
And, of course,
If no special parameters are specified, the page with the coordinate (0, 0) will be loaded from the file terrain_00000000.dat, which I added to the above-mentioned archive media.zip .
The result is not long in coming:
The most widely used library for rendering water surfaces using a projection grid in Ogre - Hydrax, is distributed under the GNU Lesser GPL license.
Downloading from here (link at the bottom of the first post) archive, for further work, you will need the Hydrax-v0.5.1 / Hydrax / src / Hydrax directory from it, which I copied to the test project tree.
Unfortunately, Hydrax does not support the CMake build system, so I had to write the Hydrax / CMakeLists.txt file for it, which, however, is only slightly more complicated than simply listing the sources and header files. To integrate Hydrax into the build system, mainly CMakeLists.txt, add the following:
Further, to add water effects to our application, you need a properly initialized instance of the class
Running our application, we see an unexpected picture:

Instead of water, some kind of ink. What happened?
The fact is that Caelum fits the Ogre options associated with the fog so that they most closely match the atmospheric model used in the Caelum. However, these options do not allow the water from Hydrax to render correctly.

Careful adjustment of fog parameters is beyond the scope of this article, so in our test application we simply turn off the fog:
Here we are waiting for the following surprise:

This unflattering picture is the result of the fact that the landscape that we added in the third step is not an ordinary Ogre entity , so Hydrax does not take it into account when calculating the water surface. To remedy this situation, it is enough to add the depth technique to the landscape material:
As a result, we get the following pleasing picture:

Carefully observing our application, we can conclude that Caelum and Hydrax do not even realize that each other exists - for example, after sunset and caustics remain on the water before the moon rises, which cannot be physically possible:

In addition, the location of the sun flare on the water does not correspond to the actual position of the sun, moreover, the flare remains even after its setting:
To solve this problem, use the slightly modified code responsible for integrating Caelum and Hydrax from the above Ogitor editor:
As a result, we get a romantic sunset and ... a couple of new artifacts:
First, when moving the camera on the horizon, long white stripes appear and disappear. This happens because the water surface intersects with the far clipping plane ( far clipping plane ) at a fairly close distance, which gives rise to visible artifacts. The solution to this problem is nowhere easier; it is enough to increase the distance to this plane:
Secondly, the lower part of the sun, "gone" under the water, which should not be seen at all, has glaring white edges. The root of this problem is the same as that of the landscape problem: the sun (and the moon) are not ordinary Ogre objects; to correct it, you also need to add a depth technique to the material of these objects. The best place for this is the Sun.material and moon.material files in the media / Caelum directory; it is necessary to add the following paragraph to each material described in these files:
Archive media_fixed.zip with all necessary fixes can be downloaded here . After launching the application, everything falls into place with them:
The final touch is to add some flora to our cozy landscape. The Ogre Paged Geometry Engine library is best suited for this, because it allows you to render huge amounts of small meshes over long distances, which is especially valuable for building, for example, a forest scene with trees, bushes, grass, stones, and so on. This library is distributed under one of the most liberal among the free licenses - MIT (like Ogre itself).
The latest version of Paged Geometry can be downloaded to this address ; again, I copied all the necessary files into the source tree of the test project. The library supports CMake, so you need to add just a few lines to our CMakeLists.txt: the location of the header files, the location of the library file and the location of the library sources themselves:
Further, in our application, we limit ourselves to adding three types of objects:
To do this, we add pointers to instances of the
Then we initialize these pointers with zeros, modifying the
In addition, we need a function that returns the height of the landscape at a point with given x and z coordinates; by calling this function, Paged Geometry will correctly place all its props on the ground. You will need exactly the function, not the class method, since the class pointer is implicitly passed to the class methods, which the library will simply nowhere to get. Therefore, we need a global variable — a pointer to the class that controls the landscape page group, for the connection between the landscape itself and our function. Well, we realize our plans:
Since this variable is initially
Finally, you can now add initialization code for all the objects we need to the
... and the code for finalizing the destructor
(without this code, the application will crash when exiting).
And the most important thing is that instances of the
By running the application, we can observe the pastoral forest landscape:

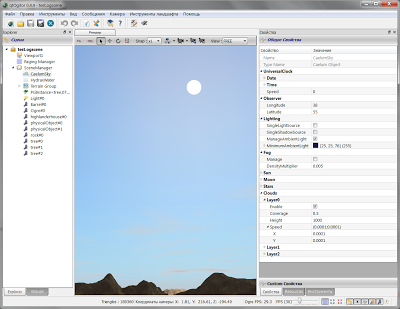
... good, no pitfalls waiting for us here. The only thing you should pay attention to is a drop in performance: despite many techniques for improving performance (starting from the banal LOD and ending with a pagination mechanism similar to that in the landscape subsystem and replacing real trees with sprites at long distances), Paged Geometry is all still requires careful adjustment of the number of displayed instances of vegetation and image quality. Here again, we can recommend using the Ogitor editor, which has the support of Paged Geometry, allowing you to easily sketch vegetation in the right places (like brushing with Paint in Paint) and adjust all the necessary parameters.
A fully compiled and ready-to-run test project can be downloaded here .
In gratitude to all who read to this place - a couple more nice screenshots:

And the video (it was not made by me, but it was created using the libraries in question - Ogre, Hydrax and Caelum):
I also want to thank Sergey ViruScD Habrayuzer for his help in preparing the article, Andrew Engine9 for his help in working with the Ogre engine and the creators of the site dumpz.org for the excellent syntax highlighting.
UPD : I took screenshots with anti-aliasing turned on, thanks m1el for the comment.
After reading a few interesting articles on Habré about one of the most powerful Ogre3D render engines, I decided to share my experience in modeling using it a realistic landscape with atmospheric effects, water surface and lush vegetation. Under the cut - a recipe for screwing to Ogre all the necessary libraries.
Looking ahead, the end result looks like this:
')
Required libraries include:
- Caelum for atmospheric effects, namely sky and clouds;
- Hydrax for water surface;
- Paged Geometry for vegetation, including but not limited to trees, bushes and grass.
Step One: Application Skeleton
As the skeleton of the application, we will use the slightly modified Ogre Wiki Tutorial Framework - a common framework for tutorials from the ogre wiki, since it is flexible enough to create applications of low complexity; In addition, it includes quite a lot of functionality, in particular, camera movement on the WASD keys, mouse browsing, FPS counter and other useful things. For compilation, I used Microsoft Visual C ++ 2008 and the CMake build system (the latter will allow compiling the project under any architecture supported by Ogre).
I posted all the sources on Github (however, in order not to mess with git, you can download them at this address). To compile, you will need to compile the 1.7 and CMake branches prepared in advance by the 2008 Ogre studio; in order for the latter to correctly locate Ogre, you need to add the
OGRE_HOME environment variable equal to the directory in which it is installed.In addition, to run the test application you will need two archives: media.zip with textures, models and other necessary things, it will need to be unpacked directly into the project directory; and the configs.zip containing the Ogre configuration files — it needs to be unpacked into the build directory.
To compile the project, first run the CMake GUI and select the directory with the project in the Where is the source code field, and arbitrary in the Where to build the binaries field, for example, you can select the project directory build subdirectory. Then click the Configure button, select Visual Studio 2008 from the list of compilers, and if everything went fine and CMake didn’t complain about the absence of something, click Generate :
As a result, the Visual Studio LandscapeApp.sln file-solution appears in the build directory, with which you can work directly - make changes to the code, compile and run a test project.
Actually, after compiling and running, we are welcomed by the standard selection window of the Ogre rendering subsystem:
Selecting, for example, Direct3D9 Rendering Subsystem as such, click OK and see a black window with a lonely FPS counter, which is clearly off scale - still, the scene is empty. By the way, the counter can be minimized / expanded with the F key, so as not to interfere.
Well, as one well-known politician said, “The main thing is to begin!”
Step Two: Sky
Caelum is a GNU Lesser GPL-distributed plugin for Ogre to create photorealistic atmospheric effects, such as the color of the sky, the sun, the moon and the stars, taking into account the current time and coordinates of the observer, clouds, weather phenomena (rain, snow, fog), etc. d.
Download the latest version of Caelum from the repository on Google Code , because, judging by the messages on the forum , this project has a new maintainer and some movement is observed - new features are added to the project and the old errors are corrected:
hg clone https://code.google.com/p/caelum
To make it more convenient, I copied all the necessary sources into the test project tree, making small changes to correct the compiler warnings. The authors of Caelum use the CMake build system, so its addition to our build system is limited to the line
add_subdirectory ( Caelum )
in the CMakeLists.txt file, adding the
Caelum/main/include and ${CMAKE_BINARY_DIR}/Caelum/main/include subdirectories to the list of include directories via the include_directories command, and adding Caelum to the list of linked libraries through the target_link_libraries command:Code
include_directories ( ${ OIS_INCLUDE_DIRS }
${ OGRE_INCLUDE_DIRS }
${ OGRE_SAMPLES_INCLUDEPATH }
"Caelum/main/include"
"${CMAKE_BINARY_DIR}/Caelum/main/include"
# ...
target_link_libraries ( LandscapeApp ${ OGRE_LIBRARIES } ${ OIS_LIBRARIES } Caelum )
The code itself will require a bit more changes. First, let's include the Caelum header file in our main header file, LandscapeApplication.hpp:
#include <Caelum.h>
and include the corresponding namespace in the LandscapeApplication.cpp source file:
using namespace Caelum;
Further, Caelum itself is a set of separate components for rendering sky and atmosphere, which are controlled by the root class
CaelumSystem . This class controls all components and updates ( update ) their internal state when needed. Create an instance of this class, to do this, add a pointer to it in our LandscapeApplication root class:Code
class LandscapeApplication : public BaseApplication
{
// ...
protected :
virtual void createScene( void );
Caelum :: CaelumSystem * mCaelumSystem;
};
And call the constructor in the
createScene method:void LandscapeApplication :: createScene( void )
{
mCaelumSystem = new CaelumSystem(mRoot, mSceneMgr, CaelumSystem :: CAELUM_COMPONENTS_DEFAULT);
The most important is the last parameter, which is a bitmask that indicates which Caelum components we will use.
CAELUM_COMPONENTS_DEFAULT is the default set, it includes all stable components.CaelumSystem and its components have a huge number of settings, most of which are accessible from the code as get/set methods and described in the documentation ; Another more obvious way of tuning is the Ogitor 3D editor, created specifically for Ogre and supporting all the libraries described in this article (and some not described):The final touch - to change the atmospheric effects over time, you need to update the Caelum every frame; all you need to do is add our copy of CaelumSystem to the Frame Listener list and Ogre Render Target Listener list:
mCaelumSystem = new CaelumSystem(mRoot, mSceneMgr, CaelumSystem :: CAELUM_COMPONENTS_DEFAULT);
mRoot -> addFrameListener(mCaelumSystem);
mWindow -> addListener(mCaelumSystem);
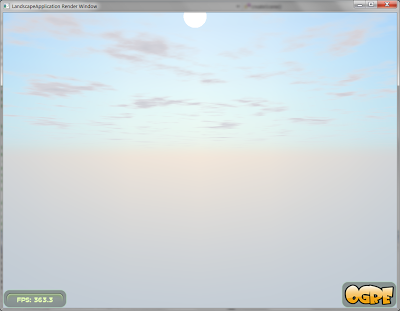
Voila - we are greeted by a blue sky with the sun slowly setting for sunset, sparse clouds and gray fog:
Let's tweak some of the parameters of Caelum for more entertainment:
Code
// ...
mWindow -> addListener(mCaelumSystem);

mCaelumSystem -> getUniversalClock() -> setTimeScale( 100 ); //
FlatCloudLayer * cloudLayer = // ,
mCaelumSystem -> getCloudSystem() -> createLayer(); // :
cloudLayer -> setCloudCover( 0.8f ); //
cloudLayer -> setCloudSpeed(Vector2( 0.0001f , 0.0001f )); //
cloudLayer -> setHeight( 5000 ); //
As a result, the sky looks like this:
The time has come to add the surface of the earth to our application so that the sun and moon will have where to go.
Step Three: Earth
We will use the native Ogrov terrain system ( Ogre Terrain System ) subsystem to add a ground surface to our application. This system was created in 2009 by the creator of Ogre Steve Striting to replace outdated terrain rendering add-ons and is a completely separate optional component (however, from version 1.7 included in the Ogre distribution). Ogre Terrain System includes everything you need both to create small test applications like ours, and for huge worlds loaded into memory in individual small pieces of pages - for more information about this you can read on the ogre forum, for example, here ; Moreover, one of the GSoC'11 projects is the improvement of the page load mechanism .
First of all, let's let CMake know about our intentions: in the CMakeLists.txt file, add
${OGRE_Terrain_LIBRARIES} to the list of linked libraries via the target_link_libraries command:target_link_libraries ( LandscapeApp ${ OGRE_LIBRARIES } ${ OGRE_Terrain_LIBRARIES } ${ OIS_LIBRARIES } Caelum )
Now we
LandscapeApplication::createScene add to the LandscapeApplication::createScene code to load one page of the terrain (taken by me from the Terrain example in Ogre), almost identical to the code from Ogre Basic Tutorial 3 :Code
mCamera -> setPosition(Vector3( 1683 , 50 , 2116 )); //
mCamera -> lookAt(Vector3( 1963 , 50 , 1660 ));

Vector3 lightdir( 0.55f , -0.3f , 0.75f ); //
lightdir.normalise();
Light * light = mSceneMgr -> createLight( "tstLight" );
light -> setType(Light :: LT_DIRECTIONAL);
light -> setDirection(lightdir);
light -> setDiffuseColour(ColourValue :: White);
light -> setSpecularColour(ColourValue( 0.4f , 0.4f , 0.4f ));

mTerrainGlobals = OGRE_NEW TerrainGlobalOptions; //
mTerrainGroup = OGRE_NEW TerrainGroup(mSceneMgr, //
Terrain :: ALIGN_X_Z, 513 , 12000 );
mTerrainGroup -> setOrigin(Vector3 :: ZERO);
mTerrainGlobals -> setLightMapDirection(light -> getDerivedDirection());
mTerrainGlobals -> setCompositeMapAmbient(mSceneMgr -> getAmbientLight());
mTerrainGlobals -> setCompositeMapDiffuse(light -> getDiffuseColour());
mSceneMgr -> destroyLight( "tstLight" );

mTerrainGroup -> defineTerrain( 0 , 0 ); // (0, 0)
mTerrainGroup -> loadAllTerrains( true ); // ,
mTerrainGroup -> freeTemporaryResources(); //
And, of course,
mTerrainGlobals and mTerrainGroup pointers to our main class:Code
#include <Terrain/OgreTerrain.h>
#include <Terrain/OgreTerrainGroup.h>

class LandscapeApplication : public BaseApplication
{
// ...
protected :
// ...
Ogre :: TerrainGlobalOptions * mTerrainGlobals;
Ogre :: TerrainGroup * mTerrainGroup;
};
If no special parameters are specified, the page with the coordinate (0, 0) will be loaded from the file terrain_00000000.dat, which I added to the above-mentioned archive media.zip .
The result is not long in coming:
Step Four: Water
The most widely used library for rendering water surfaces using a projection grid in Ogre - Hydrax, is distributed under the GNU Lesser GPL license.
Downloading from here (link at the bottom of the first post) archive, for further work, you will need the Hydrax-v0.5.1 / Hydrax / src / Hydrax directory from it, which I copied to the test project tree.
Unfortunately, Hydrax does not support the CMake build system, so I had to write the Hydrax / CMakeLists.txt file for it, which, however, is only slightly more complicated than simply listing the sources and header files. To integrate Hydrax into the build system, mainly CMakeLists.txt, add the following:
Code
include_directories (
# ...
"Hydrax"
)
add_subdirectory ( Hydrax )
# ...
target_link_libraries ( LandscapeApp ${ OGRE_LIBRARIES } ${ OGRE_Terrain_LIBRARIES } ${ OIS_LIBRARIES } Caelum Hydrax )
Further, to add water effects to our application, you need a properly initialized instance of the class
Hydrax::Hydrax :Code
// LandscapeApplication.hpp
class LandscapeApplication : public BaseApplication
{
// ...
protected :
// ...
Hydrax :: Hydrax * mHydrax;
};

// LandscapeApplication.cpp
void LandscapeApplication :: createScene( void )
{
// ...
mHydrax = new Hydrax :: Hydrax(mSceneMgr, mCamera, mWindow -> getViewport( 0 ));
Hydrax :: Module :: ProjectedGrid * mModule = new Hydrax :: Module :: ProjectedGrid( //
mHydrax, // Hydrax
new Hydrax :: Noise :: Perlin( /* */ ), //
Ogre :: Plane(Ogre :: Vector3( 0 , 1 , 0 ), Ogre :: Vector3( 0 , 0 , 0 )), //
Hydrax :: MaterialManager :: NM_VERTEX, //
Hydrax :: Module :: ProjectedGrid :: Options( 64 )); //
mHydrax -> setModule(mModule);
mHydrax -> loadCfg( "HydraxDemo.hdx" );
mHydrax -> create();
}
Running our application, we see an unexpected picture:
Instead of water, some kind of ink. What happened?
The fact is that Caelum fits the Ogre options associated with the fog so that they most closely match the atmospheric model used in the Caelum. However, these options do not allow the water from Hydrax to render correctly.
mCaelumSystem->setGlobalFogDensityMultiplier(0.01) Caelum options a bit (namely, by saying mCaelumSystem->setGlobalFogDensityMultiplier(0.01) , i.e. reducing the fog density), you can make sure that the water created by Hydrax is actually in place:Careful adjustment of fog parameters is beyond the scope of this article, so in our test application we simply turn off the fog:
void LandscapeApplication :: createScene( void )
{
// ...
cloudLayer -> setHeight( 5000 );
mCaelumSystem -> setManageSceneFog(Ogre :: FOG_NONE);
Here we are waiting for the following surprise:
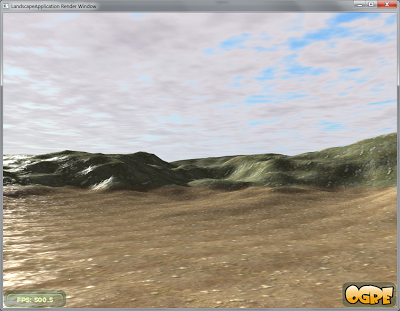
This unflattering picture is the result of the fact that the landscape that we added in the third step is not an ordinary Ogre entity , so Hydrax does not take it into account when calculating the water surface. To remedy this situation, it is enough to add the depth technique to the landscape material:
void LandscapeApplication :: createScene( void )
{
// ...
mHydrax -> create();

mHydrax -> getMaterialManager() -> addDepthTechnique(
mTerrainGroup -> getTerrain( 0 , 0 ) -> getMaterial() -> createTechnique());
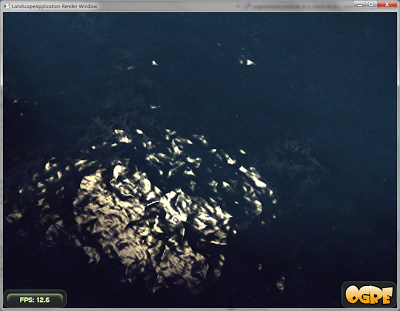
As a result, we get the following pleasing picture:
Carefully observing our application, we can conclude that Caelum and Hydrax do not even realize that each other exists - for example, after sunset and caustics remain on the water before the moon rises, which cannot be physically possible:
In addition, the location of the sun flare on the water does not correspond to the actual position of the sun, moreover, the flare remains even after its setting:
To solve this problem, use the slightly modified code responsible for integrating Caelum and Hydrax from the above Ogitor editor:
Cat
// LandscapeApplication.hpp
class LandscapeApplication : public BaseApplication
{
// ...
protected :
virtual bool frameEnded( const Ogre :: FrameEvent & evt);
Ogre :: Vector3 mOriginalWaterColor;

// LandscapeApplication.cpp
void LandscapeApplication :: createScene( void )
{
// ...
mHydrax -> loadCfg( "HydraxDemo.hdx" );
mOriginalWaterColor = mHydrax -> getWaterColor();
// ...

bool LandscapeApplication :: frameEnded( const Ogre :: FrameEvent & evt)
{
Vector3 value = mCaelumSystem -> getSun() -> getSceneNode() -> _getDerivedPosition();
ColourValue cval = mCaelumSystem -> getSun() -> getBodyColour();
mHydrax -> setSunPosition(value);
mHydrax -> setSunColor(Vector3(cval.r,cval.g,cval.b));
Caelum :: LongReal mJulian = mCaelumSystem -> getUniversalClock() -> getJulianDay();
cval = mCaelumSystem -> getSunLightColour(mJulian,
mCaelumSystem -> getSunDirection(mJulian));
mHydrax -> setWaterColor(Vector3(cval.r - 0.3 , cval.g - 0.2 , cval.b));
Vector3 col = mHydrax -> getWaterColor();
float height = mHydrax -> getSunPosition().y / 10.0f ;
Hydrax :: HydraxComponent c = mHydrax -> getComponents();
if (height < 0 )
{
if (mHydrax -> isComponent(Hydrax :: HYDRAX_COMPONENT_CAUSTICS))
mHydrax -> setComponents(Hydrax :: HydraxComponent(
c ^ Hydrax :: HYDRAX_COMPONENT_CAUSTICS));
} else {
if ( ! mHydrax -> isComponent(Hydrax :: HYDRAX_COMPONENT_CAUSTICS))
mHydrax -> setComponents(Hydrax :: HydraxComponent(
c | Hydrax :: HYDRAX_COMPONENT_CAUSTICS));
}
if (height < -99.0f )
{
col = mOriginalWaterColor * 0.1f ;
height = 9999.0f ;
}
else if (height < 1.0f )
{
col = mOriginalWaterColor * ( 0.1f + ( 0.009f * (height + 99.0f )));
height = 100.0f / (height + 99.001f );
}
else if (height < 2.0f )
{
col += mOriginalWaterColor;
col /= 2.0f ;
float percent = (height - 1.0f );
col = (col * percent) + (mOriginalWaterColor * ( 1.0f - percent));
}
else
{
col += mOriginalWaterColor;
col /= 2.0f ;
}
mHydrax -> setWaterColor(col);
mHydrax -> setSunArea(height);
mHydrax -> update(evt.timeSinceLastFrame);
return true ;
}
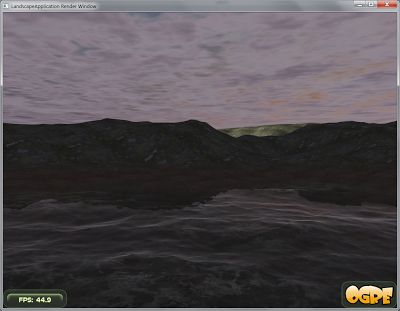
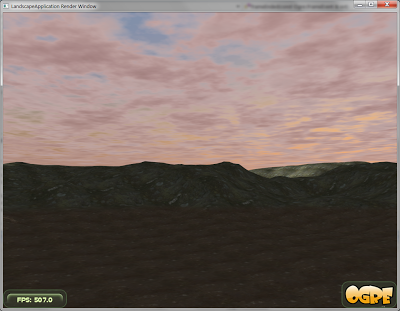
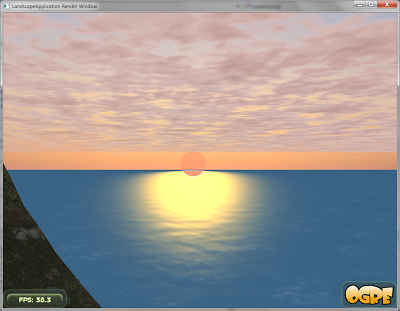
As a result, we get a romantic sunset and ... a couple of new artifacts:
First, when moving the camera on the horizon, long white stripes appear and disappear. This happens because the water surface intersects with the far clipping plane ( far clipping plane ) at a fairly close distance, which gives rise to visible artifacts. The solution to this problem is nowhere easier; it is enough to increase the distance to this plane:
mCamera -> setFarClipDistance( 1000000 );
Secondly, the lower part of the sun, "gone" under the water, which should not be seen at all, has glaring white edges. The root of this problem is the same as that of the landscape problem: the sun (and the moon) are not ordinary Ogre objects; to correct it, you also need to add a depth technique to the material of these objects. The best place for this is the Sun.material and moon.material files in the media / Caelum directory; it is necessary to add the following paragraph to each material described in these files:
technique HydraxDepth
{
scheme HydraxDepth
pass
{
lighting off
texture_unit
{
colour_op_ex modulate src_manual src_current 0 0 0
}
}
}
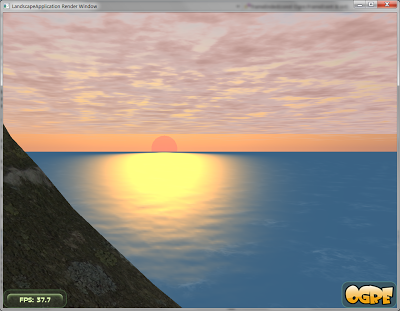
Archive media_fixed.zip with all necessary fixes can be downloaded here . After launching the application, everything falls into place with them:
Step Five: Vegetation
The final touch is to add some flora to our cozy landscape. The Ogre Paged Geometry Engine library is best suited for this, because it allows you to render huge amounts of small meshes over long distances, which is especially valuable for building, for example, a forest scene with trees, bushes, grass, stones, and so on. This library is distributed under one of the most liberal among the free licenses - MIT (like Ogre itself).
The latest version of Paged Geometry can be downloaded to this address ; again, I copied all the necessary files into the source tree of the test project. The library supports CMake, so you need to add just a few lines to our CMakeLists.txt: the location of the header files, the location of the library file and the location of the library sources themselves:
include_directories (
# ...
"PagedGeometry/include"
"${CMAKE_BINARY_DIR}/PagedGeometry/include"

# ...
add_subdirectory ( PagedGeometry )
# ...
target_link_libraries ( LandscapeApp ${ OGRE_LIBRARIES } ${ OGRE_Terrain_LIBRARIES } ${ OIS_LIBRARIES }
Caelum Hydrax PagedGeometry )
Further, in our application, we limit ourselves to adding three types of objects:
- herbs;
- trees;
- other vegetation (bushes, flowers and mushrooms).
To do this, we add pointers to instances of the
Forests::PagedGeometry key class (and auxiliary Forests::GrassLoader ) to our main class, not forgetting the Forests::GrassLoader files for this:#include <PagedGeometry.h>
#include <GrassLoader.h>
class LandscapeApplication : public BaseApplication
{
// ...
protected :
// ...
Forests :: PagedGeometry * grass, * trees, * bushes;
Forests :: GrassLoader * grassLoader;
};
Then we initialize these pointers with zeros, modifying the
LandscapeApplication constructor as follows:LandscapeApplication :: LandscapeApplication( void ) : grass( NULL ), trees( NULL ), bushes( NULL )
{
}
In addition, we need a function that returns the height of the landscape at a point with given x and z coordinates; by calling this function, Paged Geometry will correctly place all its props on the ground. You will need exactly the function, not the class method, since the class pointer is implicitly passed to the class methods, which the library will simply nowhere to get. Therefore, we need a global variable — a pointer to the class that controls the landscape page group, for the connection between the landscape itself and our function. Well, we realize our plans:
static TerrainGroup * terrainGroup = NULL ;

static float getTerrainHeight( float x, float z, void * userData)
{
OgreAssert(terrainGroup, "Terrain isn't initialized" );
return terrainGroup -> getHeightAtWorldPosition(x, 0 , z);
}
Since this variable is initially
NULL , it is necessary to initialize it with a pointer to an instance of the TerrainGroup class, which we will do with the following line after the landscape initialization code in the createScene method:terrainGroup = mTerrainGroup;
Finally, you can now add initialization code for all the objects we need to the
createScene method:Code
//
grass = new PagedGeometry(mCamera);
grass -> addDetailLevel < GrassPage > ( 160 ); // : 60
grassLoader = new GrassLoader(grass);
grass -> setPageLoader(grassLoader);
grassLoader -> setHeightFunction(getTerrainHeight); // ,
GrassLayer * l = grassLoader -> addLayer( "3D-Diggers/plant1sprite" ); //
l -> setMinimumSize( 0.9f , 0.9f ); // ...
l -> setMaximumSize( 2 , 2 ); // ...
l -> setAnimationEnabled( true ); //
l -> setSwayDistribution( 7.0f ); //
l -> setSwayLength( 0.1f ); // - 0.1
l -> setSwaySpeed( 0.4f ); //
l -> setDensity( 3.0f ); //
l -> setRenderTechnique(GRASSTECH_SPRITE); //
l -> setFadeTechnique(FADETECH_GROW); //
l -> setColorMap( "terrain_texture2.jpg" ); //
l -> setDensityMap( "densitymap.png" ); //
l -> setMapBounds(TBounds( 0 , 0 , 3000 , 3000 )); //
//
trees = new PagedGeometry(mCamera);
trees -> addDetailLevel < WindBatchPage > ( 150 , 30 ); // 150 180
trees -> addDetailLevel < ImpostorPage > ( 900 , 50 ); // 900 950
TreeLoader2D * treeLoader = new TreeLoader2D(trees, TBounds( 0 , 0 , 5000 , 5000 ));
trees -> setPageLoader(treeLoader);
treeLoader -> setHeightFunction(getTerrainHeight); // ,
treeLoader -> setColorMap( "terrain_lightmap.jpg" ); //
Entity * tree1 = mSceneMgr -> createEntity( "Tree1" , "fir05_30.mesh" ); //
Entity * tree2 = mSceneMgr -> createEntity( "Tree2" , "fir14_25.mesh" );
trees -> setCustomParam(tree1 -> getName(), "windFactorX" , 15 ); //
trees -> setCustomParam(tree1 -> getName(), "windFactorY" , 0.01f );
trees -> setCustomParam(tree2 -> getName(), "windFactorX" , 22 );
trees -> setCustomParam(tree2 -> getName(), "windFactorY" , 0.013f );
// 5000
Vector3 position = Vector3 :: ZERO;
Radian yaw;
Real scale;
for ( int i = 0 ; i < 5000 ; i ++ )
{
yaw = Degree(Math :: RangeRandom( 0 , 360 ));
position.x = Math :: RangeRandom( 0 , 2000 ); // Y , ..
position.z = Math :: RangeRandom( 2300 , 4000 ); // - getTerrainHeight,
scale = Math :: RangeRandom( 0.07f , 0.12f );
if (Math :: UnitRandom() < 0.5f )
{
if (Math :: UnitRandom() < 0.5f )
treeLoader -> addTree(tree1, position, yaw, scale);
}
else
treeLoader -> addTree(tree2, position, yaw, scale);
}
// /
bushes = new PagedGeometry(mCamera);
bushes -> addDetailLevel < WindBatchPage > ( 80 , 50 );
TreeLoader2D * bushLoader = new TreeLoader2D(bushes, TBounds( 0 , 0 , 5000 , 5000 ));
bushes -> setPageLoader(bushLoader);
bushLoader -> setHeightFunction(getTerrainHeight);
bushLoader -> setColorMap( "terrain_lightmap.jpg" );
Entity * fern = mSceneMgr -> createEntity( "Fern" , "farn1.mesh" ); //
Entity * plant = mSceneMgr -> createEntity( "Plant" , "plant2.mesh" ); //
Entity * mushroom = mSceneMgr -> createEntity( "Mushroom" , "shroom1_1.mesh" ); //
bushes -> setCustomParam(fern -> getName(), "factorX" , 1 ); //
bushes -> setCustomParam(fern -> getName(), "factorY" , 0.01f );
bushes -> setCustomParam(plant -> getName(), "factorX" , 0.6f );
bushes -> setCustomParam(plant -> getName(), "factorY" , 0.02f );
// 20000
for ( int i = 0 ; i < 20000 ; i ++ )
{
yaw = Degree(Math :: RangeRandom( 0 , 360 ));
position.x = Math :: RangeRandom( 0 , 2000 );
position.z = Math :: RangeRandom( 2300 , 4000 );
if (Math :: UnitRandom() < 0.8f ) {
scale = Math :: RangeRandom( 0.3f , 0.4f );
bushLoader -> addTree(fern, position, yaw, scale);
} else if (Math :: UnitRandom() < 0.9 ) {
scale = Math :: RangeRandom( 0.2f , 0.6f );
bushLoader -> addTree(mushroom, position, yaw, scale);
} else {
scale = Math :: RangeRandom( 0.3f , 0.5f );
bushLoader -> addTree(plant, position, yaw, scale);
}
}
... and the code for finalizing the destructor
LandscapeApplication :Code finalization
LandscapeApplication ::~ LandscapeApplication( void )
{
if (grass)
{
delete grass -> getPageLoader();
delete grass;
grass = NULL ;
}
if (trees)
{
delete trees -> getPageLoader();
delete trees;
trees = NULL ;
}
if (bushes)
{
delete bushes -> getPageLoader();
delete bushes;
bushes = NULL ;
}
mSceneMgr -> destroyEntity( "Tree1" );
mSceneMgr -> destroyEntity( "Tree2" );
mSceneMgr -> destroyEntity( "Fern" );
mSceneMgr -> destroyEntity( "Plant" );
mSceneMgr -> destroyEntity( "Mushroom" );
}
(without this code, the application will crash when exiting).
And the most important thing is that instances of the
Forests::PagedGeometry need to call the update() method on each frame so that our forest is rendered, swaying smoothly under the gusts of virtual wind:bool LandscapeApplication :: frameEnded( const Ogre :: FrameEvent & evt)
{
// ...
grass -> update();
trees -> update();
bushes -> update();
return true ;
}
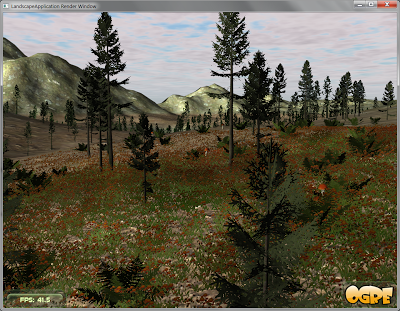
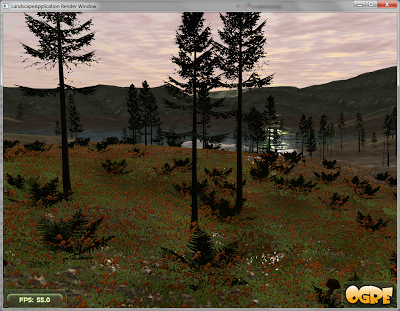
By running the application, we can observe the pastoral forest landscape:
... good, no pitfalls waiting for us here. The only thing you should pay attention to is a drop in performance: despite many techniques for improving performance (starting from the banal LOD and ending with a pagination mechanism similar to that in the landscape subsystem and replacing real trees with sprites at long distances), Paged Geometry is all still requires careful adjustment of the number of displayed instances of vegetation and image quality. Here again, we can recommend using the Ogitor editor, which has the support of Paged Geometry, allowing you to easily sketch vegetation in the right places (like brushing with Paint in Paint) and adjust all the necessary parameters.
A fully compiled and ready-to-run test project can be downloaded here .
In gratitude to all who read to this place - a couple more nice screenshots:
And the video (it was not made by me, but it was created using the libraries in question - Ogre, Hydrax and Caelum):
I also want to thank Sergey ViruScD Habrayuzer for his help in preparing the article, Andrew Engine9 for his help in working with the Ogre engine and the creators of the site dumpz.org for the excellent syntax highlighting.
UPD : I took screenshots with anti-aliasing turned on, thanks m1el for the comment.
Source: https://habr.com/ru/post/128377/
All Articles