Relatively positioned elements in WPF documents
A couple of months ago, I had to implement an interface using WPF. Mainly used FlowDocument, since it was necessary to organize the UI in the style of web pages as close as possible.
Accustomed to freedom in positioning HTML elements with CSS, I could not find a solution for the relative positioning of nested elements. Top, Left, Right, Bottom properties are completely absent in floating WPF documents. MSDN issued only the Figure class. However, HorizontalOffset and VerticalOffset do not work when using FlowDocumentScrollViewer. Search in Google also did not help.
However, the solution was more than simple.
The most interesting information about its internal implementation provides WebKit. A blog is a valuable source of information for those who do not want to study the source code of the project, but want to know about its architecture.
Of particular interest was the cycle of posts about WebCore Rendering. The main phrase was found on this page , which prompted a solution to the problem: “Relative positioning is literally nothing more than a paint-time translation”, which is in Russian: “Relative positioning is literally nothing more than movement when drawing”.
Armed with this “postulate”, I decided to find something similar in the depths of WPF.
')
If for UIElement we usually use the RenderTrasform and 2D transformations of the Translate, Rotate and Scale views, the same mechanism is provided for objects containing text. The container of all transformations is the TextEffect class.
So, we will start implementation. An example from the blog page will be used as an example.

The same example, but only for WPF, without positioning:
Before you apply a TextEffect, you need to know that it only works with the Run type. When applied to Span, or another element in the document, the effect will not be observed.
Apply effect:
And the code to cancel:
Thus, we were able to get the desired effect. I hope that the code is useful to others.
Link to the project with an example .
Accustomed to freedom in positioning HTML elements with CSS, I could not find a solution for the relative positioning of nested elements. Top, Left, Right, Bottom properties are completely absent in floating WPF documents. MSDN issued only the Figure class. However, HorizontalOffset and VerticalOffset do not work when using FlowDocumentScrollViewer. Search in Google also did not help.
However, the solution was more than simple.
How browser engines work
The most interesting information about its internal implementation provides WebKit. A blog is a valuable source of information for those who do not want to study the source code of the project, but want to know about its architecture.
Of particular interest was the cycle of posts about WebCore Rendering. The main phrase was found on this page , which prompted a solution to the problem: “Relative positioning is literally nothing more than a paint-time translation”, which is in Russian: “Relative positioning is literally nothing more than movement when drawing”.
Armed with this “postulate”, I decided to find something similar in the depths of WPF.
')
Texteffect
If for UIElement we usually use the RenderTrasform and 2D transformations of the Translate, Rotate and Scale views, the same mechanism is provided for objects containing text. The container of all transformations is the TextEffect class.
So, we will start implementation. An example from the blog page will be used as an example.
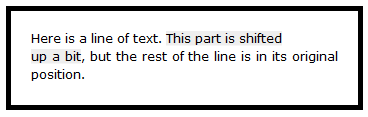
<div style="border:5px solid black; padding:20px; width:300px; margin-left:auto; margin-right:auto"> Here is a line of text. <span style="position:relative;top:-10px; background-color:#eeeeee">This part is shifted<br> up a bit</span>, but the rest of the line is in its original position. </div> The same example, but only for WPF, without positioning:
<FlowDocumentScrollViewer> <FlowDocumentScrollViewer.Document> <FlowDocument Name="doc" FontFamily="Verdana" FontSize="12px" LineHeight="18px"> <Paragraph Padding="20px" BorderThickness="5px" BorderBrush="Black"> Here is a line of text. <Span Name="shiftedText" Background="#EEE">This part is shifted<LineBreak/> up a bit </Span>, but the rest of the line is in its original position. </Paragraph> </FlowDocument> </FlowDocumentScrollViewer.Document> </FlowDocumentScrollViewer> Before you apply a TextEffect, you need to know that it only works with the Run type. When applied to Span, or another element in the document, the effect will not be observed.
Apply effect:
void DoEffect() { foreach (var run in shiftedText.Inlines.OfType<Run>()) { TextEffect f = new TextEffect(); TranslateTransform t = new TranslateTransform(0, -10d); f.Transform = t; int selectionStart = doc.ContentStart.GetOffsetToPosition(run.ElementStart); int selectionLength = run.ElementStart.GetOffsetToPosition(run.ElementEnd); f.PositionStart = selectionStart; f.PositionCount = selectionLength; run.TextEffects.Add(f); } } And the code to cancel:
void UndoEffect() { foreach (var run in shiftedText.Inlines.OfType<Run>()) { run.TextEffects.Clear(); } } Thus, we were able to get the desired effect. I hope that the code is useful to others.
Link to the project with an example .
Source: https://habr.com/ru/post/128209/
All Articles