Be ready! Always ready!
Suppose you are an information security specialist, system administrator, employee of those. support or another IT specialist - in this case, you probably have on hand various tools from the LiveCD \ Rescue Disk area. How do they help you solve problems associated with virus infection and system breakdown when an incident occurs on remote systems (servers, laptops of employees on a business trip or from acquaintances and friends who turn to you for help as a specialist)?
Of course, specialists can initially set up security systems properly and thoroughly tighten the nuts where necessary, but they often leave administrative rights to users, which sometimes leads to viral infection of the system associated with human factors. Such situations occur even in large IT companies, not to mention ordinary users, who in most cases are far from IT.
You can, of course, minimize the risks, but avoid completely fail - otherwise, why do we need all these LiveCD and Rescue Disk. In general, the idea is to prepare in advance for the possible occurrence of such situations, and the tools for treating and repairing the system should not be on removable media, but directly on the devices: laptops and system units. Replacing WinRE with Microsoft DaRT can be considered as one example, but such tools may not be used by everyone, but for the home user in most cases they will be redundant. Ordinary users need a simpler and more understandable tool, for example, an antivirus solution for scanning and treating the system.
')
Consider a simple example of implementing such a solution. The basis for using Eset SysRescue. ESET SysRescue is a LiveCD distribution with antivirus software that can be used to clean an infected computer. This choice is due to several reasons, firstly, it is based on the WAIK (Windows Automated Installation Kit), secondly, it initially incorporated the function of updating the anti-virus database from the Internet, thirdly, the anti-virus application immediately starts up during the download, which simplifies user interaction. Our choice is not limited to this distribution - you can use other solutions based on WinPE.
To deploy Eset SysRescue on a system with Windows XP, we need: a system with installed Windows XP; assembled image of Eset SysRescue ( there is an instruction on the manufacturer’s website ); a script with system configuration and three files from a system with windows 7: bootmgr - Windows 7 bootloader, as well as utilities for working with the bootloader, bcdedit.exe and bootsect.exe.
On Windows XP, run the script. The purpose of this script is to install the bootloader from Windows 7. Add the current operating system and the boot item for Eset SysRescue to the boot menu.
mkdir c: \ boot
attrib + h + s C: \ boot
bootsect / NT60 SYS
bcdedit / createstore c: \ boot \ bcd.temp
bcdedit / store c: \ boot \ bcd.temp / create {bootmgr} / d "Windows Boot Manager"
bcdedit / import c: \ boot \ bcd.temp
bcdedit / set {bootmgr} device partition = C:
bcdedit / timeout 10
attrib -h -s C: \ boot \ bcd.temp
del c: \ boot \ bcd.temp
copy bootmgr c: \
attrib + h + s C: \ bootmgr
rem
Bcdedit / create {ntldr} / d "Microsoft Windows XP"
Bcdedit / set {ntldr} description "Microsoft Windows XP"
Bcdedit / set {ntldr} device partition = C:
Bcdedit / set {ntldr} path \ ntldr
Bcdedit / displayorder {ntldr} / addlast
rem
mkdir c: \ Tools
mkdir c: \ Tools \ ESET \
attrib + h + s C: \ Tools
rem
bcdedit / create {ramdiskoptions}
bcdedit / set {ramdiskoptions} ramdisksdidevice partition = c:
bcdedit / set {ramdiskoptions} ramdisksdipath \ Tools \ boot.sdi
for / f "tokens = 2 delims = {}" %% g in ('bcdedit / create / application osloader / d "ESET SysRescue"') do (set guid = {%% g})
bcdedit / set% guid% device ramdisk = [Boot] \ Tools \ ESET \ boot.wim, {ramdiskoptions}
bcdedit / set% guid% osdevice ramdisk = [Boot] \ Tools \ ESET \ boot.wim, {ramdiskoptions}
bcdedit / set% guid% path \ windows \ system32 \ winload.exe
bcdedit / set% guid% systemroot \ Windows
bcdedit / set% guid% detecthal Yes
bcdedit / set% guid% winpe Yes
bcdedit / displayorder% guid% / addlast
bcdedit / timeout 3
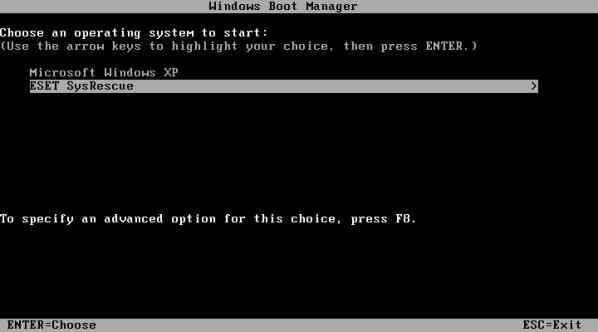
After executing the script on the system disk (c: \), the hidden folders boot and tools should appear, in the latter there should also be an eset folder. In addition, the bootmgr file should be in the root. In the tools folder, you need to copy the boot.sdi and boot.wim files from the LiveCD Eset SysRescue. Boot.sdi should be in the c: \ tools \ folder, and boot.wim in: \ tools \ eset. After the files are copied, the system is ready. You can reboot and, if necessary, use the corresponding item in the boot menu.
For Windows 7 / Windows Vista, the actions are similar, except that you do not need to install the bootloader.
mkdir c: \ Tools
mkdir c: \ Tools \ ESET \
attrib + h + s C: \ Tools
rem
bcdedit / create {ramdiskoptions}
bcdedit / set {ramdiskoptions} ramdisksdidevice partition = c:
bcdedit / set {ramdiskoptions} ramdisksdipath \ Tools \ boot.sdi
for / f "tokens = 2 delims = {}" %% g in ('bcdedit / create / application osloader / d "ESET SysRescue"') do (set guid = {%% g})
bcdedit / set% guid% device ramdisk = [Boot] \ Tools \ ESET \ boot.wim, {ramdiskoptions}
bcdedit / set% guid% osdevice ramdisk = [Boot] \ Tools \ ESET \ boot.wim, {ramdiskoptions}
bcdedit / set% guid% path \ windows \ system32 \ winload.exe
bcdedit / set% guid% systemroot \ Windows
bcdedit / set% guid% detecthal Yes
bcdedit / set% guid% winpe Yes
bcdedit / displayorder% guid% / addlast
bcdedit / timeout 3
Actually, that's all, you can optionally set access rights to the tools folder only for the system user and move the ESET SysRescue menu to the Tools section.
Of course, specialists can initially set up security systems properly and thoroughly tighten the nuts where necessary, but they often leave administrative rights to users, which sometimes leads to viral infection of the system associated with human factors. Such situations occur even in large IT companies, not to mention ordinary users, who in most cases are far from IT.
You can, of course, minimize the risks, but avoid completely fail - otherwise, why do we need all these LiveCD and Rescue Disk. In general, the idea is to prepare in advance for the possible occurrence of such situations, and the tools for treating and repairing the system should not be on removable media, but directly on the devices: laptops and system units. Replacing WinRE with Microsoft DaRT can be considered as one example, but such tools may not be used by everyone, but for the home user in most cases they will be redundant. Ordinary users need a simpler and more understandable tool, for example, an antivirus solution for scanning and treating the system.
')
Consider a simple example of implementing such a solution. The basis for using Eset SysRescue. ESET SysRescue is a LiveCD distribution with antivirus software that can be used to clean an infected computer. This choice is due to several reasons, firstly, it is based on the WAIK (Windows Automated Installation Kit), secondly, it initially incorporated the function of updating the anti-virus database from the Internet, thirdly, the anti-virus application immediately starts up during the download, which simplifies user interaction. Our choice is not limited to this distribution - you can use other solutions based on WinPE.
To deploy Eset SysRescue on a system with Windows XP, we need: a system with installed Windows XP; assembled image of Eset SysRescue ( there is an instruction on the manufacturer’s website ); a script with system configuration and three files from a system with windows 7: bootmgr - Windows 7 bootloader, as well as utilities for working with the bootloader, bcdedit.exe and bootsect.exe.
On Windows XP, run the script. The purpose of this script is to install the bootloader from Windows 7. Add the current operating system and the boot item for Eset SysRescue to the boot menu.
mkdir c: \ boot
attrib + h + s C: \ boot
bootsect / NT60 SYS
bcdedit / createstore c: \ boot \ bcd.temp
bcdedit / store c: \ boot \ bcd.temp / create {bootmgr} / d "Windows Boot Manager"
bcdedit / import c: \ boot \ bcd.temp
bcdedit / set {bootmgr} device partition = C:
bcdedit / timeout 10
attrib -h -s C: \ boot \ bcd.temp
del c: \ boot \ bcd.temp
copy bootmgr c: \
attrib + h + s C: \ bootmgr
rem
Bcdedit / create {ntldr} / d "Microsoft Windows XP"
Bcdedit / set {ntldr} description "Microsoft Windows XP"
Bcdedit / set {ntldr} device partition = C:
Bcdedit / set {ntldr} path \ ntldr
Bcdedit / displayorder {ntldr} / addlast
rem
mkdir c: \ Tools
mkdir c: \ Tools \ ESET \
attrib + h + s C: \ Tools
rem
bcdedit / create {ramdiskoptions}
bcdedit / set {ramdiskoptions} ramdisksdidevice partition = c:
bcdedit / set {ramdiskoptions} ramdisksdipath \ Tools \ boot.sdi
for / f "tokens = 2 delims = {}" %% g in ('bcdedit / create / application osloader / d "ESET SysRescue"') do (set guid = {%% g})
bcdedit / set% guid% device ramdisk = [Boot] \ Tools \ ESET \ boot.wim, {ramdiskoptions}
bcdedit / set% guid% osdevice ramdisk = [Boot] \ Tools \ ESET \ boot.wim, {ramdiskoptions}
bcdedit / set% guid% path \ windows \ system32 \ winload.exe
bcdedit / set% guid% systemroot \ Windows
bcdedit / set% guid% detecthal Yes
bcdedit / set% guid% winpe Yes
bcdedit / displayorder% guid% / addlast
bcdedit / timeout 3
After executing the script on the system disk (c: \), the hidden folders boot and tools should appear, in the latter there should also be an eset folder. In addition, the bootmgr file should be in the root. In the tools folder, you need to copy the boot.sdi and boot.wim files from the LiveCD Eset SysRescue. Boot.sdi should be in the c: \ tools \ folder, and boot.wim in: \ tools \ eset. After the files are copied, the system is ready. You can reboot and, if necessary, use the corresponding item in the boot menu.
For Windows 7 / Windows Vista, the actions are similar, except that you do not need to install the bootloader.
mkdir c: \ Tools
mkdir c: \ Tools \ ESET \
attrib + h + s C: \ Tools
rem
bcdedit / create {ramdiskoptions}
bcdedit / set {ramdiskoptions} ramdisksdidevice partition = c:
bcdedit / set {ramdiskoptions} ramdisksdipath \ Tools \ boot.sdi
for / f "tokens = 2 delims = {}" %% g in ('bcdedit / create / application osloader / d "ESET SysRescue"') do (set guid = {%% g})
bcdedit / set% guid% device ramdisk = [Boot] \ Tools \ ESET \ boot.wim, {ramdiskoptions}
bcdedit / set% guid% osdevice ramdisk = [Boot] \ Tools \ ESET \ boot.wim, {ramdiskoptions}
bcdedit / set% guid% path \ windows \ system32 \ winload.exe
bcdedit / set% guid% systemroot \ Windows
bcdedit / set% guid% detecthal Yes
bcdedit / set% guid% winpe Yes
bcdedit / displayorder% guid% / addlast
bcdedit / timeout 3
Actually, that's all, you can optionally set access rights to the tools folder only for the system user and move the ESET SysRescue menu to the Tools section.
Source: https://habr.com/ru/post/128061/
All Articles