microcontroller console with micro readline
 I present to you the microrl library ( on github ), intended for organizing the console interface in various embedded glands on microcontrollers.
Why do we need a console in MK?
Text console interface has several advantages for embedded systems, with all its power and simplicity (because the text, unlike the LED, speaks for itself!):
- It requires relatively few MK resources, and minimal hardware costs — a serial interface like UART or any other MK available, it can be a built-in USB or an external USB-Com adapter or even TCP if your microcontroller is serious enough.
- It is convenient to connect - just a terminal supporting Com-port (putty for Windows or minicom for linux) is enough.
- It is convenient to use - color output to the terminal, support for auto-add-ons, hot keys and input history.
So, what the library supports at the moment:
- basic functions of the vt100 terminal (it is supported by most terminal emulators)
- configuration file that allows you to enable and disable features to save memory (for MK is very important);
- understands HOME, END, cursor keys, backspace;
- understands hotkeys ^ U ^ K ^ E ^ A ^ N ^ P etc.
- input history with up and down navigation and hotkeys
- auto-add-ons (auto substitution?)
A bit of theory
A small insight into the history and features of the terminal economy were well described in this topic , I will not repeat, I will describe only in brief the principle of operation.

From the user's point of view, everything starts in the terminal and ends there, because as Wikipedia says: “The terminal is an I / O device, its main functions are to display and enter data” . There are a lot of terminal emulators for all platforms and with different functionalities, for example, gnome-terminal, rxvt, putty, minicom, etc.
')
The user presses the buttons on the keyboard, the terminal sends them through any channel to the device or system, and it returns the characters to be printed on the screen. In addition to simple text characters, ESC-sequences are sent to both sides for transmitting control codes and service information, for example, special codes are sent from the keyboard. keys (Enter, cursor, ESC, Backspace, etc.). The sequences go back to the screen to control the cursor position, clear the screen, line feed, delete a character, control color, type of font, and so on.
An ESC sequence, in general, is a sequence of bytes starting with an ESC character with a code of 27, followed by sequence codes consisting of a certain number of printed or non-typed characters. For the vt100 terminal codes can be viewed for example here . Control codes are non-printable characters with codes from 0 to 31 (32 is the code of the first ascii-character - space).
The program in the device (that part of it that is responsible for the command line), taking characters and sequences, forms in its command line buffer what the user enters and outputs this line back to the terminal (the local terminal echo should be turned off). The device prints text and ESC-sequences to control the cursor, color, position of the cursor, as well as commands like "Delete text from the cursor to the end of the line." In essence, this is the main task of the library - to form a string in memory and on the terminal screen, allow the user to edit it (delete arbitrary characters of the string, move through it, etc.) and, at the right time, give it to the higher-level interpreter.
A good console should have a history of input, well, and, perhaps, more auto-add-ons, without which the terminal would not be so comfortable.
Internal organization
Consider the architecture of the application using the library:
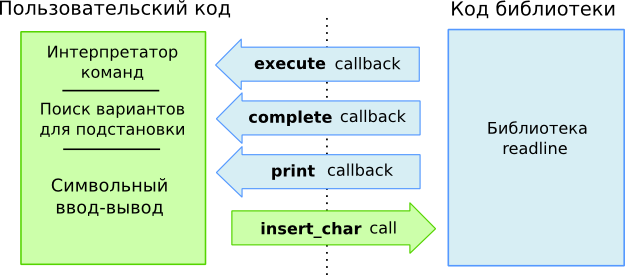
The figure shows a block diagram of the interaction of the microrl and the user application. Blue arrows indicate callback functions caused by the occurrence of events, a green arrow shows a library function call, in which, in fact, all the work takes place.
Before using, you need to install 3 callbac-functions (blue):
void print (char * str); // int execute (int argc, char * argv[]); // ENTER char ** complete (int argc, char * argv[]); // TAB The complete function is optional, to save resources, you can disable auto-add-ons in the configuration file at all.
Input stream
The user application receives characters from the terminal (via the serial interface: UART, usb-cdc, tcp-socket, etc.) and sends them to the library by calling a function (green arrow):
void microrl_insert_char (char ch); ESC-sequences and control characters responsible for moving the cursor, pressing Tab, Enter, Backspace and so on ... are selected and processed from the input stream. The rest of the characters entered from the keyboard are placed into the command line buffer.Execute
When the user presses Enter (in the input sequence, the code 0x10 or 0x13 is encountered ), the command line buffer is sliced into "tokens" (words separated by spaces) and the execute function is called with the number of these words in argc and an array of pointers argv .
The words in the argv [] array are NULL-terminated, which means you can use ordinary string functions, so command processing is as simple and convenient as handling the parameters of the main function of the desktop application. Many, if not all, are familiar with this technology, or you can easily find information .
To save RAM, all entered spaces are replaced with the ' \ 0 ' character, and when output to the terminal, they are replaced back with spaces. Because of this, you can use a single buffer to enter and store the command line and process it, because it is enough to “collect” pointers to the tokens, and all of them will be automatically NULL-terminated.

Command processing is done by the library user in the execute function, in fact, this is the command interpreter, but do not be intimidated by this phrase: D, the usual if - else if - else is the simplest command interpreter:
/* "help", "mem clear" "mem dump"*/ int execute (int argc, char * argv[]) { int i = 0; if (!strcmp (argv[i], "mem")) { i++; if ((i < argc) && (!strcmp (argv[i], "dump"))) { mem_dump (); } else if ((i < argc) && (!strcmp(argv[i], "clear"))) { mem_clear(); } else { printf ("\"mem\" needs argument {dump|clear}\n"); } } else if (!strcmp (argv[i], "help")) { print_help (); } else { printf ("%s: cmd not found\n"); } return 0; } Auto add-ons with Complete
When a user wants auto-addons, he presses Tab - this is a persistent habit for everyone who works with the console. Here we do the same when the tabulation code is captured - again we cut the line with pointers to argv, but not for the entire line, but only for the section from the beginning to the cursor (do we usually add the word under the cursor?). The same int argc and char * argv [] are transferred to callback complete , and there is one trick: if the cursor is followed by a space, then we are starting a new word, i.e. we do not, as it were, add anything concrete, in this case in the last element of argv [argc-1] there will be an empty string.
Why do you need it? In order for the auto-add-in callback-function to be clear which commands the user has already entered, and whether it complements something specific, or simply clicks Tab to view available commands. As you can see, you have everything to make really "smart" add-ons, no worse than in adult consoles.
Important!! The last element of the array must always be NULL!
If you return NULL in the very first element ([NULL]), this means that there are no add-on options.
If there is one element in the array before NULL (["help"] [NULL]), then there is only one option for the add-on, it will be simply substituted in its entirety.
If there are several elements in the array ([“clean”] [“clear”] [NULL]), then only the common part of the words will be added, if there is one, in general everything is as usual in bash: D!
Input history
If you have enough RAM, feel free to include in the config support for input history - improves the usability! For saving, a ring buffer is used, so we cannot say how many last command lines we can remember, it depends on their length. Search in history is carried out as usual, using up / down arrows or hotkeys Ctrl + n Ctrl + p (try bash!). It works simply: the messages are copied to the buffer one by one, if there is no space, delete the old ones until it appears, then the line is copied into memory, and the pointer to the last message is moved after it. When the end of the buffer is reached, we jump over 0 and so on in a circle.
Resources
All that is needed to implement the console in the application is a bit of memory and a serial two-way interface, you can use the UART (including through the USB-RS232 converter), usb-cdc, wireless bluetooth serial modules with Serial com-port profile, tcp sockets, etc. , everything that can connect a PC and a controller, and through what terminal emulators can work.
As for memory, I collected everything with GCC with optimization of -0s for the Atmega8 (8-bit) controller (an example is in the source) and for the AT91SAM7S64 (16/32-bit) controller on the ARM7 core. For comparison, I collected it in two versions: in trimmed - without auto-add-ons, without history of input and processing of cursor arrows and full, here is the result
ARM AVR 1,5 1,6 3,1 3,9 Notice how the 16/32 bit ARM kernel does the AVR!
It must be said that the measurements were carried out only for the library itself, neither the USART processing (USB-CDC for ARM), nor the interpreter were taken into account, since this is the shell.
I can only say that the example in the source for the AVR takes about 6 KB of Flash (out of 8), but there is an “all-inclusive” of the library's capabilities, you can hang out to 4. Obviously, for very small controllers (with 8 KB) this is already expensive, but the amount of memory in the controllers is growing by leaps and bounds, now you will not surprise anyone MK from ST or NXP with 128, 512Kb Flash.
As for RAM, everything is simple, the library needs internal bytes ~ 30 for internal variables, plus a buffer for the command line - you define its length in the config, plus a buffer for the input history - set how much does not mean (but not more than 256 bytes in this implementation) .
Use options:
Debugging software . You can debug logic and algorithms, emulating events from other devices / systems / protocols, change parameters, select empirical values.
# > print status state machine: receive # > set low_value 23 # > set speed 9200 > send_msg 23409823 # > map dump 0 8 0x40 0x0 0x0 0x0 0x34 0x12 0xFF 0xFF # > rise_event alarm # > calc_crc16 0x92A1 Device configuration Setting parameters through the CLI is easier than writing binary data: it does not require additional utilities, it does not require special interfaces. It is performed on any PC with a terminal and a COM port (virtual through the adapter as well). Users (many) themselves are able to use the CLI if necessary.
# > set phone_0 8952920xxxx > set dial_delay 150 > set alarm_level low > set user_name Eugene > set temperature 36 > print config 0 phone: 8952920xxxx dial delay: 150 ms alarm level: low user name: Eugene temperature: 36 Monitoring Upon request, you can print any data of any subsystem, buffers or counters.
# 1 4 > print ADC_val 1 4 121, 63, 55, 0 # > get operation_count 87 # > print stat statistics: counted 299 pulse, smaller is 11 ms, longer is 119 ms Interactive device management . Turn on the relay, turn your head 30 degrees, turn on the camera, take a step to the left. Using the bluetooth serial modules, you can steer the mobile robot through the console! I think the idea is clear.
Additionally, you can organize the authorization with a password or one-time / N-time access.
And of course, pseudo graphics in the terminal! Game console in the literal sense of the word "console"! : D
As you can see, sometimes such an interface can really be very relevant, not necessarily basic, but debugging, configuration, or duplicating.
Lyrical digression
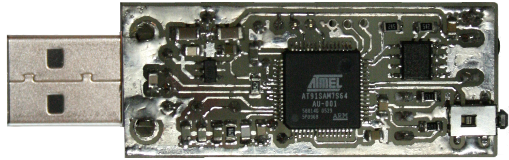
The idea to write a library was born when I was doing a USB IRin IR receiver, as a replacement for lirc with its complex infrastructure. My USB dongle is defined without special drivers in the system as / dev / ACM0 , which is essentially a virtual com port. When I press the remote control button, the dongle sends the Ascii a string like " NEC 23442 " - the code of the pressed button to the port. Button handling is very simple, a regular bash script that reads / dev / ACM0 with a large switch based on button codes.
Fine! what else is needed? Simple, convenient, no complicated configs, no lirc. But somehow I wanted to see the line " VOLUME_UP " come from the port instead of " NEC D12C0A " ... But how to set matches, if there is only one button on the device, and then it is not used yet? Very simple! Open the virtual com-port " / dev / ACM0 " through the minicom terminal emulator
$minicom -D /dev/ACM0 -b 115200 and get a console! Next, enter the command: > set_name VOLUME_UP # . Button aliases are saved in the AT24C16 2KB EEPROM. In addition, there is a parameter such as the speed of re-pressing when you hold down the button on the remote. It can be installed with the command:
> repeat_speed 500 You can still do
> eeprom print 1 60 # 1 60 well, fun team
> eeprom format # Conclusion
In the near future I will make a library for the Arduino SDK.
For examples, see the source, there is an example for unix * and for AVR. For AVR, you can simply download the hex file, flash it and try it! The application allows you to enable / disable the I / O port ports PORTB and PORTD.
I hope it was interesting: D
Thanks for attention!
Link to github github.com/Helius/microrl
Source: https://habr.com/ru/post/127890/
All Articles