Configure authorization using the key in mobile putty
Probably everyone who knows the program Putty , heard about its version for smartphones running Symbian OS. If it is interesting to you - well under kat.
Today, after several attempts to set a password on the svayp-keyboard in a crowded bus, I finally decided to set up keyless authentication. In theory, to do this, it is enough to send the public key from the client device to the server device. But in practice, everything turned out to be somewhat more complicated. And the first “complexity” is the lack of a way to create a key on the smartphone itself. Here, an image with Windows XP that happened to be handy helped me (in wine puttygen, for some reason, I could not draw the interface). When creating a key, it is important to clarify that the mobile version of putty works correctly only with an SSH2-RSA key with a length of 1024 bits. The created private key is moved to the secluded place of the smartphone's memory (and then you never know). Run the mobile putty, in the connection settings we specify the location of the key and the user name for the login. Breathed out.
Now we are going to configure the server device. I use the Ubuntu OS, but the procedure should not differ much in other Linux family operating systems. First we check if the ssh server is installed:
After executing this command, the installation will start or a message will appear indicating that the package is already installed.
Next, you need to edit the ssh server settings. To do this, open the file / etc / ssh / sshd_config in your favorite editor
Among other settings there are the following:
The first is responsible for the possibility of authorization with the key, the second indicates the path to the file with the public keys of the client devices. % h is replaced with the current user's home folder name. By default, the second line is commented out; you must remove the # sign in front of it. Now you can move on to adding public keys.
To do this, you need to create and edit a file located on the path specified earlier in the system:
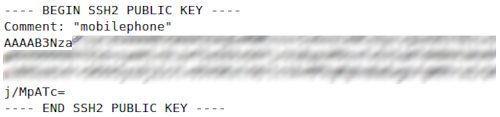
Now - magic! The public key created by puttygen will not work in its current form, so open it in the same favorite text editor, copy the key (highlighted in the screenshot) into the authorized_keys file, append the type of key (ssh-rsa) to the beginning and, if desired, at the end - a comment.
Before:
After:

And now you need to restart the ssh server, otherwise it will not work.
This completes the authorization setting without a password, but the last step is left - testing. Run the mobile putty, select the connection in which we have specified the key, waiting for the connection.
Today, after several attempts to set a password on the svayp-keyboard in a crowded bus, I finally decided to set up keyless authentication. In theory, to do this, it is enough to send the public key from the client device to the server device. But in practice, everything turned out to be somewhat more complicated. And the first “complexity” is the lack of a way to create a key on the smartphone itself. Here, an image with Windows XP that happened to be handy helped me (in wine puttygen, for some reason, I could not draw the interface). When creating a key, it is important to clarify that the mobile version of putty works correctly only with an SSH2-RSA key with a length of 1024 bits. The created private key is moved to the secluded place of the smartphone's memory (and then you never know). Run the mobile putty, in the connection settings we specify the location of the key and the user name for the login. Breathed out.
Now we are going to configure the server device. I use the Ubuntu OS, but the procedure should not differ much in other Linux family operating systems. First we check if the ssh server is installed:
sudo apt-get install openssh-server
After executing this command, the installation will start or a message will appear indicating that the package is already installed.
Next, you need to edit the ssh server settings. To do this, open the file / etc / ssh / sshd_config in your favorite editor
sudo gedit /etc/ssh/sshd_config
Among other settings there are the following:
PubkeyAuthentication yes
AuthorizedKeysFile %h/.ssh/authorized_keys
The first is responsible for the possibility of authorization with the key, the second indicates the path to the file with the public keys of the client devices. % h is replaced with the current user's home folder name. By default, the second line is commented out; you must remove the # sign in front of it. Now you can move on to adding public keys.
To do this, you need to create and edit a file located on the path specified earlier in the system:
touch ~/.ssh/authorized_keys
gedit ~/.ssh/authorized_keys
Now - magic! The public key created by puttygen will not work in its current form, so open it in the same favorite text editor, copy the key (highlighted in the screenshot) into the authorized_keys file, append the type of key (ssh-rsa) to the beginning and, if desired, at the end - a comment.
Before:
After:
And now you need to restart the ssh server, otherwise it will not work.
sudo service ssh restart
This completes the authorization setting without a password, but the last step is left - testing. Run the mobile putty, select the connection in which we have specified the key, waiting for the connection.
')
Source: https://habr.com/ru/post/127796/
All Articles