Feedback from the servo or "hammer nails"

Hi to all habraconstructors
A foolish thought came to me somehow: to assemble a device that would hammer a nail with a hammer. Just for the sake of demonstration of the servo. The algorithm is simple: we give a command to raise the hammer, wait until it rises, release the hammer; and so on until the nail is clogged. But how do you know that the hammer has risen and that the nail is hammered without using additional sensors? Ask the "stupid" servo! How exactly to do it - this will be discussed in the article.
What is a servo? Probably everyone knows, but just in case: this is a drive, which, unlike a DC motor, does not just spin as long as voltage is applied, but tends to turn to a given angle and stay in this position. The angle is set using a PWM (PWM) signal. The servo tends to a certain position, and therefore must know its own. Before starting the assembly, I was sure that it would be easier to request the current angle and this is possible out of the box. It was not there. But first things first.
')
So, the intended device: servo drive with a hammer attached to it on a small pedestal for balance. The servo connects to the Arduino via IO Shield, and the microcontroller executes the algorithm:
- Set the servo to a certain angle to raise the hammer
- Inactive until the servo reports that the angle has been reached.
- Power off the servo so that the hammer hits the nail
- Read the angle in a fallen position.
- If the angle after falling several times in a row has not changed - then the nail has stopped hammering. Presumably he is scored - stop the execution
- If the angle has changed, start over.
Take the original parts:
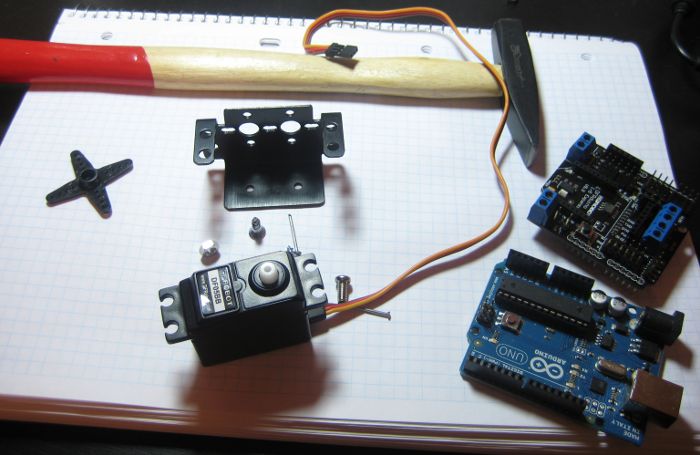
Sawing and twisting:

We start writing the firmware for the Arduino ... It’s pretty quickly becoming clear that it’s not a problem to set a certain angle for the servos. In particular, this allows you to make the standard library Servo, which from a given angle in degrees forms the corresponding PWM-signal. But reading is a problem: there is no function for that.
Quickly googling the problem, I found a bunch of posts on the forums, where they answered authoritatively to this question: “This is not possible! Servos are write-only devices. ” It confused me, I intuitively felt that getting this data was somehow just possible.
Materiel
After a brief search on the network, you can understand how the server works. This is a normal DC motor, which is connected to the removed spindle through several gears that form a lower gear. The same spindle is physically attached to the potentiometer (trimmer resistor) from the inside. When the motor rotates, the spindle rotates, rotates the potentiometer slider, the potentiometer output voltage changes, the servo brains read it, and if the voltage reaches a predetermined level - the goal is reached, the motor is disconnected from power.
That is, we have a potentiometer, the signal from which you can determine the current angle. It remains only to disassemble the servo and connect to the right place. Parse:

I’ll say right away that I broke the servo from the photo irretrievably during the disassembly process. It was not necessary to break out the board with electronics at all, it is enough just to remove the back cover, which is held on 4 screws. But it was not immediately obvious, and in order to understand where the potentiometer was soldered on the board, I had to sacrifice one drive.
Here is how the potentiometer is soldered on the servos from DFRobot :

We need a signal from the slider, which varies depending on the angle of rotation from minimum to maximum voltage. Take a multimeter, rotate the spindle and look: what angles which signal corresponds to. For my serva, the angle of 0 ° corresponds to a voltage of 0.43 V, and the maximum angle of rotation of 180 ° corresponds to a voltage of 2.56 V.
Carefully solder the new signal wire.
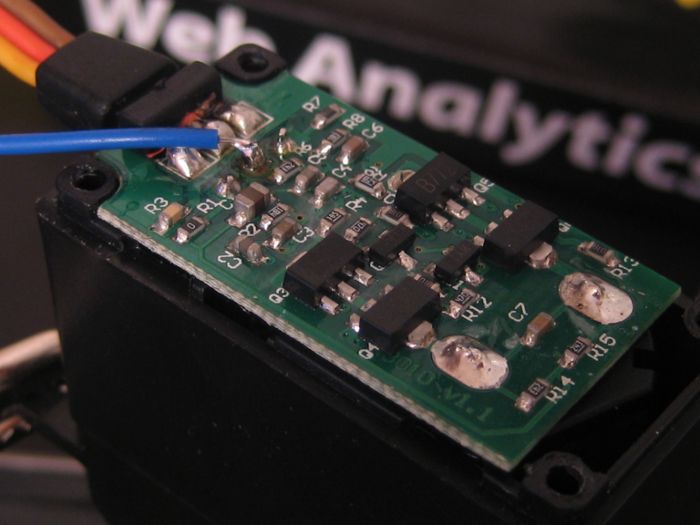
Connect it to the analog input A5 on the Arduino. Close the lid. We write the program:
#include <Servo.h> // #define A_MAX 1024 // #define A_VREF 5 // #define A_VMIN 0.43 #define A_VMAX 2.56 Servo servo; int lastHitAngle = 0; int hitAngleMatches = 0; bool jobDone = false; /* * * */ int realAngle() { return map( analogRead(A5), A_MAX * A_VMIN / A_VREF, A_MAX * A_VMAX / A_VREF, 0, 180); } void setup() { } void loop() { if (jobDone) return; // 70° servo.attach(6); servo.write(70); // . 5° while (realAngle() < 65) ; // servo.detach(); delay(1500); // // int hitAngle = realAngle(); if (hitAngle == lastHitAngle) ++hitAngleMatches; else { lastHitAngle = hitAngle; hitAngleMatches = 0; } // 5 — if (hitAngleMatches >= 5) jobDone = true; } Turn on, try, work!
What to do with the experience gained is a lot of options: you can make a controller like that used on ships to install thrust (full forward / full back); You can use the servo with feedback as an element of autonomous steering control of any machine; You can a lot of things. May fantasy come with us all!
Source: https://habr.com/ru/post/127773/
All Articles