No entry for unauthorised people
Have you ever had the idea that the idea of using a username and password to log in to the system is somewhat outdated? Why, having a flash drive in one pocket, a phone in another, and an installed SSH installed on a computer with configured authorization using keys, do we continue to enter these confusing passwords?
Passwords and accounts were invented in the era of large mainframes, the hippie movement, the war in Afghanistan and large analog tape recorders, the most technologically advanced component of which were transistors. In those days, using passwords to enter the mainframe looked really cool. You could come up with a combination like sexhero or iamsuperman and really be proud of yourself.
Today, passwords look not only archaic, but terribly inconvenient, old pontov combinations do not work anymore, and instead you have to invent furious character sets that are not only impossible to remember, but also difficult to enter the first time. We live in the XXI century, we have access to a huge number of gadgets and technical tools that offer a much simpler and higher-quality authentication mechanism, but continue to drive passwords, swearing at the whole apartment for each unsuccessful attempt to enter the system. It's time to fix it.
In this article, I will talk about how to get rid of passwords once and for all and turn your computer into a truly technological device, to enter which you just need to insert a USB flash drive, look in a webcam, or just put a cell phone on the table.
The key is the easiest and most effective method of protecting anything. We use the keys daily: to turn on the car engine, to enter the apartment, to unlock drawers and cabinets. The keys are convenient and easy to manufacture, thanks to modern programmable locks are not afraid to lose them. Many times, humanity has tried to invent a replacement for the keys, but all attempts failed (we all remember what the idea of using combination locks on the access doors led to). Why do we not use such a good and time-tested technology to protect computers?
Modern analogue of the key - USB flash drive. Regardless of the purpose for which you usually use a USB flash drive, you can always make a full-featured high-tech key from it, which will make entering the system as easy as unlocking the apartment door.
There are several ways to do this, but the simplest and most universal method is to use the PAM_usb PAM module, which will check each USB flash drive inserted into the computer for its compliance with the specified requirements and, depending on the result, unlock or block the user account.
No modification of the partition table or information stored on the flash drive is required. To identify the "correct" flash drive, its serial number, model, manufacturer, as well as a set of random data are used that are recorded in the backup flash drive area and change with every successful authentication (if someone copies your flash drive, but you have time to log in before the attacker) , the data will be changed, and its copy will no longer work). In case of loss, there will always be an opportunity to log in using the password and recode pam_usb to a new USB flash drive. Also, as a key, you can use various memory cards (SD, MMC) and other removable drives.
Starting to use pam_usb is pretty simple. Full system setup consists of five steps.
')
1. Install the libpam_usb.so library and module management utilities:
2. We take the flash drive, which we are going to use as a key, insert it into the USB port and execute the following command:
So pam_usb will collect all the necessary information about the flash drive, add to its database and write 2 KB of random data. Udisks will be used to search for flash drives in the system (the “name” argument is used here to give the flash drive an arbitrary name and not to specify its device file), so it is important that other external drives are disabled during the operation of this command.
3. Now we give pam_usb to understand that this flash drive is associated with the account we need (the path will be vasya):
4. Run the validation of the collected data in case the flash drive was not correctly identified. Or we forgot to disconnect some other drive, and it was used instead of the one we need:
5. Add pam_usb to the list of modules required for successful user authentication. On Ubuntu and other Debian-based distributions, this is done by modifying the /etc/pam.d/common-auth file. It is necessary to find a line of the following form in it (it may differ):
So we will inform PAM that before the login of any user, you need to give control to the pam_usb module, which will check the availability of the necessary flash drive, and only in case of failure of this operation to request a password. Therefore, if you want to let the user in only on a flash drive, completely blocking the account in case of failure, the word “sufficient” should be replaced with the word “required”.
In principle, all of this should be enough for the system to simply work (try to log out and log in to check it), however, the functionality of pam_usb can be slightly extended if you use the pamusb-agent daemon.
The task of pamusb-agent is to automate the work of blocking and unlocking a user account when removing and inserting a flash drive into a PC. In order for the agent to work, you need to add the following lines to the /etc/pamusb.conf configuration file:
This is a recipe for Gnome. To use pamusb-agent with other environments, the "gnome-screensaver-command --lock" and "gnome-screensaver-command --deactivate" commands need to be changed.
Now you can run pamusb-agent and check its performance:
If everything works fine, you can add it to autorun:
The pam_usb module is conveniently used as a protection method for laptops equipped with a card reader. You can carry a small SD card in your wallet or inside pocket and stick it in a laptop without worrying about what it will interfere with (as is the case with a USB flash drive). However, this approach will look somewhat archaic if the laptop is already equipped with a fingerprint scanner.
Laptops with a fingerprint scanner produced by many manufacturers. As a rule, they are not much more expensive than other models with similar characteristics, but their fingerprint sensor works only in Windows. To eliminate this drawback, freedesktop.org launched the fprint project, which developed an open library implementation for fingerprint recognition and a corresponding PAM module that allows the use of the library's capabilities during user login and other account manipulations.
Today, libfprint is in any distribution, so you can install it using any package manager:
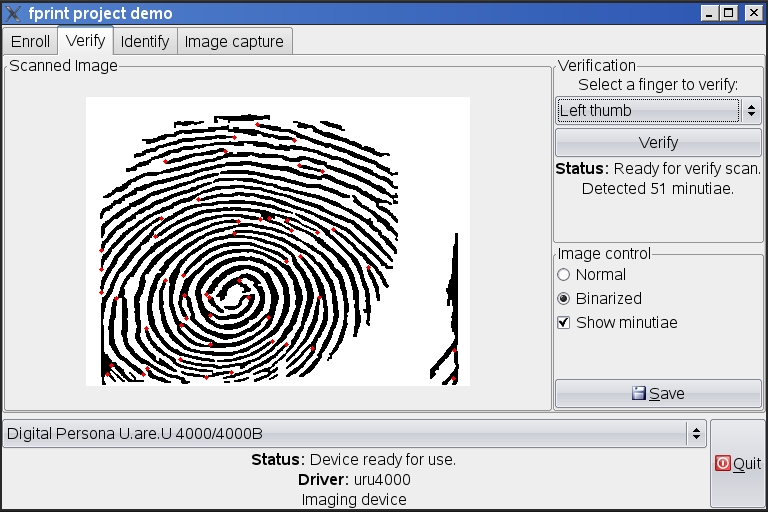
Next, the scanner can be checked using a special demo program with a graphical interface:
If everything works correctly and without failures, you can start setting up authentication. To do this, run the pam_fprint_enroll program, which will allow you to make a reference fingerprint, which will then be used to identify its owner:
The number 7 here means the index finger of the right hand. The fprint system numbers the fingers from left to right, so that the number 1 indicates the little finger of the left hand, and 10 indicates the little finger of the right hand.
When the cast is ready, add the pam_fprint module to the PAM modules stack of all applications. To do this, open the /etc/pam.d/common-auth file, find the same line “auth required pam_unix.so” and add the line in front of it, responsible for loading pam_fprint:
With the next login everything should work.

Fingers are not the only thing that distinguishes people from each other. We all have different faces, so the system can use a snapshot of the face taken by a webcam to identify the user. This is not particularly security, as the attacker can show the camera an ordinary photograph printed on paper, but it will make a very strong impression on friends and acquaintances.
Linux distributions do not have built-in face recognition tools, but you can add them by installing a software package called pam-face-authentication , which includes a library that implements a face recognition algorithm, a PAM module for authentication, and a reference snapshot application. .
All this can be collected from source or installed from third-party repositories in Ubuntu. Since the project is still raw, and the packages are not prepared for all distributions, we will consider both installation options. So, to install from source, we need packages with a compiler, linker and header files for all dependencies. In Ubuntu (and in other distributions) you can install them by executing one command:
Next, download the source from the project page and unpack:
Cmake is used for assembly, so everything is simple here:
You can use the antonio.chiurazzi repository to install an already precompiled package in Ubuntu:
After the installation is complete, launch the tutorial:
We turn the face in front of the camera, constantly pressing the "Capture" button. It is important to take at least a dozen photos so that the system learns to recognize your face from any angle. It will also be nice to take photos in different light conditions. Do not forget to test the system.
Now add the pam_face_authentication.so module to the stack of loaded PAM modules. To do this, open the file /etc/pam.d/gdm or /etc/pam.d/kdm (if you use KDE) and add the following line to its beginning:
The file /etc/pam.d/common-auth should not be changed, since it is used not only by graphical logon managers, but also by standard console / bin / login and / bin / su, and pam_face requires access to X.
You also need to create a profile for the new PAM module. Open (create) the file / usr / share / pam-configs / face_authentication with the following content:
And activate it:
Cell phone is a symbol of the 21st century. We have long been accustomed to the fact that it can be used not only for calls, but also for accessing the Internet, playing games, listening to music, watching videos, and even paying bills. But can it be used as a key to enter the computer system?
Of course yes. Like a USB flash drive, the phone has many features that make it unique. These are all the same manufacturer and model IDs, serial number, MAC address, IMEI, after all. Any of them can be used to uniquely identify the device and its owner, but we will focus only on one of them - the MAC address of the Bluetooth interface.
Anyone, even a very ancient and simple phone, has support for the Bluetooth protocol and, as a result, a unique MAC address that sends to the network in response to any request to search for devices with another Bluetooth adapter. Many modern laptops have such an adapter on board, and its external USB version costs a penny, so for us a blue tooth would be an ideal option for setting up password-free and wireless authentication. I went into the room - access is open, out - the system is locked.
We take the phone, turn on Bluetooth, make it so that it is “visible” to other devices. Sit at the computer and launch the hcitool utility (included in the bluez-utils package) in the device search mode:
We get the name of your device and its MAC address, copy the last one to the clipboard. Install the libpam_blue package (or pam_blue, where as):
Create the configuration file /etc/security/bluesscan.conf and write the following to it:
Save the file, open the already known /etc/pam.d/common-auth config and add the line
Now to log in it will be enough to put the phone next to the laptop and enter the name. The control will then be transferred to the pam_blue module, which will scan the network, find the phone's MAC address and let the user in. Otherwise, you will have to enter a password.
Setting up passwordless authentication using alternative methods in Linux is quite simple. You do not need to be an experienced geek, be able to write code or have deep knowledge in the field of security, everything is done in a few minutes and works amazingly efficiently. You can say that most of these methods are potentially unsafe and easy to get by, but before you do this, think about how safe ordinary passwords are.
The safety of a machine that outsiders can access is pure myth. To bypass the standard password protection is simple. There are a huge number of ways to do this, and they are all known even to children. The password is only a small index sign, which carries information that the company has an owner, and he does not want to see uninvited guests. By applying the methods described in the article, we will not make the system more vulnerable, but we can make our lives easier and more convenient.

Hacker Magazine, September (09) 152
Evgeny Zobnin ( execbit.ru ) .
Subscribe to "Hacker"
Passwords and accounts were invented in the era of large mainframes, the hippie movement, the war in Afghanistan and large analog tape recorders, the most technologically advanced component of which were transistors. In those days, using passwords to enter the mainframe looked really cool. You could come up with a combination like sexhero or iamsuperman and really be proud of yourself.
Today, passwords look not only archaic, but terribly inconvenient, old pontov combinations do not work anymore, and instead you have to invent furious character sets that are not only impossible to remember, but also difficult to enter the first time. We live in the XXI century, we have access to a huge number of gadgets and technical tools that offer a much simpler and higher-quality authentication mechanism, but continue to drive passwords, swearing at the whole apartment for each unsuccessful attempt to enter the system. It's time to fix it.
In this article, I will talk about how to get rid of passwords once and for all and turn your computer into a truly technological device, to enter which you just need to insert a USB flash drive, look in a webcam, or just put a cell phone on the table.
High tech key
The key is the easiest and most effective method of protecting anything. We use the keys daily: to turn on the car engine, to enter the apartment, to unlock drawers and cabinets. The keys are convenient and easy to manufacture, thanks to modern programmable locks are not afraid to lose them. Many times, humanity has tried to invent a replacement for the keys, but all attempts failed (we all remember what the idea of using combination locks on the access doors led to). Why do we not use such a good and time-tested technology to protect computers?
Modern analogue of the key - USB flash drive. Regardless of the purpose for which you usually use a USB flash drive, you can always make a full-featured high-tech key from it, which will make entering the system as easy as unlocking the apartment door.
There are several ways to do this, but the simplest and most universal method is to use the PAM_usb PAM module, which will check each USB flash drive inserted into the computer for its compliance with the specified requirements and, depending on the result, unlock or block the user account.
No modification of the partition table or information stored on the flash drive is required. To identify the "correct" flash drive, its serial number, model, manufacturer, as well as a set of random data are used that are recorded in the backup flash drive area and change with every successful authentication (if someone copies your flash drive, but you have time to log in before the attacker) , the data will be changed, and its copy will no longer work). In case of loss, there will always be an opportunity to log in using the password and recode pam_usb to a new USB flash drive. Also, as a key, you can use various memory cards (SD, MMC) and other removable drives.
Starting to use pam_usb is pretty simple. Full system setup consists of five steps.
')
1. Install the libpam_usb.so library and module management utilities:
$ sudo apt-get install libpam-usb pamusb-tools2. We take the flash drive, which we are going to use as a key, insert it into the USB port and execute the following command:
$ sudo pamusb-conf --add-deviceSo pam_usb will collect all the necessary information about the flash drive, add to its database and write 2 KB of random data. Udisks will be used to search for flash drives in the system (the “name” argument is used here to give the flash drive an arbitrary name and not to specify its device file), so it is important that other external drives are disabled during the operation of this command.
3. Now we give pam_usb to understand that this flash drive is associated with the account we need (the path will be vasya):
$ sudo pamusb-conf --add-user vasya4. Run the validation of the collected data in case the flash drive was not correctly identified. Or we forgot to disconnect some other drive, and it was used instead of the one we need:
$ sudo pamusb-check vasya5. Add pam_usb to the list of modules required for successful user authentication. On Ubuntu and other Debian-based distributions, this is done by modifying the /etc/pam.d/common-auth file. It is necessary to find a line of the following form in it (it may differ):
auth required pam_unix.so . And right in front of it add the following line: auth sufficient pam_usb.so .So we will inform PAM that before the login of any user, you need to give control to the pam_usb module, which will check the availability of the necessary flash drive, and only in case of failure of this operation to request a password. Therefore, if you want to let the user in only on a flash drive, completely blocking the account in case of failure, the word “sufficient” should be replaced with the word “required”.
In principle, all of this should be enough for the system to simply work (try to log out and log in to check it), however, the functionality of pam_usb can be slightly extended if you use the pamusb-agent daemon.
The task of pamusb-agent is to automate the work of blocking and unlocking a user account when removing and inserting a flash drive into a PC. In order for the agent to work, you need to add the following lines to the /etc/pamusb.conf configuration file:
<user id="_">
<device>_</device>
...
<agent event="lock">gnome-screensaver-command --lock</agent>
<agent event="unlock">gnome-screensaver-command --deactivate</agent>
...</user>
This is a recipe for Gnome. To use pamusb-agent with other environments, the "gnome-screensaver-command --lock" and "gnome-screensaver-command --deactivate" commands need to be changed.
Now you can run pamusb-agent and check its performance:
$ pamusb-agentIf everything works fine, you can add it to autorun:
$ cd ~/.config/autostart
$ ln -s /usr/bin/pamusb-agent pamusb-agent
Running around your fingers?
The pam_usb module is conveniently used as a protection method for laptops equipped with a card reader. You can carry a small SD card in your wallet or inside pocket and stick it in a laptop without worrying about what it will interfere with (as is the case with a USB flash drive). However, this approach will look somewhat archaic if the laptop is already equipped with a fingerprint scanner.
Laptops with a fingerprint scanner produced by many manufacturers. As a rule, they are not much more expensive than other models with similar characteristics, but their fingerprint sensor works only in Windows. To eliminate this drawback, freedesktop.org launched the fprint project, which developed an open library implementation for fingerprint recognition and a corresponding PAM module that allows the use of the library's capabilities during user login and other account manipulations.
Today, libfprint is in any distribution, so you can install it using any package manager:
$ sudo apt-get install libfprint0 libpam-fprint fprint-demoNext, the scanner can be checked using a special demo program with a graphical interface:
$ fprint_demoIf everything works correctly and without failures, you can start setting up authentication. To do this, run the pam_fprint_enroll program, which will allow you to make a reference fingerprint, which will then be used to identify its owner:
# pam_fprint_enroll –enroll-finger 7The number 7 here means the index finger of the right hand. The fprint system numbers the fingers from left to right, so that the number 1 indicates the little finger of the left hand, and 10 indicates the little finger of the right hand.
When the cast is ready, add the pam_fprint module to the PAM modules stack of all applications. To do this, open the /etc/pam.d/common-auth file, find the same line “auth required pam_unix.so” and add the line in front of it, responsible for loading pam_fprint:
auth sufficient pam_fprint.so .With the next login everything should work.
Add the pam_usb and pam_fprint modules to the PAM stack
Memory on faces
Fingers are not the only thing that distinguishes people from each other. We all have different faces, so the system can use a snapshot of the face taken by a webcam to identify the user. This is not particularly security, as the attacker can show the camera an ordinary photograph printed on paper, but it will make a very strong impression on friends and acquaintances.
Linux distributions do not have built-in face recognition tools, but you can add them by installing a software package called pam-face-authentication , which includes a library that implements a face recognition algorithm, a PAM module for authentication, and a reference snapshot application. .
All this can be collected from source or installed from third-party repositories in Ubuntu. Since the project is still raw, and the packages are not prepared for all distributions, we will consider both installation options. So, to install from source, we need packages with a compiler, linker and header files for all dependencies. In Ubuntu (and in other distributions) you can install them by executing one command:
$ sudo apt-get install build-essential cmake qt4-qmake libx11-dev libcv-dev libcvaux-dev libhighgui4 libhighgui-dev libqt4-dev libpam0g-devNext, download the source from the project page and unpack:
$ cd
$ wget goo.gl/dpD1s
$ tar -xzf pam-face-authentication-0.3.tar.gz
Cmake is used for assembly, so everything is simple here:
$ cd pam-face-authentication-0.3
$ cmake && make
$ sudo make install
You can use the antonio.chiurazzi repository to install an already precompiled package in Ubuntu:
$ sudo add-apt-repository ppa:antonio.chiurazzi/ppa
$ sudo apt-get update
$ sudo apt-get install pam-face-authentication
After the installation is complete, launch the tutorial:
$ qt-facetrainerWe turn the face in front of the camera, constantly pressing the "Capture" button. It is important to take at least a dozen photos so that the system learns to recognize your face from any angle. It will also be nice to take photos in different light conditions. Do not forget to test the system.
Now add the pam_face_authentication.so module to the stack of loaded PAM modules. To do this, open the file /etc/pam.d/gdm or /etc/pam.d/kdm (if you use KDE) and add the following line to its beginning:
auth sufficient pam_face_authentication.so enableX /The file /etc/pam.d/common-auth should not be changed, since it is used not only by graphical logon managers, but also by standard console / bin / login and / bin / su, and pam_face requires access to X.
You also need to create a profile for the new PAM module. Open (create) the file / usr / share / pam-configs / face_authentication with the following content:
Name: Manually installed face_authentication profile
Default: yes
Priority: 900
Auth-Type: Primary
Auth:
[success=end default=ignore] pam_face_authentication.so enableX
And activate it:
$ sudo pam-auth-update --package face_authenticationKey from the phone
Cell phone is a symbol of the 21st century. We have long been accustomed to the fact that it can be used not only for calls, but also for accessing the Internet, playing games, listening to music, watching videos, and even paying bills. But can it be used as a key to enter the computer system?
Of course yes. Like a USB flash drive, the phone has many features that make it unique. These are all the same manufacturer and model IDs, serial number, MAC address, IMEI, after all. Any of them can be used to uniquely identify the device and its owner, but we will focus only on one of them - the MAC address of the Bluetooth interface.
Anyone, even a very ancient and simple phone, has support for the Bluetooth protocol and, as a result, a unique MAC address that sends to the network in response to any request to search for devices with another Bluetooth adapter. Many modern laptops have such an adapter on board, and its external USB version costs a penny, so for us a blue tooth would be an ideal option for setting up password-free and wireless authentication. I went into the room - access is open, out - the system is locked.
We take the phone, turn on Bluetooth, make it so that it is “visible” to other devices. Sit at the computer and launch the hcitool utility (included in the bluez-utils package) in the device search mode:
$ hcitool scanWe get the name of your device and its MAC address, copy the last one to the clipboard. Install the libpam_blue package (or pam_blue, where as):
$ sudo apt-get install libpam_blueCreate the configuration file /etc/security/bluesscan.conf and write the following to it:
#
general {
# ( 3 15)
timeout = 15;
}

#
mylogin = {
name = ;
bluemac = MAC- ;
}
Save the file, open the already known /etc/pam.d/common-auth config and add the line
auth sufficient pam_blue.so before the line containing “pam_unix.so”.Now to log in it will be enough to put the phone next to the laptop and enter the name. The control will then be transferred to the pam_blue module, which will scan the network, find the phone's MAC address and let the user in. Otherwise, you will have to enter a password.
findings
Setting up passwordless authentication using alternative methods in Linux is quite simple. You do not need to be an experienced geek, be able to write code or have deep knowledge in the field of security, everything is done in a few minutes and works amazingly efficiently. You can say that most of these methods are potentially unsafe and easy to get by, but before you do this, think about how safe ordinary passwords are.
The safety of a machine that outsiders can access is pure myth. To bypass the standard password protection is simple. There are a huge number of ways to do this, and they are all known even to children. The password is only a small index sign, which carries information that the company has an owner, and he does not want to see uninvited guests. By applying the methods described in the article, we will not make the system more vulnerable, but we can make our lives easier and more convenient.
The equivalent of the /etc/pam.d/common-auth file in Gentoo and Mandriva is /etc/pam.d/system-auth, in FreeBSD it is replaced by /etc/pam.d/system. In ArchLinux, you will have to edit PAM configs for each application separately.
Another way to protect the machine from intrusion is to remotely create the file / etc / nologin using any mobile SSH client. To unlock you will have to log in as root and delete this file.
Hacker Magazine, September (09) 152
Evgeny Zobnin ( execbit.ru ) .
Subscribe to "Hacker"
Source: https://habr.com/ru/post/127384/
All Articles