Cocos2d-x: Building a project for Android
In the previous article, we learned how easy it is to start writing your game using the cross-platform cocos2d-x engine and learned how to run our application on a Win32 platform. But this is not enough, because the main goal is the development of mobile devices. In this article we will put together a project for the Android operating system.
We will work with the project from the previous article . Consistently install and configure the following software: JDK and JRE, Android SDK and Eclipse + ADT development environment plugin. The installation of this tool is described in many articles, for example, in this one . We also need the Android NDK library, cocos2d-x on the site, I do not recommend using the official version, and send everyone to Dmitry Moskalchuk's site. From there, download the version we need (I will use r5 ). After downloading, unpack the archive into any convenient folder (for example: C: \ android \ android-ndk-r5-crystax-1 \ ). To compile the native code we need cygwin , version no less than 1.7. Download setup.exe, run, select the installation from the Internet, specify the path, server, etc.
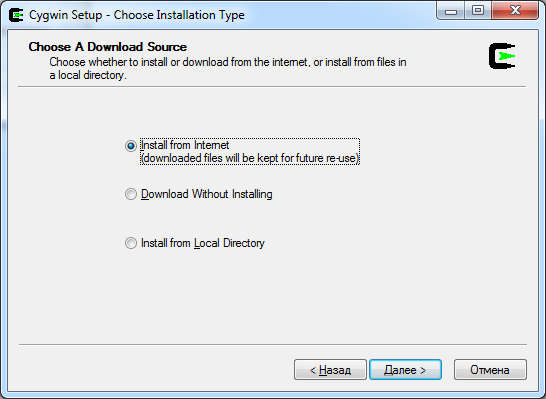
It is important that when we get to the installation package selection window, tick the make package (enter the word make in the Search field).

Everything is set and ready to go, we can continue.
In order not to lose our source files, rename our project folder MyCocosProject, for example, name it MyCocosProject1 (do not forget to close VisualStudio). Then edit the create-android-project.bat file, it is located in the working directory where cocos2d-x is installed, in the same place as our MyCocosProject project (in my case, the directory is c: \ android \ rep \ cocos2d-1.0.1-x- 0.9.1 \ ). Open the file in a text editor and change the paths to the cygwin, Android SDK Tools and NDK directories in the lines below:
After the change, I got the following lines:
')
Save the file.
In the process of writing the article, a small “ bug ” was found. In the new release ( 1.0.1-x-0.9.1 ) of the cocos2d-x library, the developers decided to replace the name of the resource folder with resources in order to bring to the general view projects for iPhone and for Android. But, as often happens, having changed it in one place, they forgot to change it in another. Perhaps the developers have already fixed this error, and maybe not. We will fix the bug ourselves. Go to the folder \ template \ android \ , look for the file build_native.sh and in notepad (it’s better not to use a standard notepad) edit the line:
replacing it with:
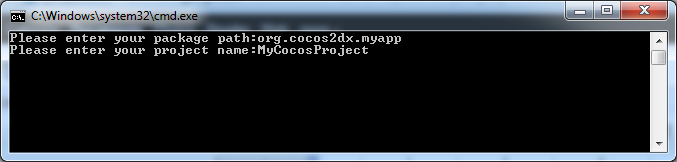
Launch our new create-android-project.bat . In the console window, we will be prompted to enter the name of the java package (enter org.cocos2dx.myapp ), and the name of our project (enter MyCocosProject ).
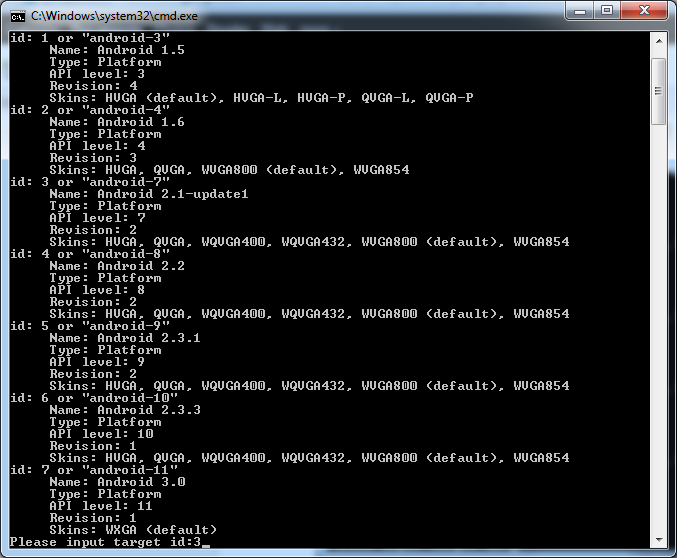
The last thing we’ll be asked for is the Android version ID. For example, for version 2.1 it is required to specify 3 , and for 2.2 - 4 and so on. We will use version 2.1, so enter 3 .
Press Enter and wait for the end of the process. The script creates a folder with the name of the project that we entered, i.e. MyCocosProject and generates a template java project in it. Copy there all the directories and files from the previously saved MyCocosProject1 folder, also rewrite the resource files from the Resource directory to the Resources folder (this is a consequence of the above “ bug ”, most likely this is a temporary problem and the developers will agree on the names of the folders for various platforms in a short time) . Now everything is ready to compile the project for Android.
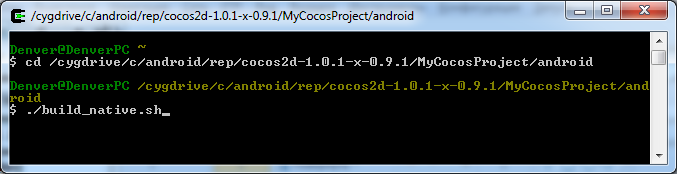
Run CygWin and use the cd command ( cd /cygdrive/c/android/rep/cocos2d-1.0.1-x-0.9.1/MyCocosProject/android ), go to our folder, then execute the file build_native.sh ( ./build_native) .sh )
If everything was done correctly, then we get the compiled libraries libcocos2d.so , libcocosdenshion.so and libgame.so at the output .
Open, ready to go, Eclipse and create a new Android project ( New-> Project, Android project ). It is important that the project name coincides with the name of our project generated by the script, i.e. MyCocosProject . We tick off the Create project from existing source . In the Location field, specify the path of our project ( C: \ android \ rep \ cocos2d-1.0.1-x-0.9.1 \ MyCocosProject \ android \ ). Api choose Android 2.1. Click Finish . The project is ready. Run it on the emulator with the version of the SDK 2.1. And what we see:
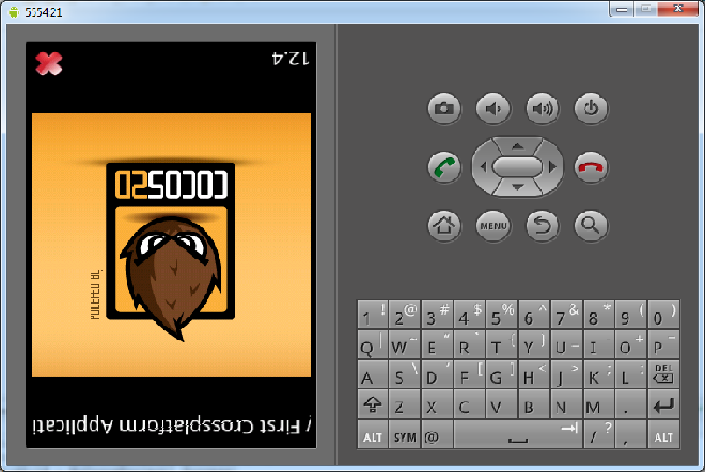
The picture is displayed upside down, the text and the exit button are not where they should be. Let's open the AppDelegate.cpp file and find the following line:
it was she who influenced the wrong display. At first glance, in this code, everything looks logical, but probably the developers have not yet brought to mind the universality of the code for different platforms. In our case, you can comment out this line or write the following construction:
To successfully launch a project after changing the source code, you first need to clean up the project ( Project-> Clean ) in Eclipse. Then in the cygwin console, re-run build_native.sh ( ./build_native.sh ) and after that start the project in Eclipse. After the changes we get the following picture:
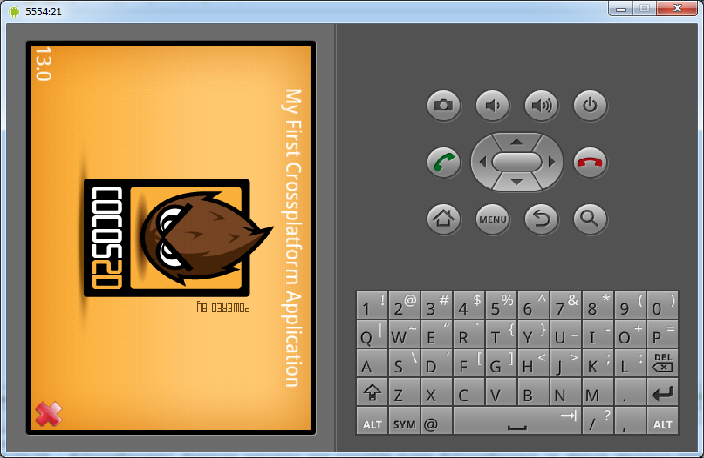
In the end, we achieved what we wanted. Our project is successfully launched on the Android device emulator.
Software installation
We will work with the project from the previous article . Consistently install and configure the following software: JDK and JRE, Android SDK and Eclipse + ADT development environment plugin. The installation of this tool is described in many articles, for example, in this one . We also need the Android NDK library, cocos2d-x on the site, I do not recommend using the official version, and send everyone to Dmitry Moskalchuk's site. From there, download the version we need (I will use r5 ). After downloading, unpack the archive into any convenient folder (for example: C: \ android \ android-ndk-r5-crystax-1 \ ). To compile the native code we need cygwin , version no less than 1.7. Download setup.exe, run, select the installation from the Internet, specify the path, server, etc.
It is important that when we get to the installation package selection window, tick the make package (enter the word make in the Search field).
Everything is set and ready to go, we can continue.
Customization
In order not to lose our source files, rename our project folder MyCocosProject, for example, name it MyCocosProject1 (do not forget to close VisualStudio). Then edit the create-android-project.bat file, it is located in the working directory where cocos2d-x is installed, in the same place as our MyCocosProject project (in my case, the directory is c: \ android \ rep \ cocos2d-1.0.1-x- 0.9.1 \ ). Open the file in a text editor and change the paths to the cygwin, Android SDK Tools and NDK directories in the lines below:
set _CYGBIN=f:\cygwin\bin
set _ANDROIDTOOLS=d:\android-sdk\tools
set _NDKROOT=e:\android-ndk-r5
After the change, I got the following lines:
')
set _CYGBIN=:\cygwin\bin
set _ANDROIDTOOLS=c:\android\android-sdk-windows\tools
set _NDKROOT=c:\android\android-ndk-r5-crystax-1
Save the file.
In the process of writing the article, a small “ bug ” was found. In the new release ( 1.0.1-x-0.9.1 ) of the cocos2d-x library, the developers decided to replace the name of the resource folder with resources in order to bring to the general view projects for iPhone and for Android. But, as often happens, having changed it in one place, they forgot to change it in another. Perhaps the developers have already fixed this error, and maybe not. We will fix the bug ourselves. Go to the folder \ template \ android \ , look for the file build_native.sh and in notepad (it’s better not to use a standard notepad) edit the line:
RESOURCE_ROOT=$GAME_ROOT/Resourcereplacing it with:
RESOURCE_ROOT=$GAME_ROOT/ResourcesLaunch our new create-android-project.bat . In the console window, we will be prompted to enter the name of the java package (enter org.cocos2dx.myapp ), and the name of our project (enter MyCocosProject ).
The last thing we’ll be asked for is the Android version ID. For example, for version 2.1 it is required to specify 3 , and for 2.2 - 4 and so on. We will use version 2.1, so enter 3 .
Press Enter and wait for the end of the process. The script creates a folder with the name of the project that we entered, i.e. MyCocosProject and generates a template java project in it. Copy there all the directories and files from the previously saved MyCocosProject1 folder, also rewrite the resource files from the Resource directory to the Resources folder (this is a consequence of the above “ bug ”, most likely this is a temporary problem and the developers will agree on the names of the folders for various platforms in a short time) . Now everything is ready to compile the project for Android.
Assembly
Run CygWin and use the cd command ( cd /cygdrive/c/android/rep/cocos2d-1.0.1-x-0.9.1/MyCocosProject/android ), go to our folder, then execute the file build_native.sh ( ./build_native) .sh )
If everything was done correctly, then we get the compiled libraries libcocos2d.so , libcocosdenshion.so and libgame.so at the output .
Open, ready to go, Eclipse and create a new Android project ( New-> Project, Android project ). It is important that the project name coincides with the name of our project generated by the script, i.e. MyCocosProject . We tick off the Create project from existing source . In the Location field, specify the path of our project ( C: \ android \ rep \ cocos2d-1.0.1-x-0.9.1 \ MyCocosProject \ android \ ). Api choose Android 2.1. Click Finish . The project is ready. Run it on the emulator with the version of the SDK 2.1. And what we see:
The picture is displayed upside down, the text and the exit button are not where they should be. Let's open the AppDelegate.cpp file and find the following line:
// sets landscape mode
pDirector->setDeviceOrientation(kCCDeviceOrientationLandscapeLeft);
it was she who influenced the wrong display. At first glance, in this code, everything looks logical, but probably the developers have not yet brought to mind the universality of the code for different platforms. In our case, you can comment out this line or write the following construction:
#if (CC_TARGET_PLATFORM == CC_PLATFORM_WIN32)
// sets landscape mode
pDirector->setDeviceOrientation(kCCDeviceOrientationLandscapeLeft);
#endif
To successfully launch a project after changing the source code, you first need to clean up the project ( Project-> Clean ) in Eclipse. Then in the cygwin console, re-run build_native.sh ( ./build_native.sh ) and after that start the project in Eclipse. After the changes we get the following picture:
In the end, we achieved what we wanted. Our project is successfully launched on the Android device emulator.
Source: https://habr.com/ru/post/127220/
All Articles