Authorization via VKontakte, Mail.ru and others - 3 (VKontakte and OAuth)
In the last two parts, we made authorization via VKontakte using the javascript widget provided by them and via Mail.ru using both the JS API and server-server interaction. Today we will correct our omission regarding VKontakte and consider authorization via VKontakte without using client javascript.
As a link to authorization, we can use any element, such as a picture.

, issued in a similar way with reference to authorization via mail.ru.
Link we will have the following form:
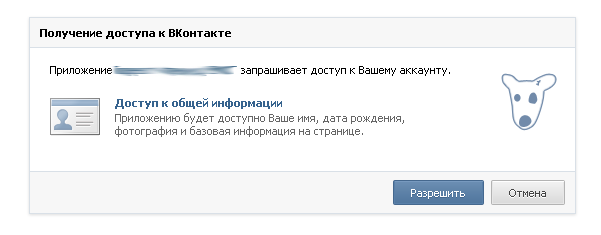
The mechanism for working with a Contact is as follows: the user follows the link, passing the number of our application to the Contact, the access parameters that our application wants to receive in the scope parameter, the URI to redirect, both in the case of the user's consent and in the event of his refusal to give access to our application. The response_type = code parameter is required in case of authorization through OAuth. We want to get only basic user data and so far we don’t want to post on its wall and send messages to it, so the scope parameter is empty.
After the user allows us access, he will be redirected to the page specified in the redirect_uri parameter in the following form:
Although the documentation indicates such an example (with the addition of http: //) before the transmitted value, as practice shows, you can safely pass full addresses, the protocol address is added only when it is needed.
In case the user refuses us (this is also important to remember), then he will be redirected to the _http: // REDIRECT_URI? Error = access_denied & error_reason = user_denied & error_description = User + denied + your + request
The code parameter that came with the response is used to obtain an access key (access_token), with which we will actually collect user data. In order to use the received code, we have exactly one hour.
To get access_token you can use the following code:
In this example, _APP_ID_ is the number of your application, and _CLIENT_SECRET_ is the secret key, we get on the application settings page.
In $ response-> access_token we will get the access key we need, and $ response-> user_id will give us the VKontakte user number. In case of any errors, the $ response-> error will be non-empty and there will be a brief description of the error in $ response-> error_description.
You can execute requests to the API by receiving both XML responses, and JSON, by retrieving the contents of the api.vkontakte.ru/method/METHOD_NAME.xml?PARAMETERS&access_token=ACCESS_TOKEN page for the first case and api.vkontakte.ru/method/METHOD_NAME?PARAMETERS&actophractactatset. . For myself, I chose JSON since the interaction with this social network begins with it.
You can view the full list of API methods on the wiki page in the section for developers, there are quite a lot of them, however, we will only need getProfiles, which returns extended information about the profiles of one or several users.
In the $ arrResponse array, we have an array of “user” objects that we will be given exactly what we specify in the fields parameter (the valid parameters are uid, first_name, last_name, nickname, screen_name, sex, bdate (birthdate), city, country, timezone, photo, photo_medium, photo_big, has_mobile, rate, contacts, education, online, however some, for example, uid and first_name come without explicit indication). In addition, a brilliant thing is available to us - we can indicate the case of the declension of the name. This most useful thing can be used on your website by performing a search by name and getting the names from the contact in the right declension.
The only thing we need from the answer is: $ response [0] -> uid, $ response [0] -> photo (for avatars), $ response [0] -> first_name and $ response [0] -> last_name, of which we'll glue the username displayed.
The following list of actions is similar to my first article : check if we have such a user, if there is, update the avatar and user name, if not, create an entry in the database, authorize it on the site and redirect to the main page.
As a link to authorization, we can use any element, such as a picture.
, issued in a similar way with reference to authorization via mail.ru.
Link we will have the following form:
api.vkontakte.ru/oauth/authorize?client_id=2445355&scope=&redirect_uri=_REDIRECT_URI_&response_type=codeThe mechanism for working with a Contact is as follows: the user follows the link, passing the number of our application to the Contact, the access parameters that our application wants to receive in the scope parameter, the URI to redirect, both in the case of the user's consent and in the event of his refusal to give access to our application. The response_type = code parameter is required in case of authorization through OAuth. We want to get only basic user data and so far we don’t want to post on its wall and send messages to it, so the scope parameter is empty.
After the user allows us access, he will be redirected to the page specified in the redirect_uri parameter in the following form:
_http://REDIRECT_URI?code=7a6fa4dff77a228eeda56603b8fAlthough the documentation indicates such an example (with the addition of http: //) before the transmitted value, as practice shows, you can safely pass full addresses, the protocol address is added only when it is needed.
In case the user refuses us (this is also important to remember), then he will be redirected to the _http: // REDIRECT_URI? Error = access_denied & error_reason = user_denied & error_description = User + denied + your + request
The code parameter that came with the response is used to obtain an access key (access_token), with which we will actually collect user data. In order to use the received code, we have exactly one hour.
To get access_token you can use the following code:
$url = "https://api.vkontakte.ru/oauth/access_token?client_id=_APP_ID_&client_secret=_CLIENT_SECRET_&code=" . $_REQUEST[ 'code' ];
$response = json_decode(@file_get_contents($url));
if ($response->error) {
die(' - ');
}
In this example, _APP_ID_ is the number of your application, and _CLIENT_SECRET_ is the secret key, we get on the application settings page.
In $ response-> access_token we will get the access key we need, and $ response-> user_id will give us the VKontakte user number. In case of any errors, the $ response-> error will be non-empty and there will be a brief description of the error in $ response-> error_description.
You can execute requests to the API by receiving both XML responses, and JSON, by retrieving the contents of the api.vkontakte.ru/method/METHOD_NAME.xml?PARAMETERS&access_token=ACCESS_TOKEN page for the first case and api.vkontakte.ru/method/METHOD_NAME?PARAMETERS&actophractactatset. . For myself, I chose JSON since the interaction with this social network begins with it.
You can view the full list of API methods on the wiki page in the section for developers, there are quite a lot of them, however, we will only need getProfiles, which returns extended information about the profiles of one or several users.
$arrResponse = json_decode(@file_get_contents( "https://api.vkontakte.ru/method/getProfiles?uid={$response->user_id}&access_token={$response->access_token}&fields=photo" ))->response;
In the $ arrResponse array, we have an array of “user” objects that we will be given exactly what we specify in the fields parameter (the valid parameters are uid, first_name, last_name, nickname, screen_name, sex, bdate (birthdate), city, country, timezone, photo, photo_medium, photo_big, has_mobile, rate, contacts, education, online, however some, for example, uid and first_name come without explicit indication). In addition, a brilliant thing is available to us - we can indicate the case of the declension of the name. This most useful thing can be used on your website by performing a search by name and getting the names from the contact in the right declension.
The only thing we need from the answer is: $ response [0] -> uid, $ response [0] -> photo (for avatars), $ response [0] -> first_name and $ response [0] -> last_name, of which we'll glue the username displayed.
The following list of actions is similar to my first article : check if we have such a user, if there is, update the avatar and user name, if not, create an entry in the database, authorize it on the site and redirect to the main page.
')
Source: https://habr.com/ru/post/127179/
All Articles