Full replacement of Denwer or deploy Ubuntu-server on VMware (Part 1)
All those who develop websites under windows, probably faced various problems after launching the website on the server. These problems appear because servers usually work under Linux OS. In addition, from time to time there are very interesting things like NodeJS (ported to win, but not immediately), which I really want to twist, but you can't - they are not on windows. However, with all these flaws I don’t want to go away from windows, because here there are a lot of advantages and familiar ones after all.
But do not be upset, because there is virtualization, which hurries to our aid.
There are many different programs to solve this problem, I will use the VMware player.
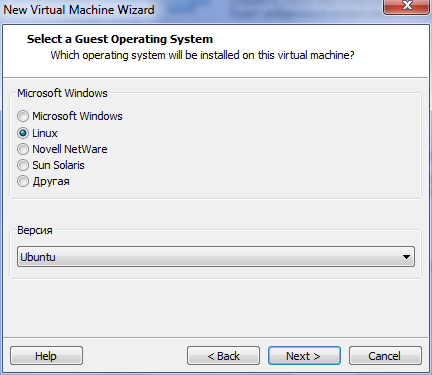
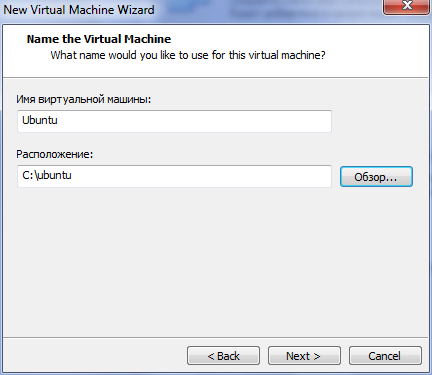
We start VMware player and go to the "Create a new VM." Then we do everything as on the screen or at its discretion (depending on the resources available to you).
')
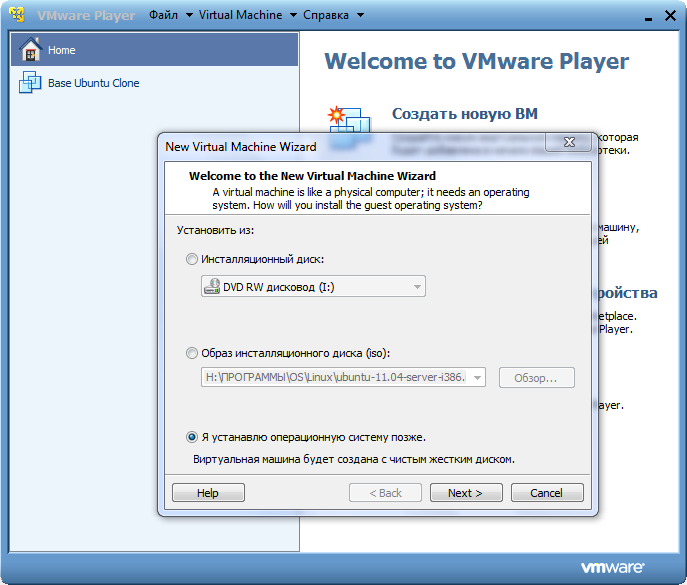


After completing the VM creation process, the virtual machine you created will appear in the right column.

Now, it needs to be configured. Go to the settings “Change virtual machine settings”> CD / DVD (IDE). Put the switch on «Use iso image file» and select the image of our Ubuntu.
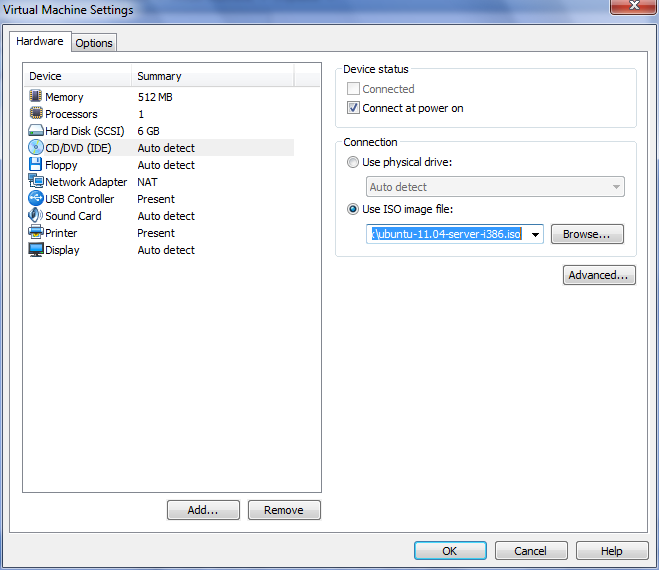
Now go to the section "Network Adapter" and set the NAT.
We launch our VM “Start Virtual Machine”. And follow the steps.
Wait while the partitions are formatted and the system components are installed. After that, you will be asked to enter the full username. Think up a name from Latin small letters, for example: Claud is me :).
And so Ubuntu is installed and running (if not, then start the virtual machine again). Log in to Ubuntu under your account (username and password that you entered during the installation of Ubuntu).
Now we have a console available. According to this, perform the installation of a couple of necessary programs.
Now it's time to go to our main window and connect to the server via ssh.
To do this, download the putty , launch it, and in the session settings we specify our IP address (see: “IP of our Ubuntu”).

All now you can safely connect to our guest OS (Ubuntu) over SSH.
That's all. In the second part, I will tell you how to mount a shared folder from windows to Ubuntu, and work with it as a locally directory. In the meantime, you’ll do php configuration (PHP-FPM is already built in versions over 5.3.3) + nginx + MySQL + something else. The benefit of detailed guides in this case is complete.
First of all, it is for beginners, and I myself am in the administration of Linux, I am at the novice level + 1 (that is, only what I need on duty). Therefore, if I made a mistake somewhere, then the comments of the pros are welcome.
Full replacement of Denwer or deploy Ubuntu-server on VMware (part 2)
But do not be upset, because there is virtualization, which hurries to our aid.
Create a virtual machine
There are many different programs to solve this problem, I will use the VMware player.
We start VMware player and go to the "Create a new VM." Then we do everything as on the screen or at its discretion (depending on the resources available to you).
')
After completing the VM creation process, the virtual machine you created will appear in the right column.
Now, it needs to be configured. Go to the settings “Change virtual machine settings”> CD / DVD (IDE). Put the switch on «Use iso image file» and select the image of our Ubuntu.
Note
Ubuntu naturally need to be downloaded from the official site. I chose Ubuntu 11.04 x32, because x64 I did not run (it seems because of the lack of support for hardware virtualization).
Now go to the section "Network Adapter" and set the NAT.
We put Ubuntu
We launch our VM “Start Virtual Machine”. And follow the steps.
- In the Language window, select the language "Russian".
- Next, select Install Ubuntu Server.
- Select a country and region (region) - Russian Federation.
- Define keyboard layout? - Not.
- Who is the keyboard for? - Russia.
- Keyboard layout - Russia.
- The way to switch between the national and Latin layout is Control + Shift.
- The main network interface (it may not appear if there is only one network card in the system), but this does not suit us. For this, press the Escape key and configure the network manually.
- IP-address - free local IP-address in your local network (for example: mine, 192.168.80.3).
Note
IP select as follows: start> all programs> VMware> Virtual Network Editor
Here we are interested in the VMnet8 interface (select it) and go to the NAT Settings. Now memorize or write down Gateway IP. I have it 192.168.80.2, which means my network is 192.168.80.x (you probably have others). Also on the network is already busy IP 192.168.80.1 - it is at the main OS (windows). According to this, our Ubuntu IP will be 192.168.80.3 (do not forget that this “192.168.80.” You have your own part). - The subnet mask is 255.255.255.0.
- Gateway - enter the IP address of the LAN gateway to access the Internet. This is your gateway ip.
- DNS server addresses - usually the same as the gateway, just press Enter if this is the case; otherwise, enter the required IP address of the DNS server.
- Computer name - any name in Latin letters.
- Domain name.
- Time setting window. If there is Internet, it will be determined automatically. If it was not determined correctly, the tone question is “Is this time zone correct?” - answer “no” and select your time zone from the list (for example, Europe / Moscow).
- Layout method (disk layout) - Auto — use the entire disk and configure LVM.
- Select a disk to partition - select (usually it is one).
- Delete existing data from the logical volume - Yes.
- Write changes to disk and configure LVM - Yes.
- The size of the volume group used for the installation - just press Enter.
- Write changes to disk - Yes.
Wait while the partitions are formatted and the system components are installed. After that, you will be asked to enter the full username. Think up a name from Latin small letters, for example: Claud is me :).
- Your account name - press Enter.
- Enter the password for the new user.
- Encrypt home directory - no.
- Information about HTTP proxy - do not enter anything, press Enter (if there is no proxy, leave the field blank).
- How do you want to manage system updates? - Without automatic updates.
- Select software to install - select only OpenSSH server.
- Install the GRUB bootloader in the master boot record? - Yes.
- When a warning appears that the installation is complete, remove the disk from the drive. Re-enter the virtual machine's CD / DVD (IDE) section and set the switch to “Use physical drive” (Auto detect).
- Installation completed.
Running ubuntu
And so Ubuntu is installed and running (if not, then start the virtual machine again). Log in to Ubuntu under your account (username and password that you entered during the installation of Ubuntu).
Now we have a console available. According to this, perform the installation of a couple of necessary programs.
- We update the list of packages and then - completely - the system:
sudo apt-get update
sudo apt-get upgrade - If the SSH server was not installed during the installation of the system, we do it now.
sudo apt-get install openssh-server - Install the package "ntp", which will provide us with automatic time synchronization:
sudo apt-get install ntp ntpdate - Now you can check the configuration of network interfaces.
ifconfig
If they coincide with what you entered when installing Ubuntu, then skip the next two points. - We configure network interfaces. To do this, enter the command:
sudo nano -w /etc/network/interfaces
and edit the settings (do not forget your IP is different).auto lo
iface lo inet loopback
# The primary network interface
auto eth0
iface eth0 inet static
address 192.168.80.3
netmask 255.255.255.0
network 192.168.80.0
broadcast 192.168.80.255
gateway 192.168.80.2
# dns-* options are implemented by the resolvconf package, if installed
dns-nameservers 192.168.80.2
dns-search localdomain - If you edited the settings of network interfaces, then restart the network service:
sudo /etc/init.d/networking restart
Now it's time to go to our main window and connect to the server via ssh.
To do this, download the putty , launch it, and in the session settings we specify our IP address (see: “IP of our Ubuntu”).
All now you can safely connect to our guest OS (Ubuntu) over SSH.
That's all. In the second part, I will tell you how to mount a shared folder from windows to Ubuntu, and work with it as a locally directory. In the meantime, you’ll do php configuration (PHP-FPM is already built in versions over 5.3.3) + nginx + MySQL + something else. The benefit of detailed guides in this case is complete.
A few words about leadership
First of all, it is for beginners, and I myself am in the administration of Linux, I am at the novice level + 1 (that is, only what I need on duty). Therefore, if I made a mistake somewhere, then the comments of the pros are welcome.
Full replacement of Denwer or deploy Ubuntu-server on VMware (part 2)
Source: https://habr.com/ru/post/127090/
All Articles