Create a font that imitates your handwriting.
High school students and university students, often doing homework, have to perform a large number of written exercises. For example, our social studies teacher each lesson asks us a DM, which means that we find material in a library or the Internet, and write it by hand (only for this you can get an “excellent” grade), even if the material found is correct, but printed out on the computer, do not expect higher than four ...
Based on the foregoing, I came to the conclusion: you need to make a font for a computer that duplicates my handwriting. In my opinion, I did it successfully. Native mother will not distinguish where I wrote by hand, and where I typed the computer. Many of my friends liked this idea, and they began to ask me how I did it all. And in order not to explain to each of them a hundred times, I decided to write this article - a plan for carrying out the work with detailed comments.
So, in this article I will tell you how to make a font that imitates your handwriting.
To work we need:
1) sheets of blank paper in A4 format;
2) black gel pen;
3) a printer;
4) scanner;
5) the program High-Logic FontCreator (I suggest to download from the official site of the program).
To download click on the proposed link .
')
Take an album sheet of paper and write on it all the letters of the Russian alphabet (lowercase and uppercase), numbers from zero to nine and punctuation marks: period, comma, semicolon, colon, quotes, dashes, brackets, etc. If you need someone, you can add other characters that will be useful to you when writing, such as @, №, $, #, ^,%, *, etc. Write nicely, output each letter so that all your work will not go down the drain.
Scan a sheet with written letters. And those people who managed to write all the characters on one page will end up with one big picture.
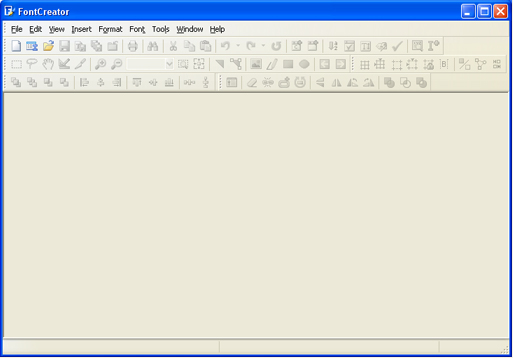
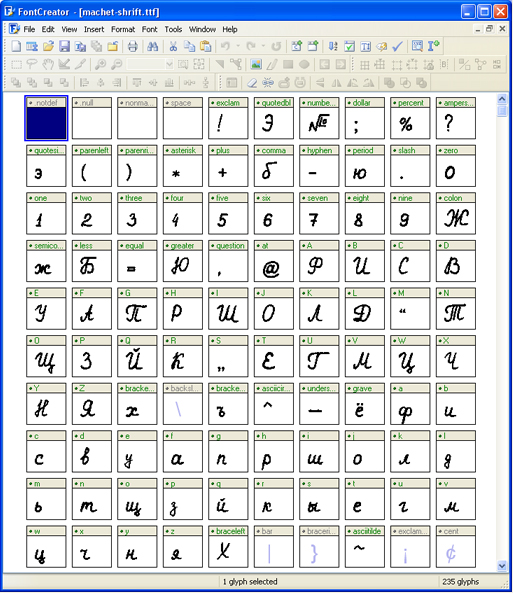
Then open the program FontCreator from the manufacturer High-Logic. Her window looks like this.
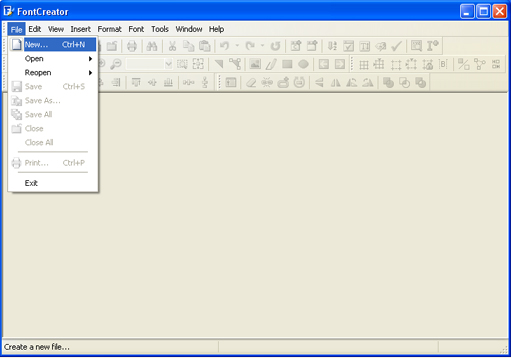
File - New ...
In the window that appears, you need to enter the name of your future font.
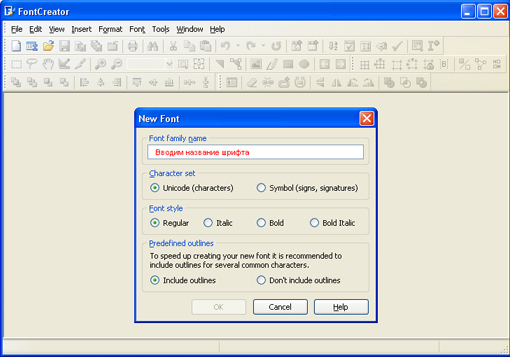
Click "OK" - a trace appears. window.
In this window, open the picture with your letters. Select the letter “A”, copy it and return to FontCreator, open the cell with the letter “F” and insert your letter there. Red dashed lines can be moved, arrange them as shown in the following figure.
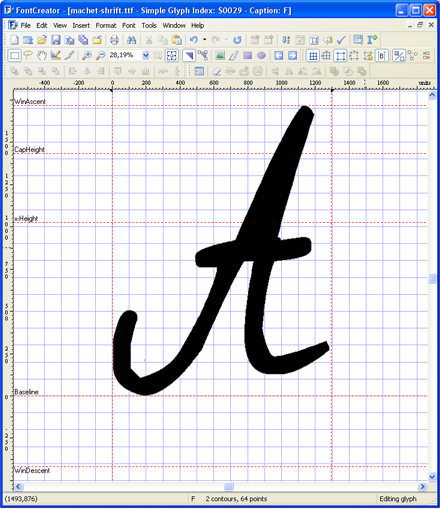
The letter must stand on the line (Baseline) and must NOT crawl beyond the upper horizontal line (WinAscent), nor should it crawl beyond the lower horizontal line (WinDescent), otherwise it will be cut off. The vertical left line should stand where the letter begins, and the vertical right line where the letter ends. If a letter comes out of vertical lines, then when typing there will be an imposition of one letter on another, this also does not suit us.
Now I will explain why we inserted the letter “A” into the cell with the letter “F”. This program is designed to create fonts using Latin letters. We, on the contrary, need to make a font for Russian letters. Therefore the font RUSSIAN made by us will turn out on the LATIN layout. In order to make it more convenient, we will insert Russian letters into the cells with Latin letters, in accordance with the keyboard.
In the cell with the letter "Q" insert the letter "J"
In the cell with the letter "W" insert the letter "C"
In the cell with the letter "E" insert the letter "U"
In the cell with the letter "R" insert the letter "K"
In the cell with the letter "T" insert the letter "E"
In the cell with the letter "Y" insert the letter "H"
And so on…
After placing all the letters in the cells, you get this picture.
Now you can test the resulting font. This can be done by pressing the "F5" key, or by going to "Font - Test ..."
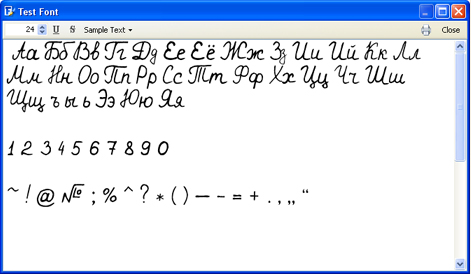
If everything suits you, save the resulting font and place it in the folder “C: \ WINDOWS \ Fonts”. The font is installed, and now you can select it, for example, in Microsoft Word and print text to them. Below is the text printed in my font.
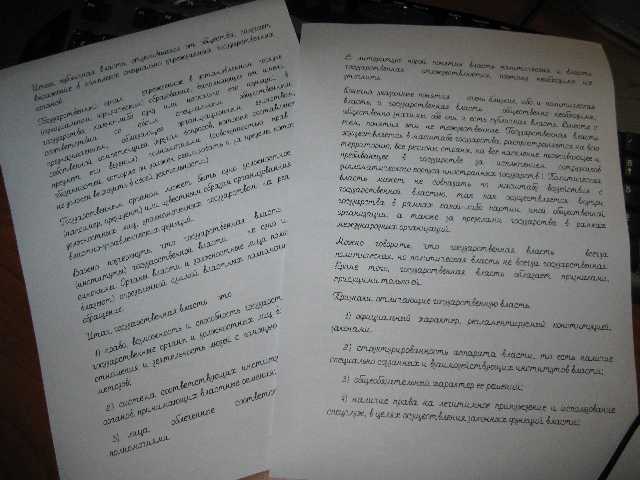
Font itself
Based on the foregoing, I came to the conclusion: you need to make a font for a computer that duplicates my handwriting. In my opinion, I did it successfully. Native mother will not distinguish where I wrote by hand, and where I typed the computer. Many of my friends liked this idea, and they began to ask me how I did it all. And in order not to explain to each of them a hundred times, I decided to write this article - a plan for carrying out the work with detailed comments.
So, in this article I will tell you how to make a font that imitates your handwriting.
To work we need:
1) sheets of blank paper in A4 format;
2) black gel pen;
3) a printer;
4) scanner;
5) the program High-Logic FontCreator (I suggest to download from the official site of the program).
To download click on the proposed link .
')
1 step
Take an album sheet of paper and write on it all the letters of the Russian alphabet (lowercase and uppercase), numbers from zero to nine and punctuation marks: period, comma, semicolon, colon, quotes, dashes, brackets, etc. If you need someone, you can add other characters that will be useful to you when writing, such as @, №, $, #, ^,%, *, etc. Write nicely, output each letter so that all your work will not go down the drain.
2 step
Scan a sheet with written letters. And those people who managed to write all the characters on one page will end up with one big picture.
3 step
Then open the program FontCreator from the manufacturer High-Logic. Her window looks like this.
File - New ...
In the window that appears, you need to enter the name of your future font.
Click "OK" - a trace appears. window.
In this window, open the picture with your letters. Select the letter “A”, copy it and return to FontCreator, open the cell with the letter “F” and insert your letter there. Red dashed lines can be moved, arrange them as shown in the following figure.
The letter must stand on the line (Baseline) and must NOT crawl beyond the upper horizontal line (WinAscent), nor should it crawl beyond the lower horizontal line (WinDescent), otherwise it will be cut off. The vertical left line should stand where the letter begins, and the vertical right line where the letter ends. If a letter comes out of vertical lines, then when typing there will be an imposition of one letter on another, this also does not suit us.
Now I will explain why we inserted the letter “A” into the cell with the letter “F”. This program is designed to create fonts using Latin letters. We, on the contrary, need to make a font for Russian letters. Therefore the font RUSSIAN made by us will turn out on the LATIN layout. In order to make it more convenient, we will insert Russian letters into the cells with Latin letters, in accordance with the keyboard.
In the cell with the letter "Q" insert the letter "J"
In the cell with the letter "W" insert the letter "C"
In the cell with the letter "E" insert the letter "U"
In the cell with the letter "R" insert the letter "K"
In the cell with the letter "T" insert the letter "E"
In the cell with the letter "Y" insert the letter "H"
And so on…
After placing all the letters in the cells, you get this picture.
Now you can test the resulting font. This can be done by pressing the "F5" key, or by going to "Font - Test ..."
If everything suits you, save the resulting font and place it in the folder “C: \ WINDOWS \ Fonts”. The font is installed, and now you can select it, for example, in Microsoft Word and print text to them. Below is the text printed in my font.
Font itself
Source: https://habr.com/ru/post/127088/
All Articles