Overview of the SLR camera Zenit 122 and the digitization of 35mm film
In this article, I will introduce you to the film camera Zenit 122 and tell you why I consider it a very good camera for novice photographers.

Under the cut - a little theory and history, a review of the camera and digitized images.
We will also look at various ways to digitize 35mm negatives.
Attention, traffic!
Zenith - probably the most famous brand of cameras, which produced the USSR. The first camera in this series went on sale in 1952, and over the entire time more than 40 models were released. All of them are designed to work with the familiar to all film type 135 (conventional 35mm film), which can now be purchased at any photo store.
You can buy a camera on any Internet flea market for the price of 500 to 5000 rubles, and for many of you it lies somewhere on the mezzanine.
')
For beginners, I advise you to choose models 122, TTL, 10-19 due to the presence of a built-in light meter.
With the exception of the exposure meter - these cameras are completely mechanical and all the parameters of photography you need to adjust manually. If you do not know what is the exposure, aperture or DOF - strongly recommend that you read this article. When reading the article, mentally replace all the words “sensor” and “matrix” with the word “film” - otherwise the setting of the film camera is almost the same as the setting of its modern digital descendants. The only difference is that the film is responsible for the white balance and ISO. Just try different films to see the difference.
Controls of Zenit 122:

Many criticize this model for a small number of options for setting the shutter speed: manual, 1 to 30, 60, 125, 250 and 500 - this is really not enough. Especially on a sunny day - 1/500 is a very long time.

The ISO options are 25, 50, 100, 200, 400.
Zenit 122 was supplied with lenses Helios and Zenitar. Unfortunately, I cannot say anything about personal experience about Zenithar, but they write on the Internet that it is sharper. In any case - they cost a penny and you can take both.
On my lens Helios-44M, you can set the aperture values from 1/2 to 1/16.
The camera also has a self-timer mode, a frame counter, a standard tripod jack, and a mount for an external flash.
Rear view of the camera:


The camera has an integrated TTL exposure meter. This means that the metering is carried out through the camera lens. The principle of its use is as follows: if you press the shutter button slightly, one of the 3 LEDs lights up in the viewfinder. The upper and lower red LEDs indicate overexposure and underexposure, and the center green LED indicates the correct exposure setting. I am completely satisfied with the work of the exposure meter, but with a long manual exposure it is better to turn it off - you can see a red light from the LED in the picture below:

The whole process of charging and discharging film in Zenith can be seen on YouTube.
Here are examples of my shots:
And finally - the pros and cons of the camera Zenith for a novice photographer
pros
In addition, it is impossible to describe the pleasant feeling when you run away in anticipation of taking your pictures from the salon. It needs to be experienced :)
Minuses
Now I will tell about some ways of digitizing negatives.
So, how to get our photos from the film?
In any case - first, the film needs to be shown - this process is very laborious and not easy, therefore, for a start, I advise you to take the film for development to photo studio. In addition, the pleasure is very cheap: 20-50 rubles for the film. At the output, we get color negatives (if you have a regular film, the development processes of CN-16 and C-41 are written on the box).
You can start digitizing in one of the ways, then we will analyze each of them:
The easiest way is that you donate negatives to photo shops, they are scanned there and recorded on a disk or on any of your media. There is a service in the region of 100-150 rubles.
Ordinary home scanners are not suitable for scanning films, even if they have a slide module (plate, inside which films are placed). In the worst case, you get a black square, at best - almost black.
The fact is that when scanning it is necessary to illuminate the film from the back side , i.e. from the side of the cover.
There are special flatbed photo scanners that can do this. For example, the pictures above were digitized using an Epson Perfection V500 Photo scanner:

The picture shows that the film is illuminated by LED backlight on top. Included with the scanner are slide modules for different film formats:

In the software bundled with the scanner, there are special film scanning modes. You can choose to remove dust, artifacts and color correction when scanning negatives. There is also a Digital Ice mode - eliminating dust and scratches during the scanning process.
The cost of such a scanner is from 6,000 to 30,000 rubles (although you can find it by an order of magnitude more expensive, but does it make sense for home use?).
To scan negatives, there is a separate type of device - slide scanners:

They differ from each other in resolution and additional buns, for example, scanning without connecting to a PC, to an SD card.
The cost is from 3,000 rubles to 20,000 (again - for those who want it is possible and more expensive).
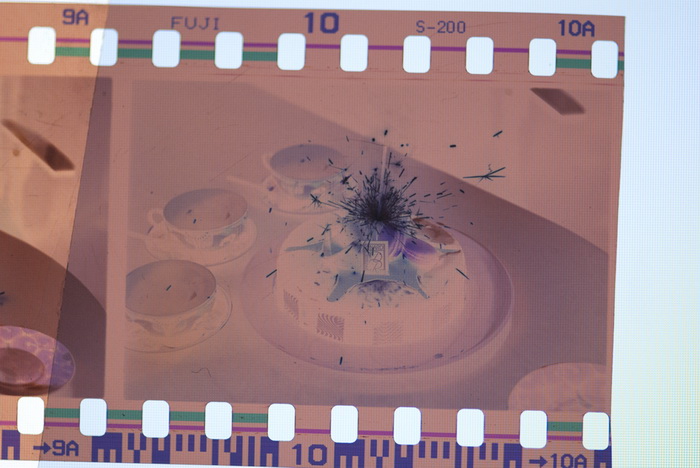
Another way to digitize is to retake our negatives on a digital camera with a macro lens. The technology is as follows: we illuminate the film from behind (with a monitor, a lamp — anything, but with white light), take pictures with a digital SLR and process them in a photo editor.
Due to lack of time, I photographed from the monitor screen, so giant pixels are visible on the film. To avoid them - you need to put a white sheet of smooth paper between the film and the monitor.
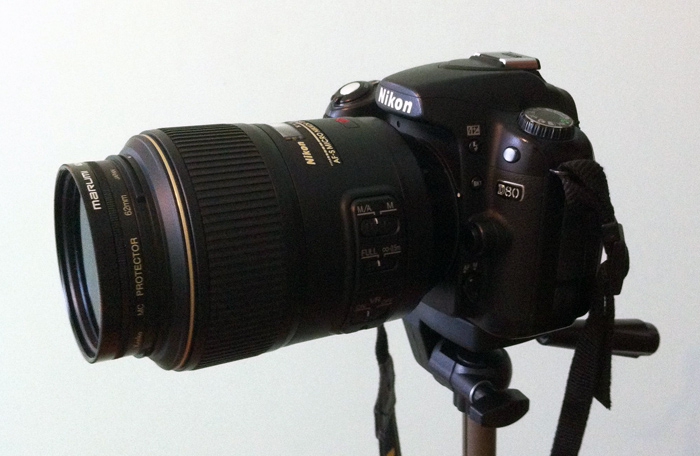
Nikon d80 with Nikon 105mm f / 2.8G IF-ED macro lens was used for shooting:
Fasten negatives to the monitor and take pictures:
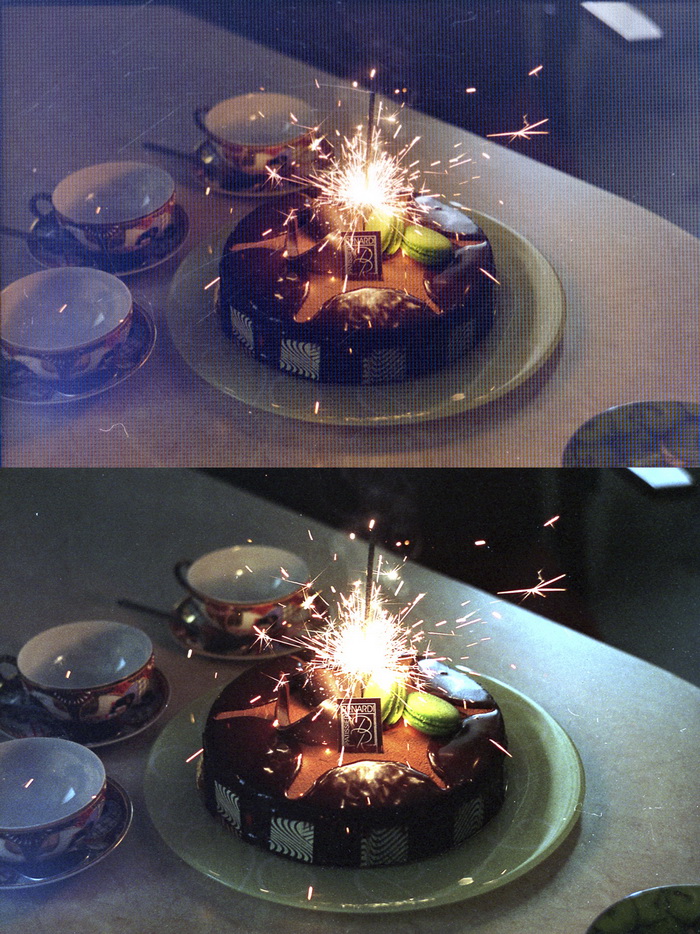
Open in photo editor and invert colors:

We change the color balance, play with the levels and exposure and everything is ready!
Comparison with a photo from a scanner:
Once again sorry for the pixels from the monitor - if you normally highlight the back, then they will not. Most importantly, I wanted to show the principle.
Under the cut - a little theory and history, a review of the camera and digitized images.
We will also look at various ways to digitize 35mm negatives.
Attention, traffic!
Camera Review
Zenith - probably the most famous brand of cameras, which produced the USSR. The first camera in this series went on sale in 1952, and over the entire time more than 40 models were released. All of them are designed to work with the familiar to all film type 135 (conventional 35mm film), which can now be purchased at any photo store.
You can buy a camera on any Internet flea market for the price of 500 to 5000 rubles, and for many of you it lies somewhere on the mezzanine.
')
For beginners, I advise you to choose models 122, TTL, 10-19 due to the presence of a built-in light meter.
With the exception of the exposure meter - these cameras are completely mechanical and all the parameters of photography you need to adjust manually. If you do not know what is the exposure, aperture or DOF - strongly recommend that you read this article. When reading the article, mentally replace all the words “sensor” and “matrix” with the word “film” - otherwise the setting of the film camera is almost the same as the setting of its modern digital descendants. The only difference is that the film is responsible for the white balance and ISO. Just try different films to see the difference.
Controls of Zenit 122:
Many criticize this model for a small number of options for setting the shutter speed: manual, 1 to 30, 60, 125, 250 and 500 - this is really not enough. Especially on a sunny day - 1/500 is a very long time.
The ISO options are 25, 50, 100, 200, 400.
Zenit 122 was supplied with lenses Helios and Zenitar. Unfortunately, I cannot say anything about personal experience about Zenithar, but they write on the Internet that it is sharper. In any case - they cost a penny and you can take both.
 |  |
On my lens Helios-44M, you can set the aperture values from 1/2 to 1/16.
The camera also has a self-timer mode, a frame counter, a standard tripod jack, and a mount for an external flash.
Rear view of the camera:
The camera has an integrated TTL exposure meter. This means that the metering is carried out through the camera lens. The principle of its use is as follows: if you press the shutter button slightly, one of the 3 LEDs lights up in the viewfinder. The upper and lower red LEDs indicate overexposure and underexposure, and the center green LED indicates the correct exposure setting. I am completely satisfied with the work of the exposure meter, but with a long manual exposure it is better to turn it off - you can see a red light from the LED in the picture below:
The whole process of charging and discharging film in Zenith can be seen on YouTube.
Here are examples of my shots:
 |  |  |
 |  |
And finally - the pros and cons of the camera Zenith for a novice photographer
pros
- Cost of
- Understanding Camera Settings
- Reliability (mine is already over 20, but he is still taking pictures))
- Limited number of frames. This forces you not to click the shutter thoughtlessly, but to create a thoughtful composition right away.
- Film camera artifacts in pictures - dust, glare, etc. Easy to clean if desired.
- Charging will not sit down, only exposure meter batteries, which are optional
- Vintage in the end!
In addition, it is impossible to describe the pleasant feeling when you run away in anticipation of taking your pictures from the salon. It needs to be experienced :)
Minuses
- Limited number of frames
- Manual exposure frame
- Weight (820 grams)
- You can not immediately view the pictures
- There are no new ones on sale
Now I will tell about some ways of digitizing negatives.
Digitizing 35mm negatives
So, how to get our photos from the film?
In any case - first, the film needs to be shown - this process is very laborious and not easy, therefore, for a start, I advise you to take the film for development to photo studio. In addition, the pleasure is very cheap: 20-50 rubles for the film. At the output, we get color negatives (if you have a regular film, the development processes of CN-16 and C-41 are written on the box).
You can start digitizing in one of the ways, then we will analyze each of them:
- Digitization in the photo salon
- Scanning
- Capturing negatives on a digital camera
Digitization in the photo salon
The easiest way is that you donate negatives to photo shops, they are scanned there and recorded on a disk or on any of your media. There is a service in the region of 100-150 rubles.
Scanning
Ordinary home scanners are not suitable for scanning films, even if they have a slide module (plate, inside which films are placed). In the worst case, you get a black square, at best - almost black.
The fact is that when scanning it is necessary to illuminate the film from the back side , i.e. from the side of the cover.
There are special flatbed photo scanners that can do this. For example, the pictures above were digitized using an Epson Perfection V500 Photo scanner:
The picture shows that the film is illuminated by LED backlight on top. Included with the scanner are slide modules for different film formats:
In the software bundled with the scanner, there are special film scanning modes. You can choose to remove dust, artifacts and color correction when scanning negatives. There is also a Digital Ice mode - eliminating dust and scratches during the scanning process.
The cost of such a scanner is from 6,000 to 30,000 rubles (although you can find it by an order of magnitude more expensive, but does it make sense for home use?).
To scan negatives, there is a separate type of device - slide scanners:
They differ from each other in resolution and additional buns, for example, scanning without connecting to a PC, to an SD card.
The cost is from 3,000 rubles to 20,000 (again - for those who want it is possible and more expensive).
Capturing negatives on a digital camera
Another way to digitize is to retake our negatives on a digital camera with a macro lens. The technology is as follows: we illuminate the film from behind (with a monitor, a lamp — anything, but with white light), take pictures with a digital SLR and process them in a photo editor.
Due to lack of time, I photographed from the monitor screen, so giant pixels are visible on the film. To avoid them - you need to put a white sheet of smooth paper between the film and the monitor.
Nikon d80 with Nikon 105mm f / 2.8G IF-ED macro lens was used for shooting:
Fasten negatives to the monitor and take pictures:
Open in photo editor and invert colors:
We change the color balance, play with the levels and exposure and everything is ready!
Comparison with a photo from a scanner:
Once again sorry for the pixels from the monitor - if you normally highlight the back, then they will not. Most importantly, I wanted to show the principle.
Thanks for attention!
Source: https://habr.com/ru/post/126388/
All Articles