Adding application settings to Settings
If you have a non-game application (in games it’s customary to place settings in the application itself, although there are no rules without exceptions) with a number of settings, instead of implementing the selection and storage of settings in the application itself, you can add them to the Settings application. the phone itself, and it is done very quickly and easily.

I was faced with the need to add a few settings to the application, I looked through a number of lessons and articles, but almost everywhere the descriptions were fragmentary and too confusing, so now I will try to briefly and easily explain the basic principles of creating the settings window of my application in Settings.
If we describe the whole process in a nutshell, then we must do the following:
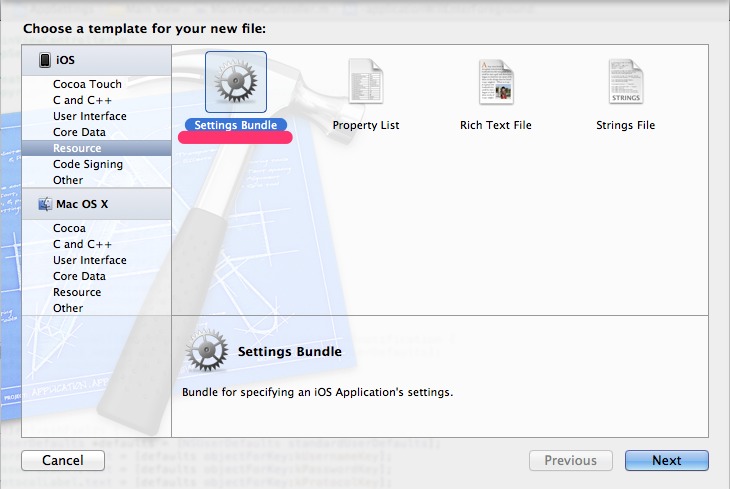
Now everything is in order and in more detail. To add all the necessary files to your project, go to the menu File -> New -> New file and select Resource -> Settings Bundle there:
')
After that, the new Settings.bundle folder will appear in the file list of your project, consisting of the Root.plist file and the en.lproj folder. It is this file that contains all the information on the basis of which the settings section of your application will be decorated in Settings, and the folder is needed to implement the application localization for different languages.
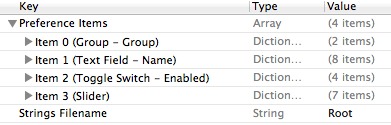
The Root.plist file is simply a list of interface elements with their properties that will constitute your settings window. By default, it looks like this:
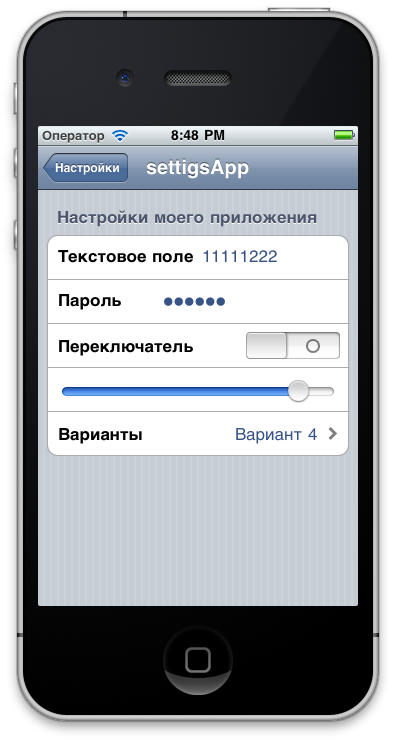
If you compile the application now, a line with the application name will appear in Settings, after selecting which a window will appear consisting of a title, a text field, a switch and a slider (slider). They are located in the same order in which they go in the file. By adding, deleting and swapping lines in the file, you can customize the appearance of the settings window in Settings.
Now more about the main interface elements and their properties.
All elements have a Type property - determines the type of an element, all elements except Slider have a Title property - an interface element title, all elements except Group have a Identifier property - determine the element identifier on which it can later be accessed.
The list of properties unique for each element:
Group - has only two properties, Title and Type, and is needed only for creating labels and visually separating settings into groups.
Text field
Toggle switch
Slider
Multi value
Separately, I want to describe the process of adding images to the Slider element. Simply dragging image files into your application will not work here, because after compiling the application files will be in one sandbox, and the Settings files in another. To add files to the sandbox of the Settings application, go to the Finder, find the folder with your application, there will be the Settings.bundle element, right-click on it and select Show Package Contents

A folder with the files already familiar to us will open, and it is in it that you need to copy the image files.
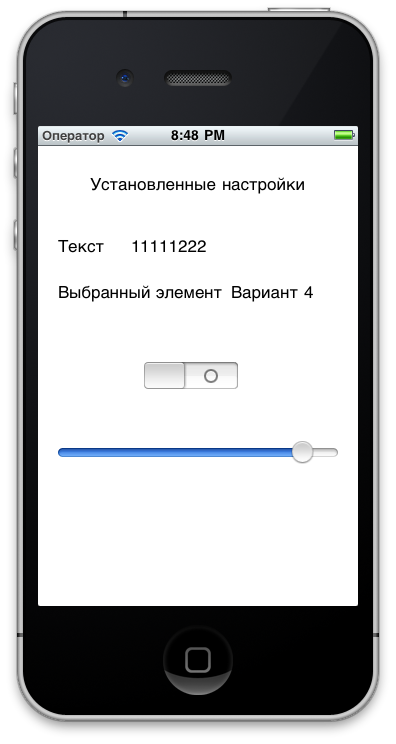
Now. when the appearance of the settings window is created, it remains only to receive these settings from the application. To do this, you need to create an object of type NSUserDefaults, assign application settings data to it, and get the values of these settings using the keys that were specified in the Identifier property of each of the settings.
The reverse process also works, that is, you can change settings from the application and save them:
Following the link you can download an example of an application that has all the main elements of the settings window, it is also possible to change the settings of the slider and switch.
Download application source
I was faced with the need to add a few settings to the application, I looked through a number of lessons and articles, but almost everywhere the descriptions were fragmentary and too confusing, so now I will try to briefly and easily explain the basic principles of creating the settings window of my application in Settings.
If we describe the whole process in a nutshell, then we must do the following:
- Add a set of Settings.bundle files to the project
- Describe all the necessary interface elements of the settings window in the Root.plist file
- Add an object of type NSUserDefaults to the project and get all the settings from it
Now everything is in order and in more detail. To add all the necessary files to your project, go to the menu File -> New -> New file and select Resource -> Settings Bundle there:
')
After that, the new Settings.bundle folder will appear in the file list of your project, consisting of the Root.plist file and the en.lproj folder. It is this file that contains all the information on the basis of which the settings section of your application will be decorated in Settings, and the folder is needed to implement the application localization for different languages.
The Root.plist file is simply a list of interface elements with their properties that will constitute your settings window. By default, it looks like this:
If you compile the application now, a line with the application name will appear in Settings, after selecting which a window will appear consisting of a title, a text field, a switch and a slider (slider). They are located in the same order in which they go in the file. By adding, deleting and swapping lines in the file, you can customize the appearance of the settings window in Settings.
Now more about the main interface elements and their properties.
All elements have a Type property - determines the type of an element, all elements except Slider have a Title property - an interface element title, all elements except Group have a Identifier property - determine the element identifier on which it can later be accessed.
The list of properties unique for each element:
Group - has only two properties, Title and Type, and is needed only for creating labels and visually separating settings into groups.
Text field
- Autocapitalization Style - autocapitalization of the text (disabled, beginning of sentences, every word, all capital letters)
- Autocorrection Style - correction of errors in the text
- Default Value - the default text field value
- Text Field Is Secure - password field
- Keyboard Type - the keyboard type for this field (alphabet, numbers and characters, numbers, URL, eMail)
Toggle switch
- Default Value - the default value (yes / no)
- Value for OFF - the value that will return the element in the case of OFF (if you need to get a value other than NO, for example 234)
- Value for ON - the value that will return the element in the case of ON (in case you need to get a value other than YES, for example, 143)
Slider
- Default Value - the default value
- Maximum Value- the maximum allowable value
- Minimum Value - the minimum acceptable value.
- Max Value Image Filename - image near the maximum
- Min Value Image Filename - image near the minimum
Multi value
- Titles - an array of labels in the selection table
- Values - the value returned when choosing each of the options
- Default Value - Default Value
Separately, I want to describe the process of adding images to the Slider element. Simply dragging image files into your application will not work here, because after compiling the application files will be in one sandbox, and the Settings files in another. To add files to the sandbox of the Settings application, go to the Finder, find the folder with your application, there will be the Settings.bundle element, right-click on it and select Show Package Contents
A folder with the files already familiar to us will open, and it is in it that you need to copy the image files.
Now. when the appearance of the settings window is created, it remains only to receive these settings from the application. To do this, you need to create an object of type NSUserDefaults, assign application settings data to it, and get the values of these settings using the keys that were specified in the Identifier property of each of the settings.
NSUserDefaults *defaults = [NSUserDefaults standardUserDefaults]; text = [defaults objectForKey:@"textField"]; The reverse process also works, that is, you can change settings from the application and save them:
NSUserDefaults *defaults = [NSUserDefaults standardUserDefaults]; [defaults setValue:text forKey:@"textField"]; Following the link you can download an example of an application that has all the main elements of the settings window, it is also possible to change the settings of the slider and switch.
Download application source
Source: https://habr.com/ru/post/126245/
All Articles