Basics of Sound Design: Cyberpunk in Ancient Egypt

Introduction
A topic was recently published, the discussion of which I decided to write this article. We will analyze the basics of sound design using two methods of sound synthesis (namely, subtractive and FM) using the example of creating a suitable timbre for the next melody . As a result, we get this .
I want to immediately warn you: after reading this (like any other) article, you will not become a cool sound designer - this is a whole profession that requires a long and hard study. The purpose of this article is to show how this all happens. I will try to demonstrate the course of my thoughts, give some basic knowledge about the main components of the synthesizer and show a couple of interesting techniques. I hope this will inspire you to move on - it is for this purpose that at the end of the article I gave a short list of what should be read if the topic seems interesting.
Pre-Requirements
In order to perform all the actions described in the article, you will need the following:
- Host: Any sequencer that supports VST plug-ins is suitable. For example, Ableton Live (I will use it), Cakewalk Sonar , Steinberg Cubase , FL Studio , Logic Pro or Cockos REAPER . If you have never used sequencers, I recommend downloading the demo version of Ableton Suite (consisting of the sequencer itself and an excellent library of samples / instruments for it) - this is the ideal product for sound designer: Session View, macros, tool racks and effects, the built-in Max programming language / MSP, ... To understand all its power, I advise you to listen to music from its creators: the Monolake group.
- Virtual synthesizer: LinPlug Albino . Initially, I wanted to use my favorite Massive synthesizer, but, unfortunately, Native Instruments doesn’t have a good demo policy. But some additional Albino chips even improved the result.
- Windows or MacOS as an operating system - unfortunately, the audio industry is pretty cool about Linux.
- Having a MIDI keyboard is very desirable. However, if you don’t have one, don’t be upset: Ableton Live and FL Studio have virtual MIDI keyboard mode, so you can do everything almost as easily as with a MIDI keyboard. Users of other sequencers can run the above melody on a loop and also feel all the changes in the sound.
Our task
Each time, creating a new sound, try to present it in your head beforehand, to feel the atmosphere that it will carry in itself. Very well, if you already have a melody that you will play them. The sound, invented by me, was to convey the atmosphere of ancient Egypt, combined with a kind of cyberpunk. I wrote a melody using the appropriate mode and came up with an unusual instrument: imagine an instrument consisting of a series of metal plates mounted on a resonant wooden case. In addition, if we have a cyberpunk, the instrument can change its timbre, becoming more “electric”.
So let's get started
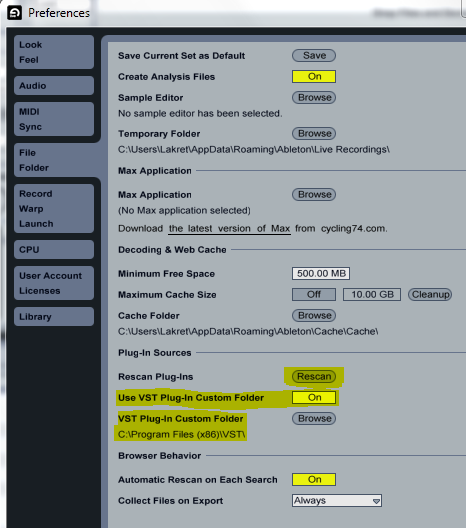
Download and install the demo version of the sequencer. Then we repeat the same with Albino. How exactly to set up the sequencer so that it finds the vsti-plugin, it is necessary to read its instructions. In Ableton Live, it looks like this:
Create a new set / song / arrangement. Download a set of necessary materials. From there we get a file with a melody (Lead.mid) and put it on a new track. Choose a pace of 120 BPM. On the track where you placed the MIDI clip with the melody, use Albino as a tool. In Live, this is done by dragging and dropping:
')

At this point, you will see the Albino window open in a friendly way. To avoid problems with exploded speakers and torn eardrums, put a limiter on the master-track (an effect that prevents a certain volume of the signal from exceeding). To do this, in Live you need to open a tab with audio effects:
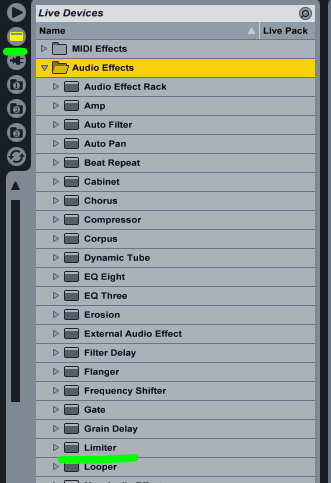
and drag Limiter to the Master track located on the right:
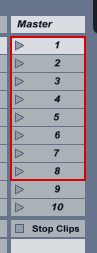
Now you can start the playback melody by clicking on the triangle adjacent to the left side of the clip:

And you will hear a sound. In order to understand where it comes from, we will have to dip into the basics of the logic device of synthesizers. And to stop this sound, use the "stop" button at the bottom of the track:

Any subtractive synthesizer consists of ...
... oscillators, filters, amplifiers, envelopes (aka Envelopes) and LFO (aka Low-Frequency Oscillators). This can be represented as such a scheme:
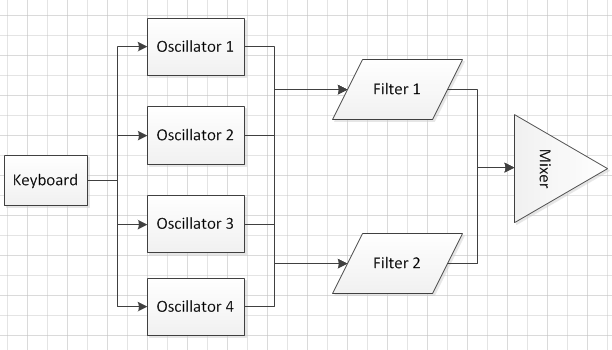
When you press a key on the MIDI keyboard or your host sends the corresponding MIDI signal to the plug-in, this signal, consisting of note height values (as a number from 0 to 127, where 60 usually corresponds to middle C, i.e. "to" first octaves) and velocity - velocity (also a number ∈ [0; 127]), goes to all synthesizer oscillators. The height of the note can be pre-changed before it hits the input of a specific oscillator, which allows us to tune different oscillators to different heights, getting a rich and complex tone. An oscillator is, simply put, a “sounding element” of a synthesizer. It generates a selected waveform with a given frequency (most often it is the frequency that corresponds to the note sent in our MIDI signal). It is the oscillator waveform that determines the timbre of the resulting sound. In fact, the whole sound design comes down to the ability to change the waveform of the signal so that we get the sound we need. Pretty quickly, you learn to determine the nature of the sound just by looking at the waveform. In analog synthesizers there were only a few of these waveforms. Here they are:

Let's hear how they sound with the help of Albino. To do this, you first need to initialize all the synthesizer parameters to default values. Unfortunately, in Albino, as far as I know, there is no standard preset / button capable of doing this, so I created my initializing preset - it is located in the archive you downloaded and is called Init Albino.FXP . Download it to Albino by clicking on the “L” button:

The sound will be sharp, so I advise you to turn down the volume. So, you see oscillator 1 in front of you:

Pay attention to the fact that the oscillator is chosen 1. The rotating knob (aka knob) of the waveform controls the same waveform. Turn it to the extreme left position and press a key on the MIDI keyboard / start playing the clip / send the MIDI signal to the synthesizer in any other way. This is what you will hear if you successively press the “before” keys, starting with the big octave and ending with the 4th octave (by the way, I advise you to download the sound if you cannot listen on your computer - soundcloud disfigured it terribly, I don’t know why). This is the sawtooth wave. It doesn't sound very nice, right? However, with the help of filters and other simple manipulations, which we will soon consider, this sound can be used to make what is usually called eurolead or, for example, some string instrument. Now turn the waveform adjuster right to the end. What you hear — a square wave, a square wave, or a square wave — has a more “empty” sound than a sawtooth waveform and is well suited for making woodwind sounds, bass and stabs.
To listen to two other traditional waveforms, we have to change the mode of operation of the oscillator. Albino oscillators can work in four different modes: we just played a little with the Analog mode, but now we have to switch to Digital mode:
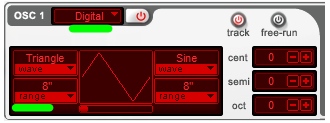
After clicking on the drop-down list and selecting Digital, you will see something like this. For everything to be exactly as in the screenshot, choose Range - 8 " , the left waveform is Classic -> Triangle , the right waveform is Classic - > Sine . Now you can enjoy the two remaining" classic "waveforms. The bottom of the display shows the waveform, allow you to mix any two waveforms: if it is in the leftmost position, you will hear only the left waveform, if in the rightmost one - only the right one, if in the center - a mix of two. A triangular wave is just a square wave without upper harmonics - therefore the sound is me it is sharp, but it also loses in “character.” The sine is the basis for FM synthesis, which we will use later, is also sometimes used to create bass sounds, is the basis of additive synthesis ( Digital mode just uses additive synthesis to get different waveforms) Here it must be recalled that any periodic function can be represented as a combination of sinusoidal waves of different amplitudes, frequencies and phases - this is why a sinusoidal wave is very important in the synthesis of sound. Nevertheless, it is time for us to recall our task.
Our sound must be, above all, metallic. I started with the first oscillator, on which I set the following parameters:
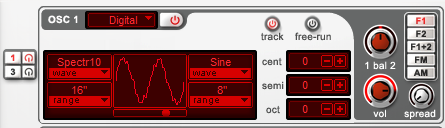
The sound already has something metallic in the character, but it sounds horribly unnatural.
Meet modulation and FM synthesis
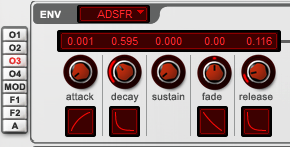
And the solution is simple: any real sound constantly changes timbre and volume. Hit the spoon with the spoon, touch the string of the guitar - you will hear that the sound starts instantly at maximum volume and is very sharp in timbre, but with the passage of time it becomes quieter and deeper. To convey such effects, the wise creators of synthesizers invented such a thing as modulation — a change in some parameter of sound synthesis over time. There are two main sources of this modulation: the aforementioned envelopes and the LFO. In Albino, the volume of each oscillator and the entire preset as a whole is controlled by five envelopes, their control elements are located directly below the oscillators:
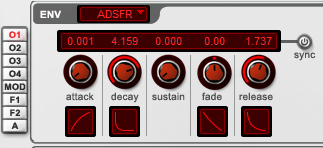
The screenshot shows the final settings for this oscillator, but before explaining their meaning in the context of our preset, I will have to make a small lyrical digression and tell about the main form of the envelopes - ADSR .
The ADSR envelope consists of several phases (thanks to the gracious Wikipedia for the excellent illustration):

When you press a key, the attack phase begins (the transition from silence to the maximum volume of the instrument): the sound of string instruments usually has zero attack — the string immediately sounds at maximum volume, but the wind instruments can slowly “swell”, moving from pianissimo to forte. Attack, like decay and release, is measured in seconds. When the maximum volume is reached, the decay phase begins ( decay ) - and at the end its sound stops at a certain level, which is called sustain - it is important to note here that, unlike other parameters, this is not time, but level, volume - therefore it is measured or in decibels, or in percentages and similar values. In stringed instruments, it is zero - the string gradually just calms down, but the organ key can be held for quite a long time, and the sound will not noticeably subside. The final phase - release - this is what happens after you release the key - how quickly the sound will die down. In guitar, this phase is quite long, if you deliberately do not stop it, and in the piano it is zero, because immediately after your finger slips off the key, the damper will stop the vibrations of the string.
Albino has three additional features you need to know in order to successfully work with its envelopes:
- We have an additional phase: Fade . After we have reached the level of sustain, the fade can raise it again to the maximum level (if the value of fade is> 0) or make it quiet down (if the fade <0). The greater the fade value, the faster the effect. With fade = 0, we get the classic ADSR - the level remains at the sustain value until we release the key. For our purposes, fade is not needed, so we will not touch it. If you want after playing with this parameter, quickly return it to the zero position, click on it with the left mouse button while holding ctrl - this returns almost any Albino slider to its default value.
- We have a global envelope. In our initialization preset, it is set in such a position that it does not affect anything ... except for the release phase. So that you can hear the release, put this knob on the main envelope (available on tab A in the envelope section) to a value that is known to exceed your other releases — I set it for 5 seconds.
- The graph of the function on which the parameters change on all phases except sustain'a (because nothing changes there, khe-khe) can be changed - for this, under the duration control for each phase there is a screen with a curve image - holding the left mouse button and moving Cursor vertically, you can change the curvature of these segments of the graph.
However, a single oscillator is usually not enough to create the desired timbre. But this time we will use FM synthesis, however, in its most primitive form. Frequency Modulation (aka Frequency Modulation) is a phenomenon well known to everyone who at least roughly imagines the principle of radio operation. But in this case we are not worried about its ability to encode signals, but the fact that if we control the frequency of one signal with the level of the other, the spectrum will be enriched: if both signals are sound, the sound will become sharper, metallic. We need it!
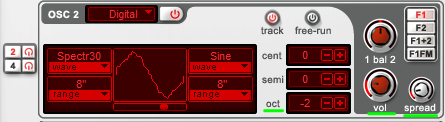
The main thing in FM: the ratio of the frequencies of the modulating and modulated signals and ... the change in their levels. It is intuitively clear that the “louder” the modulating signal, the more complex and sharp the resulting timbre will be — that is, by setting the envelope for the level of the modulating signal, we get not a simple change in volume, but a change in tone! Since it is better to hear once than read a hundred times, let's start. Usually FM is controlled by a matrix, as in Native Instruments FM8, but in Albino it all works a little differently. We can modulate the first oscillator second or third - the fourth. The first oscillator is already taken, so turn on the third one (click on the headphone icon next to the oscillator number) and fourth oscillator and set them up like this:
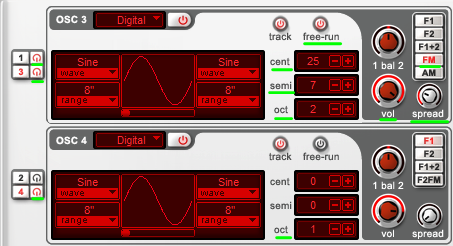
We set up the modulating (third) oscillator by 2 octaves, 7 semitones and 25 cents (in 1 octave - 12 semitones, in 1 semitone - 100 cents) higher than the note played. We also turned off the phase synchronization ( free-run controller) - this will make almost imperceptible changes to the sound attack, but it is the sum of such details that makes the sound truly memorable. We also increased the volume of this oscillator to the maximum. We activated the frequency modulation mode ( FM button on the right) - so the third oscillator is not heard directly, it only modulates the fourth one. The fourth oscillator plays an octave above the pressed note.
Especially it should be said about the third oscillator spread regulator - initially it is intended to create a polyphonic unison on the oscillator (i.e., each pressed note receives a kind of multiplied and slightly upset oscillator sound), but if we use it on a modulating oscillator in FM synthesis, It turns out a very interesting effect, - another subtlety needed to create a sound "with character." Every real and virtual synthesizer has such unobvious possibilities - you just need to be careful and not be afraid to experiment to find them.
It remains to adjust the envelopes for the oscillators and our FM epic will be completed:

At this stage, we did this (first, without the FM part, then with it).
We create the body, get acquainted with the filters and take into account the dynamics
We still have one more oscillator, why not use them? There is already a rather bright attack in our sound, but there is not enough of what is characteristic of any instrument with a body — resonance. The resonance of the body will be lower by two octaves - a rather large resonating space. In addition, this sound should make a not so sharp attack. Also note the spread control:
This is how our resonance sounds. But all together. You can make it quieter, but we'll figure it out a little later.
It seems that we have already gone so far, but still the sound is kind of strange. It costs to go above the second octave - it cuts the ears, and also - where did the whole dynamics go at the beginning of our melody, so well heard on the piano version?
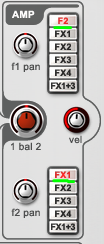
First, let's deal with problem number 2. To make our synthesizer sound differently depending on the speed of pressing the key, you need to use the technique already familiar to us - modulation, but this time the source of the control signal will not be the envelope, but that very speed of pressing. At the same time we will get acquainted with the Albino modulation matrix:

The left column shows the modulation source , the central one shows the modulation depth , the last one is the modulation assignment . We will modulate the velocity of pressing ( Velocity ) the volume of all oscillators ( Main Amplitude ), and the modulation will be direct and maximum ( 1.0000 ) - the faster the key is pressed, the louder the sound.
We also have to adjust the volume of individual oscillators. I will not clutter an article with screenshots with altered volumes: try to do it yourself, and if you get confused , you have a preset for this stage ( state 05.FXP ).
This is how the transition from quiet to loud notes now sounds.
I ask you to pay attention to the fact that we have only two pages in this matrix - and I began to fill in the lines from the second. This is due to the fact that one of the possible modulation assignments — the modulation level in one of the first four rows of the matrix — in this way, complex modulations can be created when one source controls the modulation level of a parameter by another source. Well, and because you can handle only the first four lines in this way, it makes sense to start filling the table from the second page.
We will return to the modulation matrix, but for now we will try to solve the first problem. To cope with it, we need to get acquainted with the basic concept of subtractive synthesis - filtering . Actually, thanks to her, the method of synthesis is so named - we sort of subtract the parts of the sound spectrum that we do not need using a filter. Filters are different, but the most common - Low-Pass , High-Pass , Band-Pass and Comb .
Low-Pass (LP, low-pass filter) passes a portion of the spectrum below a certain cut-off frequency , and suppresses all frequencies above. Cutoff (cutoff frequency) and Slope (cutoff slope) - the main characteristics of the filter. Slope is usually written as X db per octave. The most common in synthesizers are 6, 12 and 24 db / oct. Graphically, it all looks like this (and again thanks to Wikipedia):

And this is how it sounds. The lower the cutoff frequency, the more muffled the sound.
High Pass (abbreviated HP ) filter allows you to do exactly the opposite - cut frequencies below the cutoff frequency, leaving the upper ones. The sound is getting thinner. Band Pass ( BP ) is a combination of LP and HP — it skips the frequency band close to the cutoff frequency, cutting out all the others.
Filters have one more characteristic - resonance. If we increase it, the frequencies in the close vicinity of the cutoff frequency will become louder - listen to the previous example with an increased resonance.
The filters themselves may differ in sound (how they change the signal spectrum) and the nature of the resonance. Therefore, Albino has three variations of multi-mode filters ( Silk , Cream and Scream ). Silk and Cream have a slightly different timbre, while Scream has a very sharp and extreme resonance. And then there is a comb filter - Comb . Its frequency response is similar to a comb - consists of "hills" and "hollows" - hence the name. It can create very interesting changes in timbre, allowing you to make a sound metallic, get effects like a squeak of a door, a rattle of metal, or the pounding of a tree on a tree.
The most interesting thing about filters is that their parameters can also be modulated - by envelopes, velocity, height of the pressed note (this is called keytracking ), LFO, ... This is what we are going to do. Select Comb as the first filter type:

We will use a comb filter to create a kind of vibration and jitter. In addition, the comb filter slightly changes the timbre of the sound. To choose the frequency in this case is quite difficult - this is the case when you need to find the right value at which the sound starts to really sound. In order to get a shake, its cutoff frequency needs to be modulated. But the modulation of the envelope will not exactly suit us - we need a constant change in the parameter during the sustain phase, and adsfr envelopes can only provide a constant level at this phase. And here the LFO ( Low-Frequency Oscillator ) comes to the rescue. In contrast to the envelope, it creates periodic changes in the value of the parameter with a low (relative to sound) frequency. Here is our LFO:
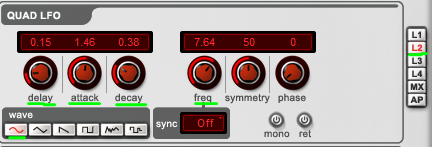
I want the modulation to start not from the very beginning of the note, but with a certain interval - otherwise the instrument will sound upset, - besides, I want the modulation to gradually increase and, reaching a maximum, stop. It is for this purpose that the values of the parameters delay = 0.15 (in the first 15 milliseconds after a key is pressed, nothing happens, the LFO is inactive), attack = 1.46 (in 1.46 seconds the modulation increases to the maximum) and decay = 0.38 (after the maximum is reached, the modulation subsides in 38 milliseconds). The freq control adjusts the modulation frequency (7.64 Hz), wave controls the LFO waveform.
We have a modulator, but so far we have not appointed what it modulates and in what range. Fix this flaw:

In the top row of the table, we see that the LFO controls the cutoff frequency of the filter - which is what we needed.But such a modulation will not be very natural - in nature, all oscillations subside, moreover, it is clear that the modulation depth should be greater if the sound itself is louder - that is, if the velocity is greater. To do this, we modulate the modulation depth in the first row of the table (i.e. LFO 2 -> Filter 1 Cutoff) with the velocity value (5th row), and in order to calm the jitter, modulate the frequency of our LFO using a modulating envelope (6th row ), which we set up as follows:
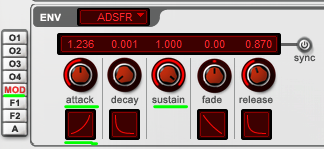
Please note that sustain we have the maximum and the attack in 1.23 seconds. From the moment you press a key, the frequency of the LFO (and our jitter, which we don’t even hear in the first milliseconds) will decrease - and along a curve that sounds quite natural (experiment with the curvature of this curve). The frequency will be exactly reduced, because in the modulation matrix we used a negative value in the middle column. Now we can enjoy the effect.
Okay, the jitter was done, but they didn’t understand the too sharp sounds in the upper octaves. To do this, use the second filter. Here, the choice is obvious - we need to make the sound more muffled, therefore - the Low-Pass Filter, at the same time, we don’t want to lose much in the brightness of the sound - so we’ll choose a drop of 12 dB / octave. For the filter type, choose Silk. We need to send the entire signal from the first filter to the second, and then from the second to the effects block. To do this, you need to use selectors in the Amp area, which is responsible for routing:
Now you can proceed to the filter settings:
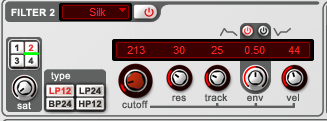
Here we modulate the cutoff frequency with a velocity ( vel = 44) - the faster, the higher the frequency, use keytracking ( track = 25) - for higher notes, the cutoff frequency is higher than for lower notes, we use resonance = 30 and modulate the cutoff frequency with using the filter envelope. Here is our envelope:
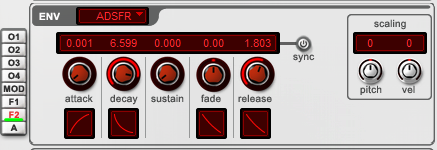
At the beginning, the cut-off frequency is maximum, with the passage of time it falls - the same we constantly hear around us - the sounds, getting quiet, become muffled.
In addition, there is a saturation unit in front of each filter in Albino - it can make the sound sharper, something like a guitar distortion. I used the second option and modulated the saturation depth by the position of the modulation wheel (available on most MIDI keyboards - to the left of the keys). Becausethe saturation unit is in front of the filter, we will not hear the effect in all its glory - saturation enriches the spectrum, and we cut out some of the high frequencies. To cope with this, we will bind to the same modulation wheel and filter cutoff frequency:

This is how our sound now sounds in the lower position of the modulation wheel. And that's how the sound with a gradual rotation of the wheel - first up, then back down. You can also attach the decay envelope of the second filter to some controller and get this effect (decay decreases for each next note). If you increase the attack of the same envelope, then the sound will become like a cross between the sound of bowed strings and a glass, along the edge of which is led with your finger. You can experiment here endlessly, the main thing is to keep in your head the image that you want to convey and how you plan to play this instrument.
The final touches: slightly increase the volume of the second oscillator, otherwise the sound of the body is completely lost, we will play with equalization and compression, add reverberation so that the instrument sounds far away, and that's it, our sound is ready .
As a conclusion ...
In his article "The Liberation of Sound" Edgar Warez wrote about the "sound-producing machine", the advantages of which he described as follows:
"If there is a need for a system of It’s not possible to say that it’s not a problem. It has been given that it has been approved for the score and it has been "contrapuntally," since the machine it can be used toIt’s humanly impossible to attain. "
Not all of what Varez dreamed about is possible today, but thanks to sound design, we can do most of the above. Success in creative work!
Materials for further study
To the make a How noise
Computer Magazine the Music
of Future the Music Magazine
Nick's the Tutorials
and all that is on the Internet .
Source: https://habr.com/ru/post/126230/
All Articles