Porting html5 game on Android
This is a continuation of my previous article " Create html5 mini-broker on CraftyJS ". I thought that now there are so many opportunities to simply port any html5 application to a mobile platform, why not try it?
Below, what came of it. Carefully read the conclusion!
It is necessary to port the game to Android, to make a brief conclusion of statistics and control by means of an accelerometer.
')
From the beginning, after listening to the criticism of the last article, I removed from the index.html multiple calls to js files, leaving only the main libraries. For this, I have connected the requirejs library. I also connected phonegap.js right away and changed the layout a bit, this is how it all looks now:
/index.html
/css/game.css
/js/game.js
Please note that I also changed the width and height in accordance with the resolution of the mobile phone.
Now let's do some management, for this we change /js/objects/player.js by replacing the Fourway component with FourwayAccel, and also calling this.fourway (1) with this.fourway_accel (1). Next, we need to create this very component, here it is:
After calling the fourway_accel method, we start listening to the “Acceleration” event, which we will create later. This event sends us tilt data (x, y, z). We are only interested in x and y. For simplicity, I check the level of the slope is high enough, less than -2 or greater than 2.
As soon as the slope has reached a certain degree, the function “start_or_stop_move” is called, which is transmitted the direction of the slope. This function, depending on the speed, sets the direction of the player’s movement, which is then drawn into the “EnterFrame” event.
Next we need to create the “Acceleration” event generator itself, to do this, add the following code to /js/game.js:
In more detail, about work with the accelerometer in phonegap, it is possible to read in documentation .
Now, we need to call startWatch () in the /js/scenes/main.js scene, as well as stopWatch () in the win.js and lose.js scenes.
So, we will assume that you have already done everything described in the documentation . You need to tweak AndroidManifest.xml a bit by adding a line to the activity section: android: screenOrientation = "landscape". This is necessary to ensure that the screen orientation is always landscape.
We bring AndroidrpgActivity.java to this view:
I think the variable FLAG_FULLSCREEN speaks for itself.
Here's what I finally got (sorry for the quality):

Works? Oh yeah! Am I pleased? Oh no!
The fact is that I tinkers, Krivorukov, toli skis do not go, but the application turned out to be extremely tormoznum. The result is more like a turn-based strategy than Action. And the point here, I think, is still in the ski, the answer is probably obvious. PhoneGap is an excellent library for tumblr readers and other news readers, but for toys it is better to use native Java for android.
Sources, as usual on GitHub .
Below, what came of it. Carefully read the conclusion!
What we need
- PhoneGap and its environment ( installation instructions )
- Project from the previous article
- The presence of android phone is highly desirable.
Task
It is necessary to port the game to Android, to make a brief conclusion of statistics and control by means of an accelerometer.
')
Preliminary preparation
From the beginning, after listening to the criticism of the last article, I removed from the index.html multiple calls to js files, leaving only the main libraries. For this, I have connected the requirejs library. I also connected phonegap.js right away and changed the layout a bit, this is how it all looks now:
/index.html
<!DOCTYPE html PUBLIC "-//W3C//DTD XHTML 1.0 Strict//EN" "http://www.w3.org/TR/xhtml1/DTD/xhtml1-strict.dtd"> <html xmlns="http://www.w3.org/1999/xhtml"> <head> <script type="text/javascript" src="js/require.js"></script> <script type="text/javascript" src="js/phonegap.js"></script> <script type="text/javascript" src="js/jquery.js"></script> <script type="text/javascript" src="js/crafty.js"></script> <script type="text/javascript" src="js/game.js"></script> <link rel="stylesheet" href="css/game.css" type="text/css" media="screen" charset="utf-8"> <title>Simpe RPG</title> </head> <body> <div id="cr-stage"></div> <div id="sidebar"> <div id="level"> Level: <span>1</span> </div> <div id="score"> Score: <span>0</span> </div> </div> </body> </html> /css/game.css
body, html { margin:0; padding: 0; overflow:hidden; font-family:Arial; font-size:20px; background-color: #000; } #cr-stage { color:white; float:left; } #sidebar { top: 0; left: 0; width: 150px; height: 100px; position: absolute; color:white;} #sidebar div { margin: 10px 5px; text-align: center; } /js/game.js
var Settings = { width: 480, // height: 320, // poligon: 16, // 16x16 level: 1, // flower_count: 0 // }; var AllScripts = [ // objects 'js/objects/flower', 'js/objects/bush', 'js/objects/grass', 'js/objects/unit', 'js/objects/fourway_accel', 'js/objects/player', 'js/objects/fourway_ai', 'js/objects/monster', // scenes 'js/scenes/loading', 'js/scenes/main', 'js/scenes/win', 'js/scenes/lose' ]; require(AllScripts, function() { require.ready(function() { Crafty.init(Settings.width, Settings.height); // // Crafty.sprite(Settings.poligon, "images/sprite.png", { grass1: [0,0], grass2: [1,0], grass3: [2,0], grass4: [3,0], flower: [0,1], bush1: [0,2], bush2: [1,2], player: [0,3], monster: [0,4] }); // Crafty.scene("loading"); }); }); Please note that I also changed the width and height in accordance with the resolution of the mobile phone.
Accelerometer
Now let's do some management, for this we change /js/objects/player.js by replacing the Fourway component with FourwayAccel, and also calling this.fourway (1) with this.fourway_accel (1). Next, we need to create this very component, here it is:
Crafty.c("FourwayAccel", { _speed: 3, _touch_element: null, init: function() { this._movement= { x: 0, y: 0}; this.accels = {}; this.accels['left'] = false; this.accels['right'] = false; this.accels['top'] = false; this.accels['bottom'] = false; }, fourway_accel: function(speed) { var self = this; self._speed = speed; self.bind('Acceleration', function(acceleration) { if (acceleration.y < -2) this.start_or_stop_move('left'); if (acceleration.y > 2) this.start_or_stop_move('right'); if (acceleration.x < -2) this.start_or_stop_move('top'); if (acceleration.x > 2) this.start_or_stop_move('bottom'); }); self.bind("EnterFrame",function() { if (self.disableControls) return; if(self._movement.x !== 0) { self.x += self._movement.x; self.trigger('Moved', {x: self.x - self._movement.x, y: self.y}); } if(self._movement.y !== 0) { self.y += self._movement.y; self.trigger('Moved', {x: self.x, y: self.y - self._movement.y}); } }); return self; }, start_or_stop_move: function(move_type) { var move_speed = this.get_speed(move_type); if (this.accels[move_type]) { // stop move this._movement.x = Math.round((this._movement.x - move_speed.x)*1000)/1000; this._movement.y = Math.round((this._movement.y - move_speed.y)*1000)/1000; this.accels[move_type] = false; } else { // start move this.accels[move_type] = true; this._movement.x = Math.round((this._movement.x + move_speed.x)*1000)/1000; this._movement.y = Math.round((this._movement.y + move_speed.y)*1000)/1000; } this.trigger('NewDirection', this._movement); }, get_speed: function(key_id) { switch (key_id) { case 'top': return {x: 0, y: -this._speed}; case 'left': return {x: -this._speed, y: 0}; case 'right': return {x: this._speed, y: 0}; case 'bottom': return {x: 0, y: this._speed}; } } }); After calling the fourway_accel method, we start listening to the “Acceleration” event, which we will create later. This event sends us tilt data (x, y, z). We are only interested in x and y. For simplicity, I check the level of the slope is high enough, less than -2 or greater than 2.
As soon as the slope has reached a certain degree, the function “start_or_stop_move” is called, which is transmitted the direction of the slope. This function, depending on the speed, sets the direction of the player’s movement, which is then drawn into the “EnterFrame” event.
Next we need to create the “Acceleration” event generator itself, to do this, add the following code to /js/game.js:
var watchID = null; function stopWatch() { if (watchID) { navigator.accelerometer.clearWatch(watchID); watchID = null; } } function startWatch() { var options = { frequency: 200 }; watchID = navigator.accelerometer.watchAcceleration(onSuccess, onError, options); // , // window.addEventListener('deviceorientation', function(event) { // Crafty.trigger("Acceleration", {x: event.beta, y: event.alpha, z: event.gamma}) // }, false); } function onSuccess(acceleration) { Crafty.trigger("Acceleration", acceleration) } function onError() { console.log('error!'); } In more detail, about work with the accelerometer in phonegap, it is possible to read in documentation .
Now, we need to call startWatch () in the /js/scenes/main.js scene, as well as stopWatch () in the win.js and lose.js scenes.
Direct launch on the phone
So, we will assume that you have already done everything described in the documentation . You need to tweak AndroidManifest.xml a bit by adding a line to the activity section: android: screenOrientation = "landscape". This is necessary to ensure that the screen orientation is always landscape.
We bring AndroidrpgActivity.java to this view:
package com.phonegap.simplerpg; import android.os.Bundle; import android.view.WindowManager; import com.phonegap.*; public class AndroidrpgActivity extends DroidGap { /** Called when the activity is first created. */ @Override public void onCreate(Bundle savedInstanceState) { super.onCreate(savedInstanceState); getWindow().clearFlags(WindowManager.LayoutParams.FLAG_FORCE_NOT_FULLSCREEN); getWindow().setFlags(WindowManager.LayoutParams.FLAG_FULLSCREEN, WindowManager.LayoutParams.FLAG_FULLSCREEN); super.loadUrl("file:///android_asset/www/index.html"); } } I think the variable FLAG_FULLSCREEN speaks for itself.
Result and conclusion
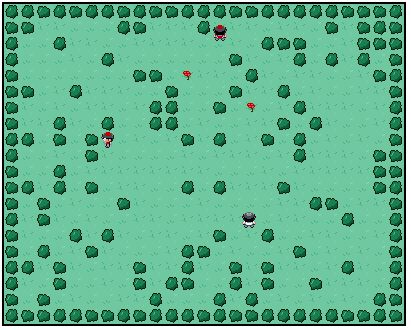
Here's what I finally got (sorry for the quality):
Works? Oh yeah! Am I pleased? Oh no!
The fact is that I tinkers, Krivorukov, toli skis do not go, but the application turned out to be extremely tormoznum. The result is more like a turn-based strategy than Action. And the point here, I think, is still in the ski, the answer is probably obvious. PhoneGap is an excellent library for tumblr readers and other news readers, but for toys it is better to use native Java for android.
Sources, as usual on GitHub .
Source: https://habr.com/ru/post/126118/
All Articles