Creating a binary tree
 When I started learning ruby, I decided to implement a binary tree and some of its basic operations (insert, delete, walk, and search), in order to better understand the language. Binary trees, this is a good exercise to understand the features of the language, such as: conditional operators, cycles, classes. At the same time, it is an opportunity to solve an interesting problem. The binary tree algorithm is well described in many books and on the Internet.
To complicate the task, I also implemented the binary tree drawing with html5 and Canvas. This allows you to more clearly understand the work of a binary tree. You can watch a demonstration on the web site .
Next, I briefly describe the implementation of the basic methods of building a binary tree.
Binary tree or binary search tree
The code itself, presented below, implements the Binary Search Tree (BST), which is a more specific version of binary trees. In a binary tree, each node has no more than 2 children, one of them is called the “left subtree” and the other is the “right subtree”, there is no sorting. In a binary search tree, all nodes are stored in the order reflected in the following rule:
Suppose x is a node in a binary search tree, if y is a “left subtree” for x, then y.key ≤ x.key. If y is a “right subtree” for x, then y.key ≥ x.key.
Implementing a binary search tree
The class for working with the tree that I implemented can be used as follows:
require "binarytree" tree = BinaryTree.new(40) tree.add(30) tree.add(100) tree.add(20) tree.add(35) tree.add(25) tree.add(34) puts "Tree nodes: #{tree.to_s}" => "20, 25, 30, 34, 35, 40, 100" We can use this class with numbers, strings, or any proper types of ruby that support matching (i.e. <=>)
')
Adding nodes in a binary tree
The code for adding nodes to a binary tree is shown below. This code first checks to see if we already have a root node, if not, then create a root node with a new value. If we already have a root node, scan the tree nodes (using the rule specified above) until we reach the final node. Once we have reached the final node we update it to point to the new node.
def add(new_value) if @root == nil @root = Node.new(new_value) @total_nodes = 1 return end current = @root while(true) if new_value >= current.value if current.right == nil current.right = Node.new(new_value) break else current = current.right end else if current.left == nil current.left = Node.new(new_value) break else current = current.left end end end @total_nodes += 1 end Walking on a tree
One of the advantages of a binary search tree is that it is very easy to get the values stored in it. This process is called “walking through a sorted tree”. For example, if we have a tree with the following values: 100, 50, 200, and 150, then the sorted tree will give us the values: 50, 100, 150, and 200. Walking around the tree can be implemented using a recursive function. However, the recursive method, although elegant, is not very efficient if the tree is large. The code I implemented does not use recursion, but instead uses an array as a stack to track the nodes it visits. This solution is not as elegant as recursion, but it works well, even if there are thousands of nodes in the tree.
def walk return nil if @root == nil node = @root stack = [] ignore_left = false while(true) #p "processing #{node.value.to_s}" if ignore_left #p "ignoring nodes to the left" ignore_left = false else if node.left != nil #p "moving to the left" stack << node node = node.left next end end yield node if node.right != nil #p "moving to the right" node = node.right next end break if stack.length == 0 #p "popping from the stack" node = stack.pop ignore_left = true end end While I was implementing this method, I realized the beauty and simplicity of one of the best features of ruby: blocks. When the algorithm finds the next node to be processed, it simply gives it to the caller. This allows you to walk on a tree and be completely independent of the actions that we want to perform on each node. For example, you can make the following code for each node:
tree.walk { |node| puts "#{node.value}" } In this example, the block simply “outputs” the values, but we will see a more complex example when we consider the code for drawing a binary tree.
How to Draw a Binary Tree
The binary tree rendering algorithm is, to a large extent, similar to the tree walking algorithm, with the exception that we need to calculate the coordinates of where each node should be located and how we intersect the nodes. The calculation of the coordinates was an interesting task.
The main algorithm is as follows:
- Draw the root node with the given coordinates
- Draw the left subtree from the left of the root node
- Draw the right subtree from the right of the root node
def draw_node(root, x, y, block) return if root == nil block.call(root, x, y, x, y) draw_left(root.left, x, y, block) if root.left != nil draw_right(root.right, x, y, block) if root.right != nil end To calculate the coordinates of the left subtree, we calculate how many children are on the right side of the left subtree. The resulting number, we use for a negative offset along the x axis. Next we recursively call this method for the left and right subtree.
def draw_left(node, parent_x, parent_y, block) if node.right != nil count = 1 + children_count(node.right) else count = 0 end x = parent_x - @x_distance - (count*@x_distance) y = parent_y + @y_distance block.call(node.value, x, y, parent_x, parent_y) draw_left(node.left, x, y, block) if node.left != nil draw_right(node.right, x, y, block) if node.right != nil end For the right subtree, we do the same thing, but vice versa.
def draw_right(node, parent_x, parent_y, block) if node.left != nil count = 1 + children_count(node.left) else count = 0 end x = parent_x + @x_distance + (count*@x_distance) y = parent_y + @y_distance block.call(node.value,x,y, parent_x, parent_y) draw_left(node.left, x, y, block) if node.left != nil draw_right(node.right, x, y, block) if node.right != nil end Like the walk method, the rendering method doesn't actually draw anything, but only indicates the coordinates of the object display. The following example shows the construction of a tree with coordinates in the console:
require "binarytree" require "binarytreedrawer" tree = BinaryTree.new tree.add(100) tree.add(50) tree.add(150) tree.add(25) tree.add(75) tree.add(125) tree.add(175) drawer = BinaryTreeDrawer.new(tree) drawer.draw(0,0, Proc.new { |value, x, y, px, py| puts "Value #{value} at (#{x}, #{y})" }) => Value 100 at (0, 0) => Value 50 at (-40, 30) => Value 25 at (-60, 60) => Value 75 at (-20, 60) => Value 150 at (40, 30) => Value 125 at (20, 60) => Value 175 at (60, 60) A real example of drawing a binary tree on a webpage
Having coordinates, we can use any graphical program for drawing a tree. In this web application, I will use HTML 5 Sanvas as a drawing surface, and several JS methods. Below is a simple example of how I generate JS calls to draw a tree:
drawer = BinaryTreeDrawer.new(@tree) drawer.draw(0, 0, Proc.new { |value, x, y, px, py| circles << "draw_circle(centerX + #{x}, offsetY + #{y}, 5);" lines << "draw_line(centerX + #{x}, offsetY + #{y}, centerX + #{px}, offsetY + #{py});" labels << "draw_label(centerX + 7 + #{x}, offsetY+5+#{y}, \"#{value}\");" }) Note that this code simply creates three arrays (circles, lines, shortcuts) with calls to JavaScript methods. These arrays are later inserted into the web page and draw a tree on the client side.
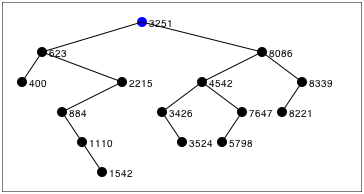
Source Code and Demonstration
If you want to see a demo, you can visit http://binarytree.heroku.com and generate several binary trees with random data or draw a binary tree with its own data set.
All sources for the implementation of a binary tree, as well as a demo site, are posted on GitHub .
Source: https://habr.com/ru/post/126091/
All Articles