Simple chat using Channel API on Google App Engine for Python
I present to your attention a free translation of the article entitled " A Simple Chat using the Channel API ". I also decided to add my code a bit.
Today we present you a new article for the Google App Engine dedicated to the Shannel API, which appeared in December 2010 in release 1.4. From this point on, it became possible to send messages directly from the server to the client and back without using polling .
Therefore, it became quite simple to implement a chat on Google App Engine. The implementation process is described under the cat.
You can view the demo at http://chat-channelapi.appspot.com/ .
The project code can be downloaded here (the code from the original article is here ).
In our application, to create a channel between the user and the program, the following steps should be taken, as shown in the picture below.
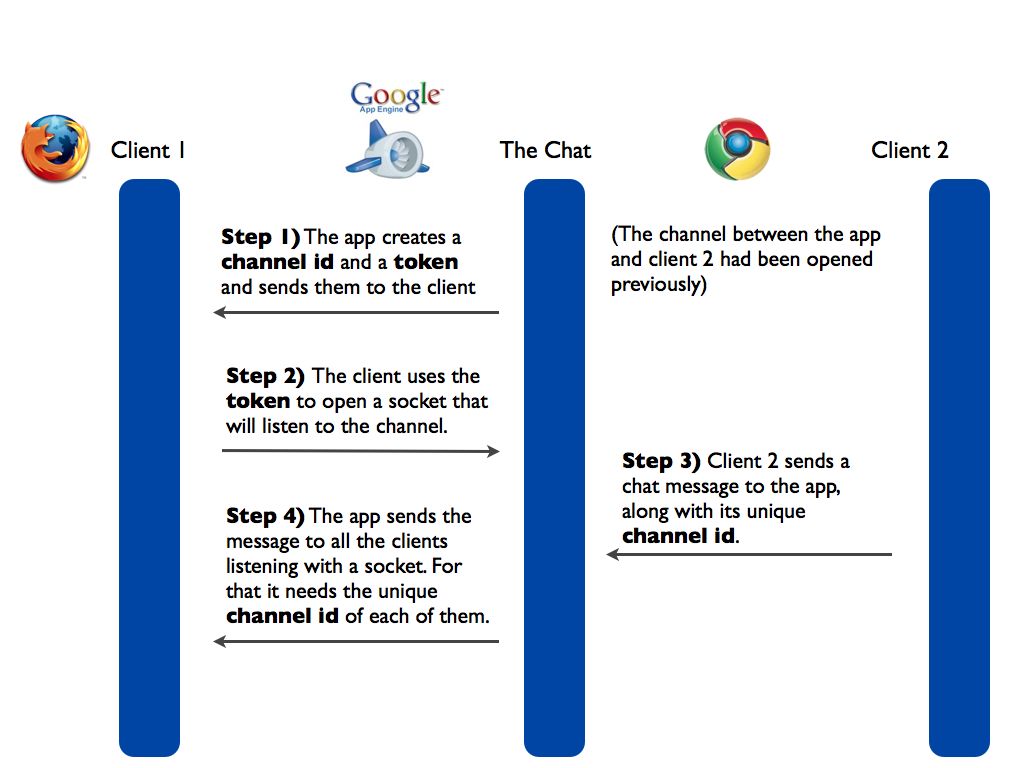
Steps:
1) The application creates a channel id and a token and sends them to the client.
2) The client uses a token to open a socket that will listen to the channel.
3) Client 2 sends a chat message to the application, along with its unique channel id
4) The application sends a message to all clients that listen to the channel through a socket. For this, the channel id of each client is used.
')
Before all steps are described, it should be noted that we have simplified to the maximum the entity of the database that will participate in the program. We created two - the User and Message model.
The code also uses the session mechanism implemented in the GAE utilities library. But do not pay much attention to the session.
Step 1.
In this step, our chat application creates a channel id and token and sends them to the client. The code for this step is quite simple. Just remember to import the Channel API:
After that, create a handler that generates a unique id for each user (we will use the uuid4 () function from the uuid module). The following handler just does this and passes the data to the template to the client:
In order not to overload this article, I do not provide the template code here. You can see it in github.
Step 2
Now the client is responsible for retrieving the token and opening the socket. We use jQuery to reduce javascript code. Below is our code:
Step 3
In this step, Client 2 sends a message to our chat via the interface. To do this, you just need to make a text box and a button to send a message. The message will be sent by javascript code using a simple listener, which we implement using jQuery. You can use any javsctipt library instead or simply using the XMLHttpRequest object. Just keep in mind that it is necessary to send a unique client channel id to correctly identify the client in the application.
Step 4
To receive messages from clients, we need to implement a new handler, which will also send a message to all clients.
Additional step
At this stage, the original article ends, but I wanted to make a few changes to the code related to the next task. In the original article, usernames are blocked after logging in to the chat and you cannot enter it under this nickname. Remove this restriction. To do this, after the completion of the key, the user data should be deleted from the database. The key ceases to operate either until two hours have passed, or until the client calls the close () function on the socket. After that, the handler registered at / _ah / channel / disconnected / is called. Let's write such a handler.
In javascript code, we add event handling that occurs when a user leaves this page:
It remains to handle the following situation. If the user entered the chat, but rather quickly closed the window, then the channel does not open. This leads to the situation that the user record is in the database, but it is not deleted due to the fact that the channel does not close. Change our user data model:
Now we have the time to create the record (creation_date) and information about whether the client’s confirmation of the opening of the channel has come (opened_socket). When a channel is opened from the client’s side using the channel.open () call on the server side, the handler registered at / _ah / channel / connected / is called. This handler will set the user to confirm the opening of the channel:
This code sends the channel id to the server for identification. The handler is presented below:
The final step will be to start using a cron handler, which will allocate all entries from the OnlineUser user model, which will not confirm the opening of the channel and the creation time from the current one will be more than 120 seconds:
Eventually
We managed to build a simple chat application. Four steps from the original article are enough to show the Channel API, the addition to the code was made to make the application look, in my opinion, more complete.
PS The real work of the application has shown that it is necessary to filter messages, excluding from them html tags. To do this, import the strip_tags function from the django framework:
In the handler for new messages (NewMessageHandler) replace the code for creating a new message with the following:
Today we present you a new article for the Google App Engine dedicated to the Shannel API, which appeared in December 2010 in release 1.4. From this point on, it became possible to send messages directly from the server to the client and back without using polling .
Therefore, it became quite simple to implement a chat on Google App Engine. The implementation process is described under the cat.
You can view the demo at http://chat-channelapi.appspot.com/ .
The project code can be downloaded here (the code from the original article is here ).
In our application, to create a channel between the user and the program, the following steps should be taken, as shown in the picture below.
Steps:
1) The application creates a channel id and a token and sends them to the client.
2) The client uses a token to open a socket that will listen to the channel.
3) Client 2 sends a chat message to the application, along with its unique channel id
4) The application sends a message to all clients that listen to the channel through a socket. For this, the channel id of each client is used.
')
Before all steps are described, it should be noted that we have simplified to the maximum the entity of the database that will participate in the program. We created two - the User and Message model.
class OnlineUser (db . Model):
nick = db . StringProperty(default = "" )
channel_id = db . StringProperty(default = "" )

class Message (db . Model):
text = db . StringProperty(default = "" )
user = db . ReferenceProperty(User)
The code also uses the session mechanism implemented in the GAE utilities library. But do not pay much attention to the session.
Step 1.
In this step, our chat application creates a channel id and token and sends them to the client. The code for this step is quite simple. Just remember to import the Channel API:
from google.appengine.api import channel
After that, create a handler that generates a unique id for each user (we will use the uuid4 () function from the uuid module). The following handler just does this and passes the data to the template to the client:
class ChatHandler (webapp . RequestHandler):
def get ( self ):
self . redirect( '/' )

def post ( self ):
# http://gaeutilities.appspot.com/
self . session = Session()
#
nick = self . request . get( 'nick' )
if not nick:
self . redirect( '/' )
# ,
user = OnlineUser . all() . filter( 'nick =' , nick) . get()
if user:
self . session[ 'error' ] = 'That nickname is taken'
self . redirect( '/' )
return
else :
self . session[ 'error' ] = ''
# id Channel API
channel_id = str (uuid . uuid4())
chat_token = channel . create_channel(channel_id)
#
user = OnlineUser(nick = nick,channel_id = channel_id)
user . put()
# 100
messages = Message . all() . order( 'date' ) . fetch( 1000 )
#
template_vars = { 'nick' :nick, 'messages' :messages, 'channel_id' :channel_id, 'chat_token' :chat_token}
temp = os . path . join(os . path . dirname(__file__), 'templates/chat.html' )
outstr = template . render(temp, template_vars)
self . response . out . write(outstr)
In order not to overload this article, I do not provide the template code here. You can see it in github.
Step 2
Now the client is responsible for retrieving the token and opening the socket. We use jQuery to reduce javascript code. Below is our code:
var chat_token = $( '#channel_api_params' ).attr( 'chat_token' );
var channel = new goog.appengine.Channel(chat_token);
var socket = channel.open();
socket.onopen = function (){
};
socket.onmessage = function (m){
var data = $.parseJSON(m.data);
$( '#center' ).append(data[ 'html' ]);
$( '#center' ).animate({scrollTop : $( "#center" ).attr( "scrollHeight" )}, 500 );
};
socket.onerror = function (err){
alert( "Error => " + err.description);
};
socket.onclose = function (){
alert( "channel closed" );
};
Step 3
In this step, Client 2 sends a message to our chat via the interface. To do this, you just need to make a text box and a button to send a message. The message will be sent by javascript code using a simple listener, which we implement using jQuery. You can use any javsctipt library instead or simply using the XMLHttpRequest object. Just keep in mind that it is necessary to send a unique client channel id to correctly identify the client in the application.
$( '#send' ).click( function (){
var text = $( '#text' ).val();
var nick = $( '#nick' ).attr( 'value' );
var channel_id = $( '#channel_api_params' ).attr( 'channel_id' );
$.ajax({
url : '/newMessage/' ,
type : 'POST' ,
data : {
text : text,
nick : nick,
channel_id : channel_id,
},
success : function (data){
},
complete : function (){
}
});
});
Step 4
To receive messages from clients, we need to implement a new handler, which will also send a message to all clients.
class NewMessageHandler (webapp . RequestHandler):
def post ( self ):
#
text = self . request . get( 'text' )
channel_id = self . request . get( 'channel_id' )
q = db . GqlQuery( "SELECT * FROM OnlineUser WHERE channel_id = :1" , channel_id)
nick = q . fetch( 1 )[ 0 ] . nick
date = datetime . datetime . now()
#
message = Message(user = nick,text = strip_tags(text), date = date, date_string = date . strftime( "%H:%M:%S" ))
message . put()
#
messages = [message]
template_vars = { 'messages' :messages}
temp = os . path . join(os . path . dirname(__file__), 'templates/messages.html' )
outstr = template . render(temp, template_vars)
channel_msg = json . dumps({ 'success' : True , "html" :outstr})
#
users = OnlineUser . all() . fetch( 100 )
for user in users:
channel . send_message(user . channel_id, channel_msg)
Additional step
At this stage, the original article ends, but I wanted to make a few changes to the code related to the next task. In the original article, usernames are blocked after logging in to the chat and you cannot enter it under this nickname. Remove this restriction. To do this, after the completion of the key, the user data should be deleted from the database. The key ceases to operate either until two hours have passed, or until the client calls the close () function on the socket. After that, the handler registered at / _ah / channel / disconnected / is called. Let's write such a handler.
class ChannelDisconnectHandler (webapp . RequestHandler):
def post ( self ):
channel_id = self . request . get( 'from' )
q = OnlineUser . all() . filter( 'channel_id =' , channel_id)
users = q . fetch( 1000 )
db . delete(users)
In javascript code, we add event handling that occurs when a user leaves this page:
$( window ).unload( function (){
socket.close();
});
It remains to handle the following situation. If the user entered the chat, but rather quickly closed the window, then the channel does not open. This leads to the situation that the user record is in the database, but it is not deleted due to the fact that the channel does not close. Change our user data model:
class OnlineUser (db . Model):
nick = db . StringProperty(default = "" )
channel_id = db . StringProperty(default = "" )
creation_date = db . DateTimeProperty(auto_now_add = True )
opened_socket = db . BooleanProperty(default = False )
Now we have the time to create the record (creation_date) and information about whether the client’s confirmation of the opening of the channel has come (opened_socket). When a channel is opened from the client’s side using the channel.open () call on the server side, the handler registered at / _ah / channel / connected / is called. This handler will set the user to confirm the opening of the channel:
class ChannelConnectHandler (webapp . RequestHandler):
def post ( self ):
channel_id = self . request . get( 'from' )
q = OnlineUser . all() . filter( 'channel_id =' , channel_id)
user = q . fetch( 1 )[ 0 ]
user . opened_socket = True
user . put()
This code sends the channel id to the server for identification. The handler is presented below:
class RegisterOpenSocketHandler (webapp . RequestHandler):
def post ( self ):
channel_id = self . request . get( 'channel_id' )
q = OnlineUser . all() . filter( 'channel_id =' , channel_id)
user = q . fetch( 1 )[ 0 ]
user . opened_socket = True
user . put()
The final step will be to start using a cron handler, which will allocate all entries from the OnlineUser user model, which will not confirm the opening of the channel and the creation time from the current one will be more than 120 seconds:
class ClearDBHandler (webapp . RequestHandler):
def get ( self ):
q = OnlineUser . all() . filter( 'opened_socket =' , False )
users = q . fetch( 1000 )
for user in users:
if ((datetime . datetime . now() - user . creation_date) . seconds > 120 ):
db . delete(user)
Eventually
We managed to build a simple chat application. Four steps from the original article are enough to show the Channel API, the addition to the code was made to make the application look, in my opinion, more complete.
PS The real work of the application has shown that it is necessary to filter messages, excluding from them html tags. To do this, import the strip_tags function from the django framework:
from django.utils.html import strip_tags
In the handler for new messages (NewMessageHandler) replace the code for creating a new message with the following:
message = Message(user = nick,text = strip_tags(text), date = date, date_string = date . strftime( "%H:%M:%S" ))
Source: https://habr.com/ru/post/126009/
All Articles