Home Mac Server
Wandering through the internet, I came across an article that I wanted to share with you.
So:
Introduction.
This article is not a guide, is not a manual or manual. This article is intended to give a general idea of what can be done with straight arms, a little ambition and perseverance. In it, in this article I will restore the chronology of events and actions that I committed, as a result of which this article turned out.
Idea.
I wanted to have my own personal home server. My Powerbook G4, with an 80Gb hard drive every day filled to capacity, and constantly had to delete something, always sacrifice something to make room for other information that was more necessary and in demand at the moment. On the other hand, the information that was deleted was also important and could be needed in the future. I didn’t want to write it to discs, I didn’t want to buy external hard drives either, for reasons that will become clear to the reader below.
I wanted the server to always work, access to it from anywhere in the world. So that it becomes a kind of continuation of my laptop, and sitting at home, it was possible to work with it via Wi-Fi via the AirPort Extreme Base Station, and somewhere “on the road” from any device that has Internet access, whether it is a handheld computer or cellular telephone.
')
Having a server at home is a blasphemy. Firstly, it is fire-dangerous; secondly, it can produce too much noise, and even if you remove it, for example, in a cupboard, it is still unsafe not only for the apartment, but also for him - normal cooling in a confined space will become impossible.
It was decided to locate the server on the floor site.
Advantages of such a decision:
It is always cool on the site, which means that normal cooling will not be a problem.
It is safe, because if a short circuit occurs and the server suddenly lights up, it will happen all the same on the site and will not harm the apartment
The total absence of noise in the apartment, the absence of an additional source of heat in it
Minuses:
The server can simply be stolen, which means that it is necessary to think over the security system for it.
Model selection.
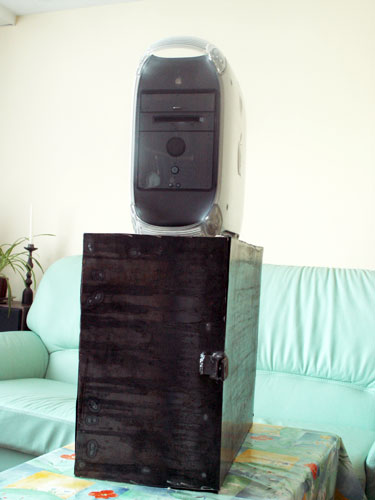
As a basis for building a server, I purchased a Powermac G4 (model “AGP”) with a PowerPC G4 400Mhz processor, 1Gb of RAM, a DVD-RW drive, a ZIP drive, a 16 megabyte video card, a 60 Gb hard drive and unnecessary me SCSI controller.

I chose Mac OS X Tiger Server as the operating system, but we'll talk about it and some details regarding the system and PowerMac G4 later, but for now let's move on to the “hard” part of the article.
Preparing the box.
To place the server on the driveway, you need to come up with a box. Having walked around the shops like “Electrics” or “Everything connected with electricity”, I came to the conclusion that what these comrades sell is suitable for storing in them perhaps potatoes, which you should not lose if there are thieves and all sorts of ... bad people. For these boxes, sellers want as much as five thousand rubles. Even a child can break such a box by bending the wall with a key. So I decided to make the box myself. I bought some sheet metal in the nearest market, sketched a sketch of a drawer and gave it to the department of welding production at one of the universities of the city.
The box turned out to be tough and durable. Not in any comparison with the store. The sizes were specially chosen with a small margin so that the server case was spacious, because besides the server itself, there will be several other devices in the box, which we will discuss below.
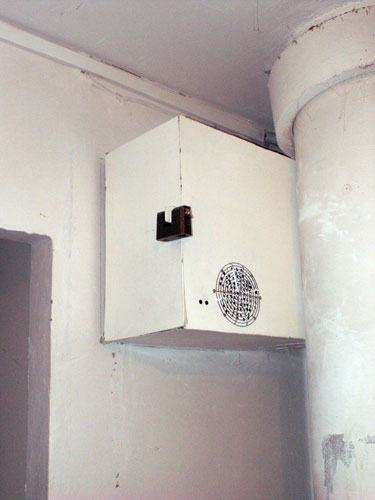
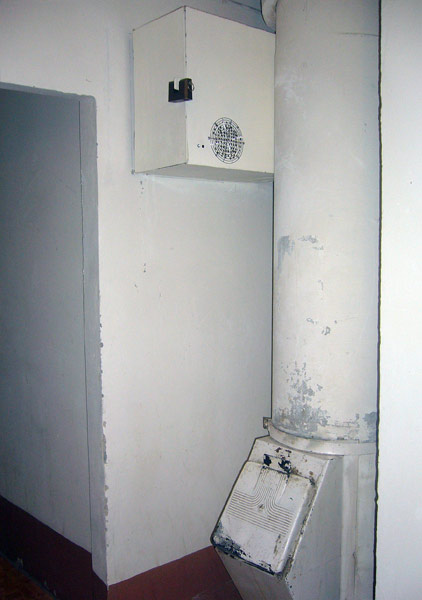
First of all, for such a box you need to think about the cooling system. It is required that the air inside it is not hot and constantly driven off. On the right wall of the box, there were multiple holes made under a large fan that would suck fresh air into the box. On the back wall are exactly the same, but under a smaller fan, which will be located, firstly, clearly opposite the fan installed in the server's power supply unit, and secondly, it will become an additional heat suction from this zone. Holes were also made on the upper wall of the box.
After all the technological holes were ready, I proceeded to paint the box. Since the box does not carry an object of art of particular beauty, I bought the cheapest paint, brush, roller and solvent. In order not to delay with painting it is better to use nitro paint.

After painting and finishing the box to a finished look, I proceeded to the placement of the cooling system. To exclude vibrations from the fans touching the metal case of the box, it is necessary to use a rubber seal on a sticky basis, which is glued around the perimeter of the contacting surface:

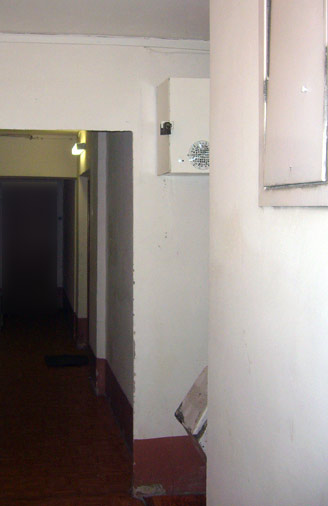
After preparing the box, I proceeded to install it. For him, not the best place was chosen - near the garbage disposal, but it turned out to be the only correct tactical point of view. The box does not attract the attention of “random visitors” of the site. All communications have been summed up in advance. Unfortunately, I can’t tell you what the wires were and where they came from, but the ideal option is to shave the walls, lay the wires and put on them. It is also necessary to install a circuit breaker during the power supply phase, which, in case of emergency overcurrent, will turn off the power to the server and, thus, it will be possible to avoid big troubles.
The box was fixed at six points on the anchor construction bolts at the top of the wall, closer to the ceiling. It is difficult to break it off (there is no reception against scrap?). It is better to use the lock without protruding parts in order to exclude the possibility of cutting it.
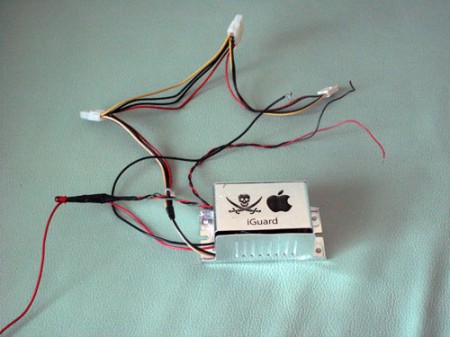
Box security system.
This is a very important point. We came up with our own alarm system, but, unfortunately, I cannot tell the principle of its operation for obvious reasons. But there are some parameters that must be considered if the reader wants to come up with his own alarm:
If the door is opened illegally (burglary), the alarm should be triggered. When the door is closed, the alarm is not difficult to switch off and continue to emit an alarm until it is turned off by a special button, which is better hidden in another apartment or inaccessible to others.
The alarm should show its current status; what mode it is in.
In the figure above, next to the fan, we see two holes into which, later, two LEDs were installed - white and red flickering. A white LED indicates that the alarm is working, and a red LED indicates that the alarm is in armed mode.
The simplest option would be to use the most primitive car alarm. Even these have in their arsenal door opening sensors and a pair of shock sensors
I called my alarm iGuard.
Preparation of the system unit, equipment purchase.
In this part we will talk about the necessary upgrade PowerMac G4. Unfortunately, this model has a very big minus. When you connect a hard drive, say 200Gb via a standard IDE channel, the system will not see more than 128 Gb of information, and indeed, the ATA bus leaves much to be desired - this is just Ultra ATA / 66. In nature, there is a driver that allows you to fool the system, and thus connect larger hard drives, but it has a number of significant flaws, which I will not talk about. Let me just say that after installing this driver and connecting the Seagate Barracuda hard drive to it at 200Gb, the download speed from it was disgusting. Anyway, IDE-bus - this is the last century.
I went to the Other World Computing store, where I picked up a wonderful SIIG Serial ATA 4 Channel PCI-M card, which has four Serial ATA ports. This will allow you to connect the latest and highest-speed hard drives of any capacity. Delivery from the United States did not cost much, and a week later I had the card.

At the same time, two top winchesters from Seagate with a capacity of 400 Gb were purchased. Thus, the total amount of our server has increased to 800 Gb, which is quite good for a start. In the future, if we calculate the number of free PCI ports, purchase more such cards, think over the power and cooling system, the total volume may increase to 13 terabytes.
I fixed one hard drive inside the case in a special basket, and the other in the compartment where the DVD-RW and ZIP drives were installed. The second hard drive does not have a mount and is installed on a rubber cushion, which was created from a compactor, which can be viewed above in this article. This made it possible to separate heat sources from each other and reduce vibrations. Also, additional cooling was provided for each hard drive, there are now a lot of those on sale.

The appearance of the box, the results of the “heavy part”.
Here's what I got as a result:
Setting up a Mac OS X Server system, general principles of a server on a local network and the Internet.
Of course, I chose Mac OS X Tiger Server as the operating system.
The server is connected to the local network, as well as to the Internet through PPPoE. My provider assigned me a real IP, thanks to which the server was accessible from anywhere in the world.
Thanks to the wonderful Remote Desktop program, all system setting operations can be performed directly from a laptop, seeing the server screen on its screen:

On my server, I configured first of all, of course, the Apple File Protocol. It allows you to connect to the server and work with files directly through the Finder, as if these files are located on your hard drive. And of course, files can be opened directly from the server, whether it be price lists or videos. Here’s how the Movies folder on my server looks like:

The built-in FTP server is too simple, its settings are not enough. But there is the most beautiful and best in my opinion FTP-server for Mac - CrushFTP.
I did not manage to see this amount of settings in any FTP server before. Enumerate all the advantages does not make sense. Users themselves can recognize them on the developer’s page. This is probably the second “Amazing” product that will satisfy even super-demanding users. Of particular note is the Web-based interface that allows you to work with FTP through any browser, and upload files to the server via drag'n'drop technology. Also, it is impossible not to note the archiving function “on the fly”. Through the Web interface, you can select multiple files / folders and click on the ZIP button. The server itself on the fly will prepare an archive in which the selected files or folders will be located and will submit this archive for download. This is incredible.
User / group support, quotas, bandwidth limiters, remote administration capabilities, SSL, the ability to process .sfv files and virtual directories. CrushFTP can even determine the WAN IP address if you are using a NAT firewall. CrushFTP supports file transfer using FTP, FTPS, HTTP, HTTPS, WebDAV, and SFTP.
For Windows-based users of the local network, Windows Sharing was provided.
When setting up the system, you need to remember that in the event of a sudden power outage in the house and its subsequent supply, the computer should turn on itself, start the necessary applications and connect to the Internet. To automatically connect to the Internet, I wrote a small AppleScript, which I put in Login Items. After logging into the system, the script waits 10 seconds until all applications are downloaded, then opens the Internet Connect application, connects to the Internet via PPPoE and closes the Internet Connect application.
Download script
Optimize work on Apple File Protocol.
Of course, you can use the standard Finder function “Connect to Server ...” for the AFP connection, which is located in the Go menu. But this is not very convenient for working on a local network, especially for Wi-Fi, because if you accidentally disconnect from the network, Finder will hang and then “unmount” the attached share point. After that, you will have to re-join, press additional buttons in the authentication window. There is a much more interesting way and it is called “static automounting”. Its essence is that after the system starts up, it automatically mounts the required share point and displays them in the Network. Do not confuse this method with programs such as AutoMountMaker, this is different. First, it uses the dynamic method of joining. Yes, you will not have to enter anything and the server will be reachable directly from the Network, but the dynamic connection does not allow streaming playback of audio files or movies directly from the server, they will need to be downloaded first.
The static method mounts the share point you need (both with and without authentication) also on the Network, but allows you to stream content from the server.
In order to create your own automount share points you need to proceed in NetInfo Manager. There, choose the path / mounts and do something approximate, as in the screenshot below:
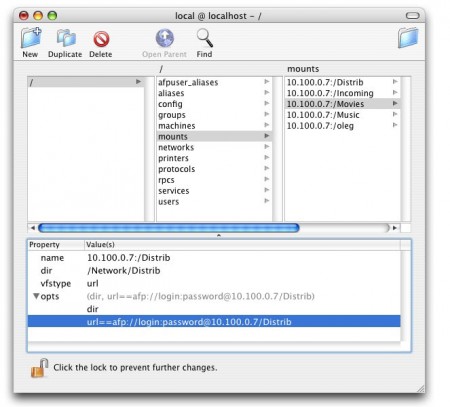
Where 10.100.0.7 is your server's ip (it may be different for you).
Note: the variable “dir” must necessarily begin with “/ Network /” and end with the desired Share Point. In the described case, this Share Point is a Distrib.
Login and password for all of course get your own. Also, on the Internet you can find more information about this method.
This operation needs to be done once and no longer will you have to click any “Connect to server ...”, enter logins, passwords and be distracted by pressing buttons. Moreover, this method does not hang the Finder in case of unsuccessful disconnection from the network. This method just works.
Conclusion, conclusions, thanks.
Creating a home server is fun and not so complicated. Of course, not having skills in soldering, electronics, software to make the described more difficult. The purpose of the article is to show how important the idea that is being carried out. It is very important - to do everything as it was intended and not to lower blots and errors, and correct and do it all over again until a positive result is achieved.
Some people told me: “Why did you need to make a Mac-based server? On a PC basis, it would be much cheaper! ”. Maybe it is so. However, it is not speculative to think that the PC system unit would be five times cheaper than the PowerMac G4. And then, what can the PC offer? FTP? Windows Sharing? Dismiss. A Mac based server is a special love.
The server is working and working properly. It is called “Pirate Mac Server”. Why - the big secret. His address
http://www.server.elevensky.ru/ .
It took me three months to create it.
A source:
www.borisov.elevensky.ru/
So:
Introduction.
This article is not a guide, is not a manual or manual. This article is intended to give a general idea of what can be done with straight arms, a little ambition and perseverance. In it, in this article I will restore the chronology of events and actions that I committed, as a result of which this article turned out.
Idea.
I wanted to have my own personal home server. My Powerbook G4, with an 80Gb hard drive every day filled to capacity, and constantly had to delete something, always sacrifice something to make room for other information that was more necessary and in demand at the moment. On the other hand, the information that was deleted was also important and could be needed in the future. I didn’t want to write it to discs, I didn’t want to buy external hard drives either, for reasons that will become clear to the reader below.
I wanted the server to always work, access to it from anywhere in the world. So that it becomes a kind of continuation of my laptop, and sitting at home, it was possible to work with it via Wi-Fi via the AirPort Extreme Base Station, and somewhere “on the road” from any device that has Internet access, whether it is a handheld computer or cellular telephone.
')
Having a server at home is a blasphemy. Firstly, it is fire-dangerous; secondly, it can produce too much noise, and even if you remove it, for example, in a cupboard, it is still unsafe not only for the apartment, but also for him - normal cooling in a confined space will become impossible.
It was decided to locate the server on the floor site.
Advantages of such a decision:
It is always cool on the site, which means that normal cooling will not be a problem.
It is safe, because if a short circuit occurs and the server suddenly lights up, it will happen all the same on the site and will not harm the apartment
The total absence of noise in the apartment, the absence of an additional source of heat in it
Minuses:
The server can simply be stolen, which means that it is necessary to think over the security system for it.
Model selection.
As a basis for building a server, I purchased a Powermac G4 (model “AGP”) with a PowerPC G4 400Mhz processor, 1Gb of RAM, a DVD-RW drive, a ZIP drive, a 16 megabyte video card, a 60 Gb hard drive and unnecessary me SCSI controller.
I chose Mac OS X Tiger Server as the operating system, but we'll talk about it and some details regarding the system and PowerMac G4 later, but for now let's move on to the “hard” part of the article.
Preparing the box.
To place the server on the driveway, you need to come up with a box. Having walked around the shops like “Electrics” or “Everything connected with electricity”, I came to the conclusion that what these comrades sell is suitable for storing in them perhaps potatoes, which you should not lose if there are thieves and all sorts of ... bad people. For these boxes, sellers want as much as five thousand rubles. Even a child can break such a box by bending the wall with a key. So I decided to make the box myself. I bought some sheet metal in the nearest market, sketched a sketch of a drawer and gave it to the department of welding production at one of the universities of the city.
The box turned out to be tough and durable. Not in any comparison with the store. The sizes were specially chosen with a small margin so that the server case was spacious, because besides the server itself, there will be several other devices in the box, which we will discuss below.
First of all, for such a box you need to think about the cooling system. It is required that the air inside it is not hot and constantly driven off. On the right wall of the box, there were multiple holes made under a large fan that would suck fresh air into the box. On the back wall are exactly the same, but under a smaller fan, which will be located, firstly, clearly opposite the fan installed in the server's power supply unit, and secondly, it will become an additional heat suction from this zone. Holes were also made on the upper wall of the box.
After all the technological holes were ready, I proceeded to paint the box. Since the box does not carry an object of art of particular beauty, I bought the cheapest paint, brush, roller and solvent. In order not to delay with painting it is better to use nitro paint.
After painting and finishing the box to a finished look, I proceeded to the placement of the cooling system. To exclude vibrations from the fans touching the metal case of the box, it is necessary to use a rubber seal on a sticky basis, which is glued around the perimeter of the contacting surface:
After preparing the box, I proceeded to install it. For him, not the best place was chosen - near the garbage disposal, but it turned out to be the only correct tactical point of view. The box does not attract the attention of “random visitors” of the site. All communications have been summed up in advance. Unfortunately, I can’t tell you what the wires were and where they came from, but the ideal option is to shave the walls, lay the wires and put on them. It is also necessary to install a circuit breaker during the power supply phase, which, in case of emergency overcurrent, will turn off the power to the server and, thus, it will be possible to avoid big troubles.
The box was fixed at six points on the anchor construction bolts at the top of the wall, closer to the ceiling. It is difficult to break it off (there is no reception against scrap?). It is better to use the lock without protruding parts in order to exclude the possibility of cutting it.
Box security system.
This is a very important point. We came up with our own alarm system, but, unfortunately, I cannot tell the principle of its operation for obvious reasons. But there are some parameters that must be considered if the reader wants to come up with his own alarm:
If the door is opened illegally (burglary), the alarm should be triggered. When the door is closed, the alarm is not difficult to switch off and continue to emit an alarm until it is turned off by a special button, which is better hidden in another apartment or inaccessible to others.
The alarm should show its current status; what mode it is in.
In the figure above, next to the fan, we see two holes into which, later, two LEDs were installed - white and red flickering. A white LED indicates that the alarm is working, and a red LED indicates that the alarm is in armed mode.
The simplest option would be to use the most primitive car alarm. Even these have in their arsenal door opening sensors and a pair of shock sensors
I called my alarm iGuard.
Preparation of the system unit, equipment purchase.
In this part we will talk about the necessary upgrade PowerMac G4. Unfortunately, this model has a very big minus. When you connect a hard drive, say 200Gb via a standard IDE channel, the system will not see more than 128 Gb of information, and indeed, the ATA bus leaves much to be desired - this is just Ultra ATA / 66. In nature, there is a driver that allows you to fool the system, and thus connect larger hard drives, but it has a number of significant flaws, which I will not talk about. Let me just say that after installing this driver and connecting the Seagate Barracuda hard drive to it at 200Gb, the download speed from it was disgusting. Anyway, IDE-bus - this is the last century.
I went to the Other World Computing store, where I picked up a wonderful SIIG Serial ATA 4 Channel PCI-M card, which has four Serial ATA ports. This will allow you to connect the latest and highest-speed hard drives of any capacity. Delivery from the United States did not cost much, and a week later I had the card.
At the same time, two top winchesters from Seagate with a capacity of 400 Gb were purchased. Thus, the total amount of our server has increased to 800 Gb, which is quite good for a start. In the future, if we calculate the number of free PCI ports, purchase more such cards, think over the power and cooling system, the total volume may increase to 13 terabytes.
I fixed one hard drive inside the case in a special basket, and the other in the compartment where the DVD-RW and ZIP drives were installed. The second hard drive does not have a mount and is installed on a rubber cushion, which was created from a compactor, which can be viewed above in this article. This made it possible to separate heat sources from each other and reduce vibrations. Also, additional cooling was provided for each hard drive, there are now a lot of those on sale.
The appearance of the box, the results of the “heavy part”.
Here's what I got as a result:
Setting up a Mac OS X Server system, general principles of a server on a local network and the Internet.
Of course, I chose Mac OS X Tiger Server as the operating system.
The server is connected to the local network, as well as to the Internet through PPPoE. My provider assigned me a real IP, thanks to which the server was accessible from anywhere in the world.
Thanks to the wonderful Remote Desktop program, all system setting operations can be performed directly from a laptop, seeing the server screen on its screen:
On my server, I configured first of all, of course, the Apple File Protocol. It allows you to connect to the server and work with files directly through the Finder, as if these files are located on your hard drive. And of course, files can be opened directly from the server, whether it be price lists or videos. Here’s how the Movies folder on my server looks like:
The built-in FTP server is too simple, its settings are not enough. But there is the most beautiful and best in my opinion FTP-server for Mac - CrushFTP.
I did not manage to see this amount of settings in any FTP server before. Enumerate all the advantages does not make sense. Users themselves can recognize them on the developer’s page. This is probably the second “Amazing” product that will satisfy even super-demanding users. Of particular note is the Web-based interface that allows you to work with FTP through any browser, and upload files to the server via drag'n'drop technology. Also, it is impossible not to note the archiving function “on the fly”. Through the Web interface, you can select multiple files / folders and click on the ZIP button. The server itself on the fly will prepare an archive in which the selected files or folders will be located and will submit this archive for download. This is incredible.
User / group support, quotas, bandwidth limiters, remote administration capabilities, SSL, the ability to process .sfv files and virtual directories. CrushFTP can even determine the WAN IP address if you are using a NAT firewall. CrushFTP supports file transfer using FTP, FTPS, HTTP, HTTPS, WebDAV, and SFTP.
For Windows-based users of the local network, Windows Sharing was provided.
When setting up the system, you need to remember that in the event of a sudden power outage in the house and its subsequent supply, the computer should turn on itself, start the necessary applications and connect to the Internet. To automatically connect to the Internet, I wrote a small AppleScript, which I put in Login Items. After logging into the system, the script waits 10 seconds until all applications are downloaded, then opens the Internet Connect application, connects to the Internet via PPPoE and closes the Internet Connect application.
Download script
Optimize work on Apple File Protocol.
Of course, you can use the standard Finder function “Connect to Server ...” for the AFP connection, which is located in the Go menu. But this is not very convenient for working on a local network, especially for Wi-Fi, because if you accidentally disconnect from the network, Finder will hang and then “unmount” the attached share point. After that, you will have to re-join, press additional buttons in the authentication window. There is a much more interesting way and it is called “static automounting”. Its essence is that after the system starts up, it automatically mounts the required share point and displays them in the Network. Do not confuse this method with programs such as AutoMountMaker, this is different. First, it uses the dynamic method of joining. Yes, you will not have to enter anything and the server will be reachable directly from the Network, but the dynamic connection does not allow streaming playback of audio files or movies directly from the server, they will need to be downloaded first.
The static method mounts the share point you need (both with and without authentication) also on the Network, but allows you to stream content from the server.
In order to create your own automount share points you need to proceed in NetInfo Manager. There, choose the path / mounts and do something approximate, as in the screenshot below:
Where 10.100.0.7 is your server's ip (it may be different for you).
Note: the variable “dir” must necessarily begin with “/ Network /” and end with the desired Share Point. In the described case, this Share Point is a Distrib.
Login and password for all of course get your own. Also, on the Internet you can find more information about this method.
This operation needs to be done once and no longer will you have to click any “Connect to server ...”, enter logins, passwords and be distracted by pressing buttons. Moreover, this method does not hang the Finder in case of unsuccessful disconnection from the network. This method just works.
Conclusion, conclusions, thanks.
Creating a home server is fun and not so complicated. Of course, not having skills in soldering, electronics, software to make the described more difficult. The purpose of the article is to show how important the idea that is being carried out. It is very important - to do everything as it was intended and not to lower blots and errors, and correct and do it all over again until a positive result is achieved.
Some people told me: “Why did you need to make a Mac-based server? On a PC basis, it would be much cheaper! ”. Maybe it is so. However, it is not speculative to think that the PC system unit would be five times cheaper than the PowerMac G4. And then, what can the PC offer? FTP? Windows Sharing? Dismiss. A Mac based server is a special love.
The server is working and working properly. It is called “Pirate Mac Server”. Why - the big secret. His address
http://www.server.elevensky.ru/ .
It took me three months to create it.
A source:
www.borisov.elevensky.ru/
Source: https://habr.com/ru/post/12595/
All Articles