Create an html5 mini-walker on CraftyJS
I want to tell how to make my first mini-game on html5 without much difficulty (to be more precise: js, html5, css).
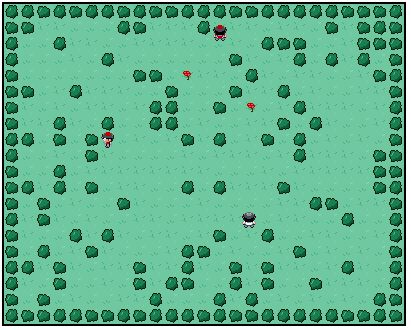
The essence of the game will be as follows: a man walks across the field, between the stones and collects flowers, each flower has 1 guard. The number of colors with each level increases, maps are created in random order.
It all looks like this:
')
So, for our task, I will use the js craftyjs library. Since in order to draw sprites on my own, my hands do not grow from there, I will borrow sprites from the example on the website, we will do everything else from scratch, and we will supplement the sprite with enemies in red caps and T-shirts:

Now it's time to make an application framework, for me it looks like this:

Also, let's create it right away:
/index.html
/css/game.css
/js/game.js
In the last file, we create a canvas with a given width and height, create sprites from our file and run the first “loading” scene.
Let's do our loading scene:
/js/scenes/loading.jd
Here we simply load sprite, make a black background and display text on the background. By the way we brought the text, we will return, but for now let's immediately make 2 more similar scenes for winning and losing.
/js/scenes/win.js
/js/scenes/lose.js
Let's leave the main stage for a while and move on to the objects.
Craftyjs has 2 basic types, the components Crafty.c and the entities Crafty.e. Entities accumulate in themselves the properties of components. In our game there will be 6 entities: a flower, a stone, a grass (background), a unit (base class of a little man), a player and a monster. For each entity, we will create our own component.
Let's start with the simplest grass:
/js/objects/grass.js
Notice that here we connected the Canvas component, and in the scenes, we connected the DOM component to the text, this gives us different behavior of objects, for example, in the text of the scenes we have the opportunity to use the css method. Just here we connected our sprite, choosing in random order which of the 2 grass drawings we use. Now, just make a component for the stone:
/js/objects/bush.js
Everything is the same here, just pay attention to hard_bush, it will come in handy soon. We turn to the flowers, they will develop in our wind:
/js/objects/flower.js
To create an animation, we include the SpriteAnimation component, which gives us methods:
public this .animate (String id, Number fromX, Number y, Number toX) - animation on sprite
public Boolean .isPlaying ([String reel]) - check if animation is playing
Next to the EnterFrame event, we create the wind. Also in this component there is a clear module, which removes a flower if we have collected it.
It's time to go to create a unit, I will describe everything in the comments:
/js/objects/unit.js
Here, all the magic lies in the Collision component, which allows us to set collision boundaries, and work out various events. The Moved event is also processed in this component. .
Create a player:
/js/objects/player.js
Connect the previously created component Unit, sprite player and motion component Fourway. Fourway is a component that changes the position of our sprite depending on the pressed arrow on the keyboard, while creating it takes the parameter of the speed of movement. Then, using the same collision component, we catch 2 events, a collision with a flower (then we collect it) and a collision with a monster (then we die).
It's time to create a monster:
/js/objects/monster.js
Pay attention to the FourwayAI component, there is no such component, we will need to create it. This component will be responsible for the independent movement of the monster:
/js/objects/fourwai_ai.js
this.trigger - as it is not difficult to guess, it creates an event that we later catch for animation.
Now we have to create the last main scene, which will generate our entire map and place on it the player, monsters, stones and flowers.
/js/scenes/main.js
Here we finally create entities for our components, draw a wall of stones around the perimeter, fill the background with grass, and inside for each 16x16 square we create an emptiness, a stone or a flower + an enemy. At the end we place our player.
That's all, we made a simple, endless game - hdml5 walker. Source code is available on github . Checked only in chrome and firefox under mac os.
If anyone tells a steady service where you can put a demo, I will be grateful.
UPD : On the advice of RiderSx laid out a demo here , I hope it will survive.
The essence of the game will be as follows: a man walks across the field, between the stones and collects flowers, each flower has 1 guard. The number of colors with each level increases, maps are created in random order.
It all looks like this:
Frame preparation
')
So, for our task, I will use the js craftyjs library. Since in order to draw sprites on my own, my hands do not grow from there, I will borrow sprites from the example on the website, we will do everything else from scratch, and we will supplement the sprite with enemies in red caps and T-shirts:
Now it's time to make an application framework, for me it looks like this:
Also, let's create it right away:
/index.html
<! DOCTYPE html PUBLIC "-//W3C//DTD XHTML 1.0 Strict//EN"
"http://www.w3.org/TR/xhtml1/DTD/xhtml1-strict.dtd" >
< html xmlns ="http://www.w3.org/1999/xhtml" >
< head >
< script type ="text/javascript" src ="js/jquery.js" ></ script >
<script type= "text/javascript" src= "js/crafty.js" ></script>
<!-- objects -->
<script type= "text/javascript" src= "js/objects/flower.js" ></script>
<script type= "text/javascript" src= "js/objects/bush.js" ></script>
<script type= "text/javascript" src= "js/objects/grass.js" ></script>
<script type= "text/javascript" src= "js/objects/unit.js" ></script>
<script type= "text/javascript" src= "js/objects/player.js" ></script>
<script type= "text/javascript" src= "js/objects/fourway_ai.js" ></script>
<script type= "text/javascript" src= "js/objects/monster.js" ></script>
<!-- scenes -->
<script type= "text/javascript" src= "js/scenes/loading.js" ></script>
<script type= "text/javascript" src= "js/scenes/main.js" ></script>
<script type= "text/javascript" src= "js/scenes/win.js" ></script>
<script type= "text/javascript" src= "js/scenes/lose.js" ></script>

<script type= "text/javascript" src= "js/game.js" > </ script >
< link rel ="stylesheet" href ="css/game.css" type ="text/css" media ="screen" charset ="utf-8" >
< title > Simpe RPG </ title >
</ head >
< body ></ body >
</ html >

* This source code was highlighted with Source Code Highlighter .
/css/game.css
body, html { margin:0; padding: 0; overflow:hidden; font-family:Arial; font-size:20px }
#cr-stage { border:2px solid black; margin:5px auto; color:white }

* This source code was highlighted with Source Code Highlighter .
/js/game.js
var Settings = {
width: 400, //
height: 320, //
poligon: 16, // 16x16
level: 1, //
flower_count: 0 //
};

window.onload = function() {
Crafty.init(Settings.width, Settings.height); //

// sprite
Crafty.sprite(Settings.poligon, "images/sprite.png", {
grass1: [0,0],
grass2: [1,0],
grass3: [2,0],
grass4: [3,0],
flower: [0,1],
bush1: [0,2],
bush2: [1,2],
player: [0,3],
monster: [0,4]
});

//
Crafty.scene("loading");
};

* This source code was highlighted with Source Code Highlighter .
In the last file, we create a canvas with a given width and height, create sprites from our file and run the first “loading” scene.
Creating scenes
Let's do our loading scene:
/js/scenes/loading.jd
Crafty.scene("loading", function() {
Crafty.load(["images/sprite.png"], function() {
// , images/sprite.png
setTimeout(function() {
Crafty.scene("main");
}, 100);
});

//
Crafty.background("#000");
//
Crafty.e("2D, DOM, Text").attr({w: 100, h: 20, x: 150, y: 120})
.text("Loading... < br /> Level: " + Settings.level)
.css({"text-align": "center"});
});

* This source code was highlighted with Source Code Highlighter .
Here we simply load sprite, make a black background and display text on the background. By the way we brought the text, we will return, but for now let's immediately make 2 more similar scenes for winning and losing.
/js/scenes/win.js
Crafty.scene("win", function() {
Settings.level += 1;

Crafty.background("#000");
Crafty.e("2D, DOM, Text").attr({w: 100, h: 20, x: 150, y: 120})
.text("You win! < br /> Level: " + Settings.level)
.css({"text-align": "center"});

setTimeout(function() {
Crafty.scene("main");
}, 1000);
});

* This source code was highlighted with Source Code Highlighter .
/js/scenes/lose.js
Crafty.scene("lose", function() {
Settings.level = 1;

Crafty.background("#000");
Crafty.e("2D, DOM, Text").attr({w: 100, h: 20, x: 150, y: 120})
.text("You lose! < br /> Level: " + Settings.level)
.css({"text-align": "center"});

setTimeout(function() {
Crafty.scene("main");
}, 1000);
});

* This source code was highlighted with Source Code Highlighter .
Let's leave the main stage for a while and move on to the objects.
Creating components
Craftyjs has 2 basic types, the components Crafty.c and the entities Crafty.e. Entities accumulate in themselves the properties of components. In our game there will be 6 entities: a flower, a stone, a grass (background), a unit (base class of a little man), a player and a monster. For each entity, we will create our own component.
Let's start with the simplest grass:
/js/objects/grass.js
Crafty.c('Grass', {
init: function() {
this.requires("2D");
this.requires("Canvas");
this.requires("grass"+Crafty.randRange(1,2));

this.attr({x: 0, y: 0});
}
});

* This source code was highlighted with Source Code Highlighter .
Notice that here we connected the Canvas component, and in the scenes, we connected the DOM component to the text, this gives us different behavior of objects, for example, in the text of the scenes we have the opportunity to use the css method. Just here we connected our sprite, choosing in random order which of the 2 grass drawings we use. Now, just make a component for the stone:
/js/objects/bush.js
Crafty.c('Bush', {
init: function() {
this.requires("2D");
this.requires("Canvas");
this.requires("bush"+Crafty.randRange(1,2));
this.requires("hard_bush");

this.attr({x: 0, y: 0, z: 2});
}
});

* This source code was highlighted with Source Code Highlighter .
Everything is the same here, just pay attention to hard_bush, it will come in handy soon. We turn to the flowers, they will develop in our wind:
/js/objects/flower.js
Crafty.c('Flower', {
init: function() {
this.requires("2D");
this.requires("Canvas");
this.requires("flower");
this.requires("SpriteAnimation");

this.attr({x: 0, y: 0});
this.animate("wind", 0, 1, 3);

this.bind("EnterFrame", function() {
if(!this.isPlaying())
this.animate("wind", 80);
});
},

clear: function() {
this.removeComponent('flower');
this._visible = false;
}
});

* This source code was highlighted with Source Code Highlighter .
To create an animation, we include the SpriteAnimation component, which gives us methods:
public this .animate (String id, Number fromX, Number y, Number toX) - animation on sprite
public Boolean .isPlaying ([String reel]) - check if animation is playing
Next to the EnterFrame event, we create the wind. Also in this component there is a clear module, which removes a flower if we have collected it.
It's time to go to create a unit, I will describe everything in the comments:
/js/objects/unit.js
Crafty.c('Unit', {
init: function() {
this.requires("2D");
this.requires("Canvas");
this.requires("SpriteAnimation");
this.requires("Collision"); //

this.attr({x: 0, y: 0, z: 1});

this.collision(); //

//

this.onHit("hard_bush", function(e) {
var object = e[0].obj;
// left
if (object.x > this.x && (this.x + Settings.poligon) > object.x) {
this.x -= this._speed;
this.stop();
}
// right
if (object.x < this.x && this.x < (object.x + Settings.poligon)) {
this.x += this._speed;
this.stop();
}
// top
if (object.y < this.y && (this.y + Settings.poligon) > object.y) {
this.y += this._speed;
this.stop();
}
// bottom
if (object.y > this.y && this.y < (object.y + Settings.poligon)) {
this.y -= this._speed;
this.stop();
}
});

// , sprite
//

this.bind("Moved", function(e) {
if(this.x < ex) {
if(!this.isPlaying("walk_left"))
this.stop().animate("walk_left", 10);
}
if(this.x > ex) {
if(!this.isPlaying("walk_right"))
this.stop().animate("walk_right", 10);
}
if(this.y < ey) {
if(!this.isPlaying("walk_up"))
this.stop().animate("walk_up", 10);
}
if(this.y > ey) {
if(!this.isPlaying("walk_down"))
this.stop().animate("walk_down", 10);
}
});
}
});

* This source code was highlighted with Source Code Highlighter .
Here, all the magic lies in the Collision component, which allows us to set collision boundaries, and work out various events. The Moved event is also processed in this component. .
Create a player:
/js/objects/player.js
Crafty.c('Player', {
init: function() {
this.requires("Unit"); // unit
this.requires("player"); // sprite
this.requires("Fourway"); //

this.attr({x: 0, y: 0, z: 1});

this.animate("walk_left", 6, 3, 8);
this.animate("walk_right", 9, 3, 11);
this.animate("walk_up", 3, 3, 5);
this.animate("walk_down", 0, 3, 2);

this.fourway(1);

this.onHit("flower", function(e) {
var object = e[0].obj;
object.clear();
if ((Settings.flower_count -= 1) == 0) Crafty.scene("win");
});

this.onHit("monster", function(e) {
var object = e[0].obj;
object.clear();
Crafty.scene("lose");
});
}
});

* This source code was highlighted with Source Code Highlighter .
Connect the previously created component Unit, sprite player and motion component Fourway. Fourway is a component that changes the position of our sprite depending on the pressed arrow on the keyboard, while creating it takes the parameter of the speed of movement. Then, using the same collision component, we catch 2 events, a collision with a flower (then we collect it) and a collision with a monster (then we die).
It's time to create a monster:
/js/objects/monster.js
Crafty.c('Monster', {
init: function() {
this.requires("Unit");
this.requires("monster");
this.requires("FourwayAI");

this.attr({x: 0, y: 0, z: 1});

this.animate("walk_left", 6, 4, 8);
this.animate("walk_right", 9, 4, 11);
this.animate("walk_up", 3, 4, 5);
this.animate("walk_down", 0, 4, 2);

this.fourway_ai(1);
},

clear: function() {
clearInterval(this.removeComponent('monster')._interval);
}
});

* This source code was highlighted with Source Code Highlighter .
Pay attention to the FourwayAI component, there is no such component, we will need to create it. This component will be responsible for the independent movement of the monster:
/js/objects/fourwai_ai.js
Crafty.c('FourwayAI', {
_speed: 3,
_interval: null,

init: function() {
this._movement= { x: 0, y: 0};

this.bind("EnterFrame",function() {
if (this.disableControls) return;

if(this._movement.x !== 0) {
this.x += this._movement.x;
this.trigger('Moved', {x: this.x - this._movement.x, y: this.y});
}
if(this._movement.y !== 0) {
this.y += this._movement.y;
this.trigger('Moved', {x: this.x, y: this.y - this._movement.y});
}
});
},

fourway_ai: function(speed) {
this._speed = speed;

this.make_step();

var kclass = this;
this._interval = setInterval(function() {
kclass.make_step();
}, 1000 * this._speed);
},

make_step: function() {
step = Crafty.randRange(-1,1);

if (Crafty.randRange(1,2) == 1) {
this._movement.x = step;
this._movement.y = 0;
} else {
this._movement.x = 0;
this._movement.y = step;
}

this.trigger('NewDirection', this._movement);
}
});

* This source code was highlighted with Source Code Highlighter .
this.trigger - as it is not difficult to guess, it creates an event that we later catch for animation.
Now we have to create the last main scene, which will generate our entire map and place on it the player, monsters, stones and flowers.
Again creating scenes
/js/scenes/main.js
Crafty.scene("main", function() {
var flower_count = Settings.level + 1;
Settings.flower_count = 0;

//generate the grass along the x-axis
for(var i = 0; i < 25; i++) {
//generate the grass along the y-axis
for(var j = 0; j < 20; j++) {
Crafty.e("Grass").attr({x: i * Settings.poligon, y: j * Settings.poligon});
if (i * Settings.poligon == 160 && j * Settings.poligon == 144) continue;

if(i > 0 && i < 24 && j > 0 && j < 19 && Crafty.randRange(0, 50) > 40) {
if (Crafty.randRange(1,10) == 1 && (flower_count -= 1) > 0) {
Crafty.e("Flower").attr({x: i * Settings.poligon, y: j * Settings.poligon});
Settings.flower_count += 1
// one monster for one flower
Crafty.e("Monster").attr({x: i * Settings.poligon, y: j * Settings.poligon});
} else {
Crafty.e("Bush").attr({x: i * Settings.poligon, y: j * Settings.poligon});
}
}
}
}

//create the bushes along the x-axis which will form the boundaries
for(var i = 0; i < 25; i++) {
Crafty.e("Bush").attr({x: i * Settings.poligon, y: 0});
Crafty.e("Bush").attr({x: i * Settings.poligon, y: 304});
}

//create the bushes along the y-axis
//we need to start one more and one less to not overlap the previous bushes
for(var i = 1; i < 19; i++) {
Crafty.e("Bush").attr({x: 0, y: i * Settings.poligon});
Crafty.e("Bush").attr({x: 384, y: i * Settings.poligon});
}

Crafty.e("Player").attr({x: 160, y: 144, z: 1});
});

* This source code was highlighted with Source Code Highlighter .
Here we finally create entities for our components, draw a wall of stones around the perimeter, fill the background with grass, and inside for each 16x16 square we create an emptiness, a stone or a flower + an enemy. At the end we place our player.
That's all, we made a simple, endless game - hdml5 walker. Source code is available on github . Checked only in chrome and firefox under mac os.
If anyone tells a steady service where you can put a demo, I will be grateful.
UPD : On the advice of RiderSx laid out a demo here , I hope it will survive.
Source: https://habr.com/ru/post/125857/
All Articles