MT6080 digital fountain pen review
INTRODUCTION
Since the first computer was built, a person has constantly sought to simplify work with him. In science fiction, communication between a person and a machine has long been taking place on the verbal and even on the mental level. In real life over the past 50 years, we have not progressed very much. Keyboard, mouse - the most common means of input, but for a person it is much more natural to speak and write, rather than typing on a keyboard. And the thought of creating a digital pen came into someone's clever head.
I have long wanted to try in the digital pen, but it was not possible. And then I had a chance to satisfy my old desire: I got the kit from Master Keith - MT6080. The kit, in addition to the digital pen itself with the base unit, includes an additional set of software. Since it is quite difficult to fully cover the work with application software in one review, I will focus only on the basic functionality. Perhaps in the future I will ripen for a detailed review and software. Attention: many pictures ! So, who are interested in this gadget -
')
EQUIPMENT
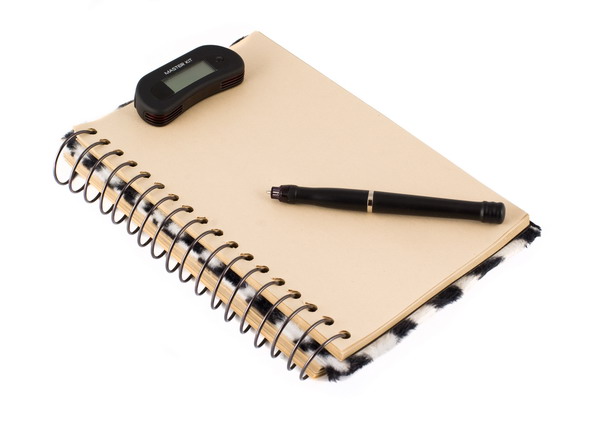
The gadget comes in a soft box with dimensions of 18x13x3.5 cm, inside of which there is an equally soft “bed”, into which the base unit and the handle itself are squeezed. The rest of the contents were under this “bed”.


That's all that was in the package, with the exception of batteries. I recklessly immediately put them into the pen.

Package Included:
- base unit;
- digital pen with a cap;
- writing rod;
- two batteries for the handle;
- mini-USB cable for connecting to a PC and charging the base unit;
- CD with basic software “Easy note taker” and additional program “Photo Sketcher”;
- mini CD with a limited version of the handwriting recognition software “MyScript Notes Lite”;
- thin brochure manual;
- bag made of artificial suede for storing and carrying a set.
DESIGN AND ERGONOMICS
In general, I liked the design, workmanship and usability with the pen and the base unit, but there are some things that I would like to improve.
BASE BLOCK
It was not very convenient for me to mount the base unit in the form of three clips. The clips are raised above the case for a small distance, 1.5-2.0 mm, which creates certain problems when fixing the device on relatively thick (for example, a tablet for individual sheets of paper) objects. In addition, simultaneously pressing all three clips when fixing the device is also not very convenient. It seems to me that it would be much more logical to mount in the form of a single clip-clips with a slot (for dressing the corner of a notebook or tablet).
On the base unit is the only control button. Long press switches on / off the device, short, depending on the mode of operation, changes the mode of operation, or saves the next page in the device’s memory. The display shows the battery charge, the current page (a separate object in the device's memory), the mode of operation.

The lower end of the device is made of dark red transparent plastic with slits. This screen closes IR receivers (I was able to examine two, but perhaps the third is hidden under the section without slots). Accordingly, for proper functioning between the pen and the base unit there should be no foreign objects.

At the top there is a mini-USB connector. With it, the device is connected to a PC or charger. Personally, it seemed to me right that the manufacturer did not include a charger with a USB port. This good is now enough for any gadget lover.

From the back of the device, there are petals of clips, which smoothly transfer to the end of the device, such L-shaped keys are obtained, and an opening for access to the device reset button to factory settings.

DIGITAL HANDLE
The pen looks almost like an ordinary one, with the exception of a slightly extended writing unit and the presence of a button in the place where the fingers are usually wrapped around the pen. The button is quite large and often falls under the finger in the usual girth. It is necessary to get used to this, in order not to press a button when it is not required, however this is only relevant when the PC is connected.

The writing site is quite large, but it does not cause inconvenience. At least it didn’t deliver discomfort to me when writing.

Before work, insert the writing rod from the delivery set. Do not forget to remove the glue "cap" from the ball, which protects the rod from drying out. The color of the rod paste from the kit is black.

It should be noted that short rods of this format have a rather small resource, so it doesn’t interfere with carrying a pen with a couple of three spare rods, good now you can find consumables for every taste and color in the stationery stores. In order to remove the rod, a plate with a cross-shaped slot is provided in the cap. Just pushes the tip of the rod into the end of the cap and remove it.

Batteries are inserted into the top of the handle. To do this, unscrew the small cap.

Since there are no clues as to how to install the batteries, neither on the case, nor on the cap, you will have to remember that they are installed “plus” upwards.

WORK WITH DEVICE
The digital pen can work in four modes:
- Offline mode. You write on paper, and the device remembers what is written in the memory of the base unit. The entire device can memorize over 100 A4 pages;
- Online mode. The base unit connects to a PC for loading saved records and further working with them - printing, sending by mail, recognition, etc .;
- Note mode (interactive notepad). The base unit is connected to a PC and everything that you write and draw on paper is displayed on the computer screen;
- Mouse mode. The base unit is connected to a PC, and pen movements move the cursor on the computer display. The button on re performs the role of the left mouse button.
Consider each of the modes of operation separately.
Offline mode
In my opinion the most demanded mode and the easiest in terms of usability. I think it will be very useful to students, journalists, and indeed to all who often write and who need the ability to save handwritten text not only on paper.
To work in this mode, you need to fix the base unit on a notebook, tablet, or something else that you are going to write on, and turn on the base unit by long pressing the control button. Then you do what you always do - write, make drawings by hand. When you have finished writing on one page, shortly pressing the control button saves the current page and proceeds to writing the next one. The numbers on the base block display the current page number. When finished, turn off the base unit by long pressing the control button.


There are several nuances that I would like to draw attention to. The base unit can be fixed in one of three ways: on the left corner (suitable for right-handers), on the right corner (suitable for left-handers) and along the upper edge of a notebook or tablet (suitable for all). The main condition - between the end of the digital pen and the IR receivers of the base unit should be direct visibility. This is where the nuances begin:
- The orientation of the base unit is stored in the device’s memory. It can be changed only in the Online mode through the program “Easy note taker”. But there is no way to find out what orientation you chose when you last used the device. The only way out - reset to factory settings with a needle. In the default state, the device assumes fixing along the edge of the notebook.
- If you want to continue to use the handwriting recognition program, you must ensure that the lines in the document are as even as possible. When corner fixing the base unit is very difficult. Tip: use lined paper, “zebra” and position the base unit along the edge. This will give the greatest chances for proper recognition, but about that separately.
Online mode
To work in this mode, you need to install the software "Easy note taker". After installing and running the program, if the base unit is connected to the PC, the program will detect the connected device and display a notification in the tray.

After starting the program immediately tries to go online. I think this is an attempt to check for updates. I did not go into clarifying this issue and allowed the program to access the Internet.

When you first start the program will offer to choose a method of fixing the base unit on a notebook or tablet. Let me remind you: the default option is to attach to the upper edge. Changing the orientation of the base unit requires changing it through the software settings.

The second question will be what mode - interactive notebook or mouse - to use by default when connecting the base unit to the PC.

The program interface is in English, but there are no difficulties with understanding its functions. The program window resembles “Explorer”: the left side is a note tree, the right side is a window with thumbnails in the current “folder”. The icons on the left to the right are: “download” (active when the base unit is connected to the PC), “convert to text” (active when the MyScript Notes Lite program is installed), cut, copy, paste , "Delete", "edit", "print", five icons for various options for displaying notes and two icons for selecting the "note mode" and "mouse mode" modes.

After connecting the base unit to the PC, it takes 5-7 seconds to detect the connected device, after which the note download icon becomes active. When you click on it, the program asks if you need to clear the memory of the device after loading the contents.

I can not judge how much it will take to load the contents of the device “stuffed to capacity”, but the couple of pages that were in his memory after my experiments were loaded in a second or two.

The context menu, invoked by right-clicking on a note, provides the same actions as the toolbar, plus the ability to export the note to a JPEG file or to a data file (apparently the format in which the note is stored in the base unit), and also send the note to e -mail

In note editing mode, a new window opens in which you can edit the note using the mouse (including the pen in mouse mode) by removing the unnecessary with the eraser or by adding / finishing the missing.

Handwriting recognition is performed by calling the external program “MyScript Notes Lite”, which has 16 languages in the arsenal (plus various dialects of some of them) recognition, including Russian. Lite version has limitations:
- “graphics and text” mode is unavailable - conversion of forms, tables, arrows and pictures;
- It is impossible to select individual pages for recognition;
- do not create and use recognition profiles;
- the volume of the personal dictionary is limited to 30 words;
- autochange is not available.

Honestly, given my clumsy handwriting, I didn’t particularly expect that the program recognizes anything at all correctly. The result I was somewhat discouraged. The text was quite readable, although some words were misinterpreted. The only thing that upset - for some reason, not all of the note fell into the recognition zone. A couple of the last paragraphs remained behind the scenes.

Interactive mode
The interactive mode allows you to write and draw in a notebook or on a tablet while simultaneously displaying all your actions on a virtual sheet on a computer screen. In this mode, the functions of line style selection, editing, printing, exporting, sending by e-mail and recognizing written text are also available. Now I regret to recall those moments when it was necessary to quickly sketch out some kind of scheme and send it to the addressee. I had to spend a lot of time drawing such elementary stuff in Visio, Worde, and anything else. If I had such a gadget then - it would be a minute!

Interactive mode can be enabled either through the toolbar, or by pressing a button on the base unit. At the same time, the mouse icon is displayed on the base unit. As soon as the pen touches the paper, a virtual tablet will appear on which your notes will appear.

Mouse mode
Personally, this mode seemed to me not the most useful. I didn’t manage to adjust the sensitivity of the pen and mouse so that I didn’t have to move my hand for half a meter in order to move the cursor on a not very large screen netbook from one edge to another. Apparently, the authors' idea was to use the pen in mouse mode to “edit” notes, that is, for local edits, when you do not need to move the pen strongly. In addition, it is the mouse mode that is used in the program “Photo Sketcher”, which is intended for marking on photos and other images. Load the test picture.

Select the color and thickness of the line by clicking on the pencil icon on the right.

And, writing on a piece of paper, we get the result in the picture. If you like it - save.

Mouse mode can be enabled either through the toolbar, or by clicking a button on the base unit. At the same time, the mouse icon is displayed on the base unit.
CONCLUSION
The device, despite the minor flaws, in general, turned out to be very interesting and useful. If the developers do not stop at what has been achieved and will improve the design and software, then this gadget has every chance of becoming a convenient tool for recording and writing. After all, it’s not at all troublesome to carry along another small case with a useful gadget, isn’t it? ;)
With other gadgets Master Kit can be found here .
PS Thanks to everyone who mastered this confusion to the last line! I hope the information will be useful to someone. Ready to answer your questions.
Source: https://habr.com/ru/post/125710/
All Articles