Introduction to SproutCore Part One
Recently, there have been many articles on JavaScript MVC frameworks. Apparently there is a need for such tools. My attention was drawn to a product called SproutCore. Having discovered the meager availability of information in Russian, I decided to translate for myself a number of manuals from the official framework website. I will share with the community the first of them.
After reading this manual, you will be able to:
You will learn all this while creating the application Todo-list.
')
The source code for this application is available on Github . There is also a screencast .
1 Installing SproutCore
It is assumed that you already have SproutCore installed, otherwise you need to install it.
You can download the installer from the official SproutCore site, or you can install it using the RubyGems gem install sproutcore command.
By the way, SproutCore is written in ruby, so the installer will still install the ruby interpreter. After the end of development, you can make a build of the application, then ruby will no longer be needed, but more on that another time.
I installed using RubyGems, there were no problems.
2 Creating a new application
First, let's generate the HTML application with the command:
$ sc-init todos - template
This utility will create several files in the apps / todos directory.
apps /
todos /
todos.js is a JavaScript file that defines your models, views, and controllers.
resources /
templates / - contains application templates.
todos.handlebars is the main application template.
images / - contains images here.
stylesheets / - and here are the styles.
todos.css - the main style sheet for the application.
tests /
Buildfile - Contains commands for building an application. In most cases, you can use the default file.
README - Description of the project.
If you open the apps / todos / todos.js file, you will see the following
This code creates a namespace for the application (in this case, “Todos”), and adds a new panel.
The panel is responsible for delegating events and placing your templates in the DOM, but more on that later.
If, when generating an application, the name contains uppercase characters, for example, ToDos, then the namespace will be called ToDos,
and directory names will contain underscores (in the given example, apps / to_dos).
3 model announcement
We create a todo list, respectively, users should be able to add tasks to the list, and also mark completed tasks.
Define the model as a new subclass of SC.Object.
Now the apps / todos / todos.js file looks like this:
Note that the model definition must follow after creating the Todos object.
Now we have a model class with two properties, title - string and isDone - boolean.
4 Controlling a model using a controller
Now that the data has been described using a model, we will create a controller to control it. Since we need an ordered list of tasks, we will use an instance of the SC.ArrayController class.
At the end of the apps / todos / todos.js file we add:
In MVC frameworks, such as SproutCore, the controller is a bridge between the model (responsible for working with data) and the view (responsible for displaying data).
Now we have a controller without data, we will add to it a method for creating a new task. Update the previous code in the apps / todos / todos.js file :
SC.ArrayController acts as a proxy to the contents of the array. SproutCore will apply all changes made to the ArrayController directly to the contents of the array.
5 Creating a new task using a text field.
For this example, a CSS file was prepared that can be downloaded here and
replace them with an empty file generated by the application creation utility located at apps / todos / resources / stylesheets / todos.css .
We have a model and a controller that is configured to work with it, now let's get down to the most interesting part - creating a user interface. To begin with, we will create a text field in which the user can enter the name of the task being created.
To describe the user interface patterns in SproutCore, Handlebars are used, which has been somewhat extended for more convenience.
To start working with views, open the resources / templates / todos.handlebars file .
It contains the following:
Replace the contents with:
Get more information on using Handlebars here . To learn more about using Handlebars with SproutCore, read here .
Now that we have a model, controller and view, it's time to open the application in the browser and see how it looks. To simplify the development process, there is the sc-server utility. This command must be executed from the directory where the application is located.
Open a web browser and go to http: // localhost: 4020 / todos . Admire your creation. After we make sure the application is working, it's time to tell SproutCore how to handle tag events. When the user enters the name of the task and presses Enter, we will create a new task and add it to the array of tasks.
In SproutCore, the view is responsible for updating the DOM tree and handling events. In addition, it is possible to buffer changes in the DOM to improve performance, and to support universal cross-platform event handling. Whenever you need to display
dynamic content, you need to use the view object.
Add the following code to the apps / todos / todos.js file before calling the SC.ready function:
When CreateTodoView contains a text field, we create a subclass of SC.TextField, which provides several conveniences for working with text fields. For example, you can access property values and respond to requests for higher-level events, such as insertNewline,
when the user presses Enter. Now that we have defined our presentation, we need to include it in the template.
edit the apps / todos / resources / templates / todos.handlebars file :
#view is an auxiliary block of Handlebars (helper or helper - as usual), which connects SC.TemplateView and HTML elements. This means that the behavior described in the view (for example, event handling) will be associated with HTML elements inside the #view block.
Now that we have an interface for creating new tasks, we will create an interface for displaying them.
We will use the #collection block to display the list. #collection will create an instance of SC.TemplateCollectionView, which will display each item in the list according to the HTML code inside the #collection block.
Add the following code to the end of the apps / todos / resources / templates / todos.handlebars file :
We declared a collection binding to the content of todoListController.
Now each element of the array will be displayed in accordance with the {{content.title}} template.
Note that in order to create a binding (binding) you must declare a property whose name ends with a Binding. In our case, the content property will be bound to Todos.todoListController and all changes to the content property will cause changes to Todos.todoListController.
Great time to look at our application http: // localhost: 4020 / todos in your browser. It looks the same as before, but if you type the name of the task in the text field and press Enter, it will automatically be added to the list below the text field.
Bindings or Bindings is the primary tool for working with data in SproutCore. They do all the dirty work of data synchronization and display.
6 Task Mark
We have the ability to add tasks, but there is no way to mark their implementation. Let's add this feature.
The first thing we will do is add a checkbox to each item in the task list. As mentioned earlier, in order to handle events (for example, user input), you must apply a view object to the part of HTML that needs this processing. In our case, we add a checkbox and want to be notified every time a user changes his status. Remember that we can link the view and the HTML content using the #view helper. At the same time, we can refer
on specific objects from HTML elements that are responsible for displaying data using the view helper (note the absence of #). For example, you can create a complex presentation
which will be used several times. In this case, there is no need to update all templates when one of the elements needs to be updated.
Replace the previous code in the apps / todos / resources / templates / todos.handlebars file with the following:
Now we will describe Todos.MarkDoneView which we will refer to in the template. When our view contains a checkbox, we declare a subclass of SC.Checkbox, which passes the value and title properties to the view.
SproutCore binds the change event handler and updates the value when the handler finishes its work. In different browsers this task may be implemented in different ways, but SproutCore will save you from these problems.
For each item in the SC.TemplateCollectionView list, create a child view whose content property will contain a view object. In our case, this will be a child view for each task, and the value of the content property will be tied to the contents of the specific task.
This will allow us to easily link the properties of the checkbox and the properties of the object. In our case, we will bind the value property (checkbox) with the isDone property (object) and the title property (checkbox) with the title property (object).
Add the following code to the apps / todos / todos.js file before calling the SC.ready function:
To give the task list a unique look, the CSS file contains different classes for active and completed tasks. Let's connect the class property (checkbox) and the isDone property (object).
Replace the task list display code in the apps / todos / resources / templates / todos.handlebars file with the following:
Each element will receive an is-done class if the isDone property of the associated object is true. SproutCore will automatically generate the class name based on the property name.
Each view has a number of properties, such as ID, class, and classBinding. The helper collection allows you to add to the elements any of these properties that will also be applied to all child views. For example, if you define the itemClass property in collection, then each of the elements will have a class property.
Now reload the application in the browser and try to mark the task as completed, the task text will immediately be crossed out. If you change the isDone property of any array element, the corresponding HTML element will change its appearance. SproutCore will do this automatically.
7 Learn more
We can add tasks and mark completed. Can we still extract any information from the list? Let's display at the top of the list the number of outstanding tasks.
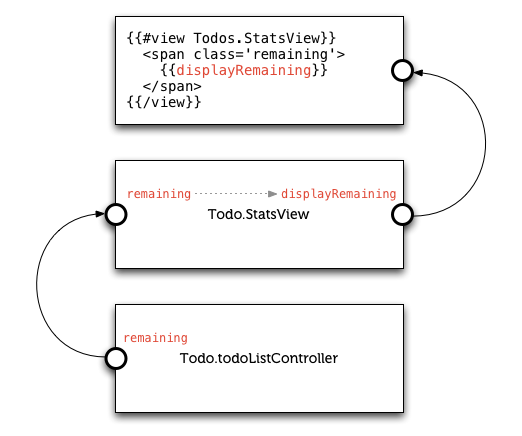
Open apps / todos / resources / templates / todos.handlebars and add a new view element after Todos.CreateTodoView.
The {{displayRemaining}} expression will automatically update the DOM when the displayRemaining property of the Todos.StatsView view changes.
Add a description of the view to the file apps / todos / todos.js before calling SC.ready:
displayRemaining contains a plural string based on the number of remaining tasks. Here is another major tool SproutCore in action, it is called a computed property. A calculated property is a property whose value is determined using a function.
To get the actual number of tasks not completed, add the corresponding property to the controller.
in the apps / todos / todos.js file, update the code as follows:
In this case, we use the each dependency key. Thus, we declare the dependence on the change of the isDone property of any element of the array. Properties with the key each are also updated when adding or removing items. It is necessary to declare dependency keys, since SproutCore uses them to update bindings. That's how it works.
8 Deleting completed tasks
When working with the application, you will need to periodically delete completed tasks. As you understand, we want to make changes to todoListController and have SproutCore automatically display these changes.
To do this, add the clearCompletedTodos method to the controller.
in the apps / todos / todos.js file, update the code to the following:
Now add a button to the template.
Open apps / todos / resources / templates / todos.handlebars and add a button for StatsViews:
We defined an instance of SC.Button, which calls the object's method when pressed. In our case, we created a button to call the TodC.todoListController object's clearCompletedTodos method. We also announced that when the button is pressed, it is necessary to add the is-active class to it. This will allow you to change the appearance of the button.
Now try to download the application, add tasks, mark some of them as completed and remove them from the list. As you can see, everything works.
9 Mark all
Suppose we decided to mark all tasks as completed. Now it is not difficult, because the main work has already been done.
Add the allAreDone method to todoListController. Update the code in the apps / todos / todos.js file to the following:
SproutCore has many enumerated helpers. everyProperty ('isDone', true) returns true if every element in the array has an isDone property equal to true. You can learn more by reading the manual .
Next, we will create a check box to mark all the tasks completed and associate its value with the property of the controller. In the apps / todos / resources / templates / todos.handlebars file immediately after Todos.StatsView, we add:
If you download the application now and try to mark all tasks as completed, you will see that the “do everything” checkbox automatically changed the state, but it does not work in the opposite direction. When you click on the "execute all" checkbox, no changes are made to the task list. To make the flag work as it should, we rewrite the allAreDone method in todoListController.
Update the code in the apps / todos / todos.js file to the following:
When you try to assign a value to a calculated property, the function of the property is called with the key and value parameters. This is what we use in our example, by clicking on the checkbox, SproutCore tries to change the allAreDone property, respectively, we can intercept this call.
Now the application works as we wanted.
10 Styles for mobile devices
Our application can be considered fully functional on all types of modern mobile devices. Let's optimize it for different screen resolutions. Download the CSS file here and save as
apps / todos / resources / stylesheets / todos_mobile.css . Now open the application using a mobile device and you will see also the application only designed for a mobile device.
Good luck in the development of SproutCore.
Original article .
After reading this manual, you will be able to:
- Use templates SproutCore, to describe the appearance of the application;
- Handle events inside the view;
- Use bindings to update the view after changing the state of the model.
You will learn all this while creating the application Todo-list.
')
The source code for this application is available on Github . There is also a screencast .
1 Installing SproutCore
It is assumed that you already have SproutCore installed, otherwise you need to install it.
You can download the installer from the official SproutCore site, or you can install it using the RubyGems gem install sproutcore command.
By the way, SproutCore is written in ruby, so the installer will still install the ruby interpreter. After the end of development, you can make a build of the application, then ruby will no longer be needed, but more on that another time.
I installed using RubyGems, there were no problems.
2 Creating a new application
First, let's generate the HTML application with the command:
$ sc-init todos - template
This utility will create several files in the apps / todos directory.
apps /
todos /
todos.js is a JavaScript file that defines your models, views, and controllers.
resources /
templates / - contains application templates.
todos.handlebars is the main application template.
images / - contains images here.
stylesheets / - and here are the styles.
todos.css - the main style sheet for the application.
tests /
Buildfile - Contains commands for building an application. In most cases, you can use the default file.
README - Description of the project.
If you open the apps / todos / todos.js file, you will see the following
Todos = SC.Application.create(); SC.ready(function() { Todos.mainPane = SC.TemplatePane.append({ layerId: "todos", templateName: "todos" }); }); This code creates a namespace for the application (in this case, “Todos”), and adds a new panel.
The panel is responsible for delegating events and placing your templates in the DOM, but more on that later.
If, when generating an application, the name contains uppercase characters, for example, ToDos, then the namespace will be called ToDos,
and directory names will contain underscores (in the given example, apps / to_dos).
3 model announcement
We create a todo list, respectively, users should be able to add tasks to the list, and also mark completed tasks.
Define the model as a new subclass of SC.Object.
Now the apps / todos / todos.js file looks like this:
Todos = SC.Application.create(); Todos.Todo = SC.Object.extend({ title: null, isDone: false }); SC.ready(function() { Todos.mainPane = SC.TemplatePane.append({ layerId: 'todos', templateName: 'todos' }); }); Note that the model definition must follow after creating the Todos object.
Now we have a model class with two properties, title - string and isDone - boolean.
4 Controlling a model using a controller
Now that the data has been described using a model, we will create a controller to control it. Since we need an ordered list of tasks, we will use an instance of the SC.ArrayController class.
At the end of the apps / todos / todos.js file we add:
Todos.todoListController = SC.ArrayController.create({ // . content: [] }); In MVC frameworks, such as SproutCore, the controller is a bridge between the model (responsible for working with data) and the view (responsible for displaying data).
Now we have a controller without data, we will add to it a method for creating a new task. Update the previous code in the apps / todos / todos.js file :
Todos.todoListController = SC.ArrayController.create({ // . content: [], // , . createTodo: function(title) { var todo = Todos.Todo.create({ title: title }); this.pushObject(todo); } }); SC.ArrayController acts as a proxy to the contents of the array. SproutCore will apply all changes made to the ArrayController directly to the contents of the array.
5 Creating a new task using a text field.
For this example, a CSS file was prepared that can be downloaded here and
replace them with an empty file generated by the application creation utility located at apps / todos / resources / stylesheets / todos.css .
We have a model and a controller that is configured to work with it, now let's get down to the most interesting part - creating a user interface. To begin with, we will create a text field in which the user can enter the name of the task being created.
To describe the user interface patterns in SproutCore, Handlebars are used, which has been somewhat extended for more convenience.
To start working with views, open the resources / templates / todos.handlebars file .
It contains the following:
<h1>Welcome to SproutCore!</h1> Replace the contents with:
<h1>Todos</h1> <input id="new-todo" type="text" placeholder=" ?" > Get more information on using Handlebars here . To learn more about using Handlebars with SproutCore, read here .
Now that we have a model, controller and view, it's time to open the application in the browser and see how it looks. To simplify the development process, there is the sc-server utility. This command must be executed from the directory where the application is located.
$ sc-server

Starting server at 0.0.0.0:4020 in debug mode
To quit sc-server, press Control-C
>> Thin web server (v1.2.1 codename Bat-Shit Crazy)
>> Maximum connections set to 1024
>> Listening on 0.0.0.0:4020, CTRL+C to stop
Open a web browser and go to http: // localhost: 4020 / todos . Admire your creation. After we make sure the application is working, it's time to tell SproutCore how to handle tag events. When the user enters the name of the task and presses Enter, we will create a new task and add it to the array of tasks.
In SproutCore, the view is responsible for updating the DOM tree and handling events. In addition, it is possible to buffer changes in the DOM to improve performance, and to support universal cross-platform event handling. Whenever you need to display
dynamic content, you need to use the view object.
Add the following code to the apps / todos / todos.js file before calling the SC.ready function:
Todos.CreateTodoView = SC.TextField.extend({ insertNewline: function() { var value = this.get('value'); if (value) { Todos.todoListController.createTodo(value); this.set('value', ''); } } }); When CreateTodoView contains a text field, we create a subclass of SC.TextField, which provides several conveniences for working with text fields. For example, you can access property values and respond to requests for higher-level events, such as insertNewline,
when the user presses Enter. Now that we have defined our presentation, we need to include it in the template.
edit the apps / todos / resources / templates / todos.handlebars file :
<h1>Todos</h1> {{#view Todos.CreateTodoView}} <input id="new-todo" type="text" placeholder=" ?" /> {{/view}} #view is an auxiliary block of Handlebars (helper or helper - as usual), which connects SC.TemplateView and HTML elements. This means that the behavior described in the view (for example, event handling) will be associated with HTML elements inside the #view block.
Now that we have an interface for creating new tasks, we will create an interface for displaying them.
We will use the #collection block to display the list. #collection will create an instance of SC.TemplateCollectionView, which will display each item in the list according to the HTML code inside the #collection block.
Add the following code to the end of the apps / todos / resources / templates / todos.handlebars file :
{{#collection SC.TemplateCollectionView contentBinding="Todos.todoListController"}} {{content.title}} {{/collection}} We declared a collection binding to the content of todoListController.
Now each element of the array will be displayed in accordance with the {{content.title}} template.
Note that in order to create a binding (binding) you must declare a property whose name ends with a Binding. In our case, the content property will be bound to Todos.todoListController and all changes to the content property will cause changes to Todos.todoListController.
Great time to look at our application http: // localhost: 4020 / todos in your browser. It looks the same as before, but if you type the name of the task in the text field and press Enter, it will automatically be added to the list below the text field.
Bindings or Bindings is the primary tool for working with data in SproutCore. They do all the dirty work of data synchronization and display.
6 Task Mark
We have the ability to add tasks, but there is no way to mark their implementation. Let's add this feature.
The first thing we will do is add a checkbox to each item in the task list. As mentioned earlier, in order to handle events (for example, user input), you must apply a view object to the part of HTML that needs this processing. In our case, we add a checkbox and want to be notified every time a user changes his status. Remember that we can link the view and the HTML content using the #view helper. At the same time, we can refer
on specific objects from HTML elements that are responsible for displaying data using the view helper (note the absence of #). For example, you can create a complex presentation
which will be used several times. In this case, there is no need to update all templates when one of the elements needs to be updated.
Replace the previous code in the apps / todos / resources / templates / todos.handlebars file with the following:
{{#collection SC.TemplateCollectionView contentBinding="Todos.todoListController"}} {{view Todos.MarkDoneView}} {{/collection}} Now we will describe Todos.MarkDoneView which we will refer to in the template. When our view contains a checkbox, we declare a subclass of SC.Checkbox, which passes the value and title properties to the view.
SproutCore binds the change event handler and updates the value when the handler finishes its work. In different browsers this task may be implemented in different ways, but SproutCore will save you from these problems.
For each item in the SC.TemplateCollectionView list, create a child view whose content property will contain a view object. In our case, this will be a child view for each task, and the value of the content property will be tied to the contents of the specific task.
This will allow us to easily link the properties of the checkbox and the properties of the object. In our case, we will bind the value property (checkbox) with the isDone property (object) and the title property (checkbox) with the title property (object).
Add the following code to the apps / todos / todos.js file before calling the SC.ready function:
Todos.MarkDoneView = SC.Checkbox.extend({ titleBinding: '.parentView.content.title', valueBinding: '.parentView.content.isDone' }); To give the task list a unique look, the CSS file contains different classes for active and completed tasks. Let's connect the class property (checkbox) and the isDone property (object).
Replace the task list display code in the apps / todos / resources / templates / todos.handlebars file with the following:
{{#collection SC.TemplateCollectionView contentBinding="Todos.todoListController" itemClassBinding="content.isDone"}} {{view Todos.MarkDoneView}} {{/collection}} Each element will receive an is-done class if the isDone property of the associated object is true. SproutCore will automatically generate the class name based on the property name.
Each view has a number of properties, such as ID, class, and classBinding. The helper collection allows you to add to the elements any of these properties that will also be applied to all child views. For example, if you define the itemClass property in collection, then each of the elements will have a class property.
Now reload the application in the browser and try to mark the task as completed, the task text will immediately be crossed out. If you change the isDone property of any array element, the corresponding HTML element will change its appearance. SproutCore will do this automatically.
7 Learn more
We can add tasks and mark completed. Can we still extract any information from the list? Let's display at the top of the list the number of outstanding tasks.
Open apps / todos / resources / templates / todos.handlebars and add a new view element after Todos.CreateTodoView.
{{#view Todos.StatsView id="stats"}} {{displayRemaining}} {{/view}} The {{displayRemaining}} expression will automatically update the DOM when the displayRemaining property of the Todos.StatsView view changes.
Add a description of the view to the file apps / todos / todos.js before calling SC.ready:
Todos.StatsView = SC.TemplateView.extend({ remainingBinding: 'Todos.todoListController.remaining', displayRemaining: function() { var remaining = this.get('remaining'); return (remaining === 1 ? remaining +" " : " : "+remaining); }.property('remaining') }); displayRemaining contains a plural string based on the number of remaining tasks. Here is another major tool SproutCore in action, it is called a computed property. A calculated property is a property whose value is determined using a function.
To get the actual number of tasks not completed, add the corresponding property to the controller.
in the apps / todos / todos.js file, update the code as follows:
Todos.todoListController = SC.ArrayController.create({ // ... remaining: function() { return this.filterProperty('isDone', false).get('length'); }.property('@each.isDone') }); In this case, we use the each dependency key. Thus, we declare the dependence on the change of the isDone property of any element of the array. Properties with the key each are also updated when adding or removing items. It is necessary to declare dependency keys, since SproutCore uses them to update bindings. That's how it works.
8 Deleting completed tasks
When working with the application, you will need to periodically delete completed tasks. As you understand, we want to make changes to todoListController and have SproutCore automatically display these changes.
To do this, add the clearCompletedTodos method to the controller.
in the apps / todos / todos.js file, update the code to the following:
Todos.todoListController = SC.ArrayController.create({ // ... clearCompletedTodos: function() { this.filterProperty('isDone', true).forEach(this.removeObject, this); } }); Now add a button to the template.
Open apps / todos / resources / templates / todos.handlebars and add a button for StatsViews:
{{#view Todos.StatsView id="stats"}} {{#view SC.Button classBinding="isActive" target="Todos.todoListController" action="clearCompletedTodos"}} {{/view}} {{displayRemaining}}. {{/view}} We defined an instance of SC.Button, which calls the object's method when pressed. In our case, we created a button to call the TodC.todoListController object's clearCompletedTodos method. We also announced that when the button is pressed, it is necessary to add the is-active class to it. This will allow you to change the appearance of the button.
Now try to download the application, add tasks, mark some of them as completed and remove them from the list. As you can see, everything works.
9 Mark all
Suppose we decided to mark all tasks as completed. Now it is not difficult, because the main work has already been done.
Add the allAreDone method to todoListController. Update the code in the apps / todos / todos.js file to the following:
Todos.todoListController = SC.ArrayController.create({ // ... clearCompletedTodos: function() { this.filterProperty('isDone', true).forEach(this.removeObject, this); } }); SproutCore has many enumerated helpers. everyProperty ('isDone', true) returns true if every element in the array has an isDone property equal to true. You can learn more by reading the manual .
Next, we will create a check box to mark all the tasks completed and associate its value with the property of the controller. In the apps / todos / resources / templates / todos.handlebars file immediately after Todos.StatsView, we add:
{{view SC.Checkbox class="mark-all-done" title=" " valueBinding="Todos.todoListController.allAreDone"}} If you download the application now and try to mark all tasks as completed, you will see that the “do everything” checkbox automatically changed the state, but it does not work in the opposite direction. When you click on the "execute all" checkbox, no changes are made to the task list. To make the flag work as it should, we rewrite the allAreDone method in todoListController.
Update the code in the apps / todos / todos.js file to the following:
Todos.todoListController = SC.ArrayController.create({ // ... allAreDone: function(key, value) { if (value !== undefined) { this.setEach('isDone', value); return value; } else { return this.get('length') && this.everyProperty('isDone', true); } }.property('@each.isDone') }); When you try to assign a value to a calculated property, the function of the property is called with the key and value parameters. This is what we use in our example, by clicking on the checkbox, SproutCore tries to change the allAreDone property, respectively, we can intercept this call.
Now the application works as we wanted.
10 Styles for mobile devices
Our application can be considered fully functional on all types of modern mobile devices. Let's optimize it for different screen resolutions. Download the CSS file here and save as
apps / todos / resources / stylesheets / todos_mobile.css . Now open the application using a mobile device and you will see also the application only designed for a mobile device.
Good luck in the development of SproutCore.
Original article .
Source: https://habr.com/ru/post/125698/
All Articles