Silverlight cookbook: drag & drop recipe
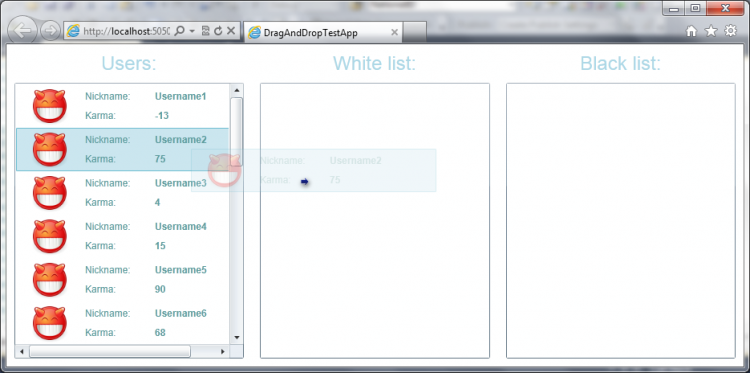
In this article I will analyze the work with drag & drop on the example of such an application:
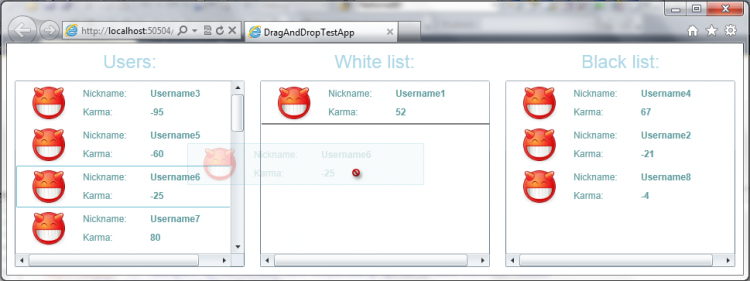
The idea is that from the list of all users we could personally (using drag & drop) sort the users into two groups. Moreover, users with negative karma cannot be added to the white list.
')
But more to the point. I ask under the cat.
Out of the box, we cannot immediately take and start using drag & drop functionality (we’ll have to implement everything ourselves), but to make our lives easier, specially trained guys from the Silverlight Team at Microsoft have already implemented everything in the Silverlight Toolkit .
This functionality is presented in the form of wrappers for some basic controls (User Controls) with the control name + DragDropTarget (for ListBox this is ListBoxDragDropTarget ). The example of ListBox, or rather several ListBoxes, will demonstrate how to work with drag & drop.
I called it DragAndDropTestApp, which, in fact, doesn’t have any meaning at all.
In the next dialog box, leave everything as is and click OK.
Immediately add a link to the Toolkit:
It is assumed that it is already downloaded and installed.
Add the following namespaces to MainPage.xaml:
On the toolkit. And on the namespace in which our application rests.
Sketch xaml.
Each of the three lists is represented by the following markup:
TextBox with a title for the list of items (with all the styles I dabbled in App.xaml). And, actually, ListBox itself, wrapped in ListBoxDragDropTarget. ItemTemplate is overridden to display users. UCUser is my own control. Inside there is nothing supernatural, see for yourself.
The source (Source) for the image is set and the data binding (Binding) is registered.
By the way, for the user there is a separate class. Here is his presentation:
Now we will create a collection for each list and simulate the loading of users:
As the DataContext for the MainPage, set the MainPage itself. I did this so that you can easily attach to the data. It looks like this:
Drag & Drop lacks the final touch:
By setting this property to true, we allow the element to accept data using drag & drop. Moreover, it can be installed both in ListBox and ListBoxDragDropTarget.
Here's what happened:
Now you can drag a user with negative karma to any of the lists.
According to the plan, you need to prohibit dragging such in the White List.
First, let's deal with the events that are generated during the Drag-n-Drop:

DragEnter occurs when the dragged container crosses the boundary of the destination element (triggered before the DragOver event).
DragLeave - draggable container dragged from the source element.
DragOver - triggered when the drag container moves over the destination element.
Drop - the container being dragged was "dropped" into the destination element.
Add a DragEnter event handler for the whitelist.
And assign a name to ListBox, it will be useful to us.
Handler itself:
DragEventArgs.Data returns an IDataObject object that contains the data associated with the corresponding drag event. But data cannot be directly accessed, they are labeled as Non-Public:
To obtain this data, use the GetData () method, which returns data in the format passed as a parameter (the format can be specified as a string or type). You can find out the format using the GetFormats () method.
The result is an instance of the class ItemDragEventArgs . This class contains information describing the drag and drop event on a UIElement. It has a Data property that directly relates to the container being dragged. We bring this object to SelectionCollection .
The collection is used here because we can drag several items at once.
(it is possible to check this very simply, in ListBox, the SelectionMode property is set to Multiple ).
It remains to run through the entire collection and check whether there are guys with negative karma among the draggable users. If there is, then simply prohibiting them to "drop" into the white list.
You can return AllowDrop to its previous value (to True) in the MouseLeave event handler.
And finally, to implement the ability to sort items within the same list using drag-n-drop, it is enough just to override the template for ItemsPanel :
Download the project here .
The idea is that from the list of all users we could personally (using drag & drop) sort the users into two groups. Moreover, users with negative karma cannot be added to the white list.
')
But more to the point. I ask under the cat.
So, the entry.
Out of the box, we cannot immediately take and start using drag & drop functionality (we’ll have to implement everything ourselves), but to make our lives easier, specially trained guys from the Silverlight Team at Microsoft have already implemented everything in the Silverlight Toolkit .
This functionality is presented in the form of wrappers for some basic controls (User Controls) with the control name + DragDropTarget (for ListBox this is ListBoxDragDropTarget ). The example of ListBox, or rather several ListBoxes, will demonstrate how to work with drag & drop.
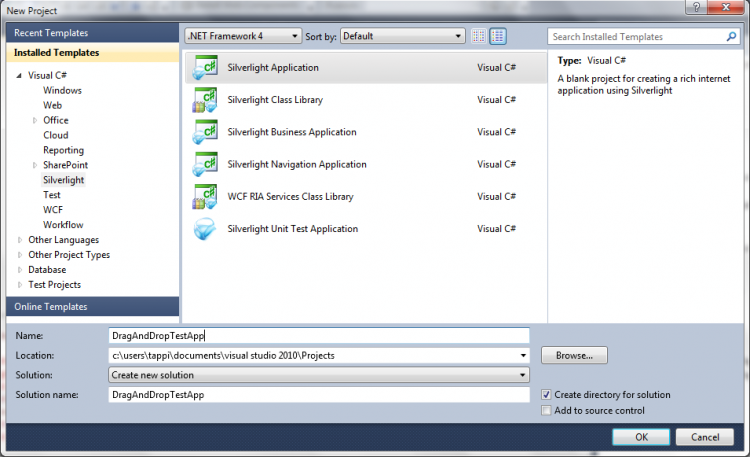
Create a new Silverlight application.
I called it DragAndDropTestApp, which, in fact, doesn’t have any meaning at all.
In the next dialog box, leave everything as is and click OK.
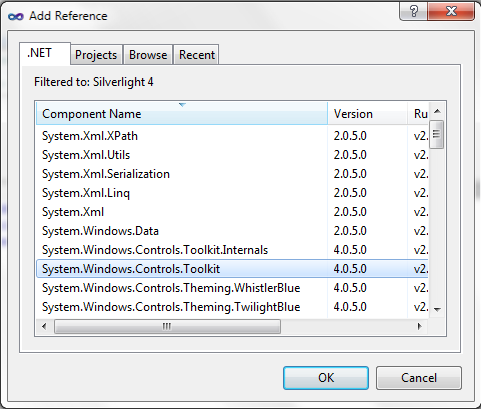
Immediately add a link to the Toolkit:
It is assumed that it is already downloaded and installed.
Add the following namespaces to MainPage.xaml:
xmlns:toolkit= "clr-namespace:System.Windows.Controls;assembly=System.Windows.Controls.Toolkit"
xmlns:my= "clr-namespace:DragAndDropTestApp"
* All source code (under and below) was highlighted with Source Code Highlighter .
On the toolkit. And on the namespace in which our application rests.
Sketch xaml.
Each of the three lists is represented by the following markup:
< TextBlock
Text ="Users:"
Style ="{StaticResource Header}" />
< toolkit:ListBoxDragDropTarget
Grid . Row ="1"
HorizontalContentAlignment ="Stretch"
VerticalContentAlignment ="Stretch" >
< ListBox >
< ListBox.ItemTemplate >
< DataTemplate >
< my:UCUser />
</ DataTemplate >
</ ListBox.ItemTemplate >
</ ListBox >
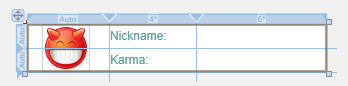
</ toolkit:ListBoxDragDropTarget >TextBox with a title for the list of items (with all the styles I dabbled in App.xaml). And, actually, ListBox itself, wrapped in ListBoxDragDropTarget. ItemTemplate is overridden to display users. UCUser is my own control. Inside there is nothing supernatural, see for yourself.
- < Grid
- x: Name = "LayoutRoot"
- Background = "Transparent" >
- < Grid.ColumnDefinitions >
- < ColumnDefinition Width = "Auto" />
- < ColumnDefinition Width = "4 *" />
- < ColumnDefinition Width = "6 *" />
- </ Grid.ColumnDefinitions >
- < Grid.RowDefinitions >
- < RowDefinition Height = "Auto" />
- < RowDefinition Height = "Auto" />
- </ Grid.RowDefinitions >
- < Image
- Source = "../ Images / gnome_face_devilish.png"
- Width = "48"
- Height = "48"
- Margin = "15, 0, 20, 0"
- Grid RowSpan = "2" />
- < Textblock
- Text = "Nickname:"
- Grid Column = "1" />
- < Textblock
- Text = "{Binding Path = NickName, Mode = OneWay}"
- Grid Column = "2"
- FontWeight = "Bold" />
- < Textblock
- Text = "Karma:"
- Grid Row = "1"
- Grid Column = "1" />
- < Textblock
- Text = "{Binding Path = Karma, Mode = OneWay}"
- Grid Row = "1"
- Grid Column = "2"
- FontWeight = "Bold" />
- </ Grid >
The source (Source) for the image is set and the data binding (Binding) is registered.
By the way, for the user there is a separate class. Here is his presentation:
public class User
{
public string NickName { get ; set ; }
public int Karma { get ; set ; }
}
Now we will create a collection for each list and simulate the loading of users:
- public partial class MainPage: UserControl
- {
- public MainPage ()
- {
- Initializecomponent ();
- this .DataContext = this ;
- InitializeCollections ();
- LoadUsers ();
- }
- // Announcement of collections
- public ObservableCollection <User> Users { get ; set ; }
- public ObservableCollection <User> WhiteList { get ; set ; }
- public ObservableCollection <User> BlackList { get ; set ; }
- // Initialize Collections
- private void InitializeCollections ()
- {
- Users = new ObservableCollection <User> ();
- WhiteList = new ObservableCollection <User> ();
- BlackList = new ObservableCollection <User> ();
- }
- // Method that simulates loading data into the Users collection
- private void LoadUsers ()
- {
- var r = new Random ();
- // Add 20 users with a random karma value.
- for ( int i = 1; i <21; i ++)
- {
- var newUser = new User
- {
- NickName = "Username" + i,
- Karma = r.Next (200) - 100
- };
- Users.Add (newUser);
- }
- }
- }
As the DataContext for the MainPage, set the MainPage itself. I did this so that you can easily attach to the data. It looks like this:
< ListBox ItemsSource ="{Binding Path=Users, Mode=TwoWay}" >Drag & Drop lacks the final touch:
AllowDrop ="True"By setting this property to true, we allow the element to accept data using drag & drop. Moreover, it can be installed both in ListBox and ListBoxDragDropTarget.
Here's what happened:
Now you can drag a user with negative karma to any of the lists.
According to the plan, you need to prohibit dragging such in the White List.
First, let's deal with the events that are generated during the Drag-n-Drop:
DragEnter occurs when the dragged container crosses the boundary of the destination element (triggered before the DragOver event).
DragLeave - draggable container dragged from the source element.
DragOver - triggered when the drag container moves over the destination element.
Drop - the container being dragged was "dropped" into the destination element.
Add a DragEnter event handler for the whitelist.
- < toolkit: ListBoxDragDropTarget
- AllowDrop = "True"
- Grid Row = "1"
- Grid Column = "1"
- HorizontalContentAlignment = "Stretch"
- VerticalContentAlignment = "Stretch"
- DragEnter = "ListBoxDragDropTarget_DragEnter" >
- < Listbox
- ItemsSource = "{Binding Path = WhiteList, Mode = TwoWay}"
- x: Name = "lbWhiteList" >
- < ListBox.ItemTemplate >
- < DataTemplate >
- < my: UCUser />
- </ DataTemplate >
- </ ListBox.ItemTemplate >
- </ Listbox >
- </ toolkit: ListBoxDragDropTarget >
And assign a name to ListBox, it will be useful to us.
Handler itself:
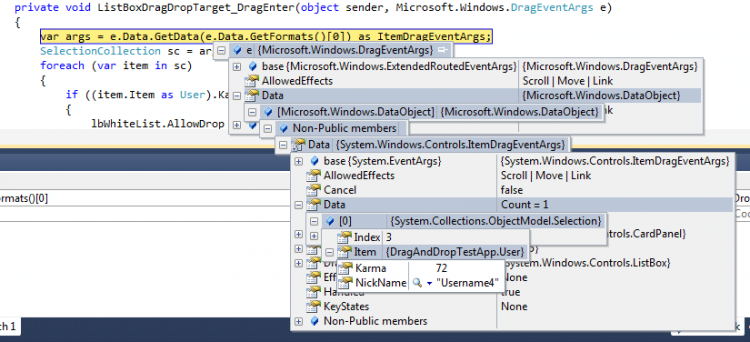
- private void ListBoxDragDropTarget_DragEnter ( object sender, Microsoft.Windows.DragEventArgs e)
- {
- // learned the format
- var dataFormat = e.Data.GetFormats () [0];
- // Received an object in the ItemDragEventArgs format
- var dragEventArgs = e.Data.GetData (dataFormat) as ItemDragEventArgs;
- // Got a collection of drag and drop items
- SelectionCollection sc = dragEventArgs.Data as SelectionCollection;
- // Check each item in the collection
- foreach ( var item in sc)
- {
- // If at least one of the dragged items (users) has negative karma
- // Do not add these items to the white list.
- if ((item.Item as User) .Karma <0)
- {
- lbWhiteList.AllowDrop = false ;
- break ;
- }
- }
- }
DragEventArgs.Data returns an IDataObject object that contains the data associated with the corresponding drag event. But data cannot be directly accessed, they are labeled as Non-Public:
To obtain this data, use the GetData () method, which returns data in the format passed as a parameter (the format can be specified as a string or type). You can find out the format using the GetFormats () method.
The result is an instance of the class ItemDragEventArgs . This class contains information describing the drag and drop event on a UIElement. It has a Data property that directly relates to the container being dragged. We bring this object to SelectionCollection .
The collection is used here because we can drag several items at once.
(it is possible to check this very simply, in ListBox, the SelectionMode property is set to Multiple ).
It remains to run through the entire collection and check whether there are guys with negative karma among the draggable users. If there is, then simply prohibiting them to "drop" into the white list.
You can return AllowDrop to its previous value (to True) in the MouseLeave event handler.
And finally, to implement the ability to sort items within the same list using drag-n-drop, it is enough just to override the template for ItemsPanel :
< ListBox.ItemsPanel >
< ItemsPanelTemplate >
< StackPanel />
</ ItemsPanelTemplate >
</ ListBox.ItemsPanel >
Download the project here .
Source: https://habr.com/ru/post/125592/
All Articles