Iconified Preferences
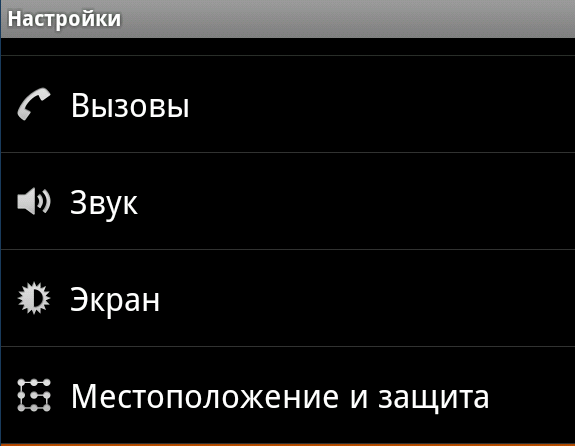
Everyone saw the settings in Android devices - a menu with icons. This is the standard PreferencesActivity, except that the standard Android functions cannot achieve this effect.
To get such an appearance, we use the code borrowed from the Settings.apk system application, which is good for open-source.
And so, we will need:
1. Class IconPreferenceScreen.java;
2. The file attrs.xml in the values folder;
3. Layout preference_icon.xml;
4. Own class PreferencesActivity.java;
5. Settings file preferences.xml
')
The first 3 files are in the source code of the settings application, but I will give their text in the topic.
Class IconPreferenceScreen.java:
Attrs.xml file:
Layout preference_icon.xml
Next, in the PreferencesActivity.java class you need to add lines that describe these items.
And in the preferences.xml settings file itself IconPreferenceScreen
But since the IconPreferenceScreen is not a standard PreferenceScreen and it is impossible to add other elements to it, we will add the processing of a click on it and the opening of the activation.
That's all.
As a bonus, you can make the settings window as a dialog by adding the following code to the activation settings in Manifest:
You can also make a dialog without a title, for which you can create a styles.xml file with the following content:
and registering in Manifest to activate

Advantages of this approach:
-The ability to make beautiful settings items, as well as standard widgets like CheckBox should be placed in one window;
-Visual aesthetics.
Minuses:
-The need to create additional activations for use with the IconPreferenceScreen as opposed to the standard PreferenceScreen.
Download links:
1. The source code of the example ;
2. Sample application (apk) .
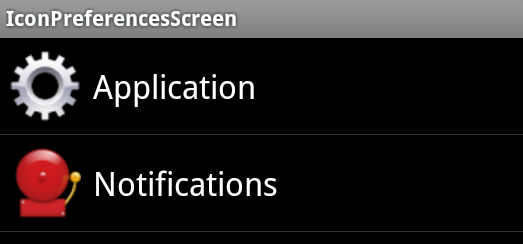
In example 3, activate the first using IconPreferenceScreen and Theme.Dialog style, the second (opens by clicking on any of the two icons), the standard PreferencesActivity with standard widgets and NoTitleDialog style, the third with IconPreferenceScreen and standard widgets without specifying a style, this is exactly the type and is used in Android settings.
Yes, let's make beautiful settings windows in our applications, decorate the world!
To get such an appearance, we use the code borrowed from the Settings.apk system application, which is good for open-source.
And so, we will need:
1. Class IconPreferenceScreen.java;
2. The file attrs.xml in the values folder;
3. Layout preference_icon.xml;
4. Own class PreferencesActivity.java;
5. Settings file preferences.xml
')
The first 3 files are in the source code of the settings application, but I will give their text in the topic.
Class IconPreferenceScreen.java:
public class IconPreferenceScreen extends Preference { private Drawable mIcon; public IconPreferenceScreen(Context context, AttributeSet attrs) { this(context, attrs, 0); } public IconPreferenceScreen(Context context, AttributeSet attrs, int defStyle) { super(context, attrs, defStyle); setLayoutResource(R.layout.preference_icon); TypedArray a = context.obtainStyledAttributes(attrs, R.styleable.IconPreferenceScreen, defStyle, 0); mIcon = a.getDrawable(R.styleable.IconPreferenceScreen_icon); } @Override public void onBindView(View view) { super.onBindView(view); ImageView imageView = (ImageView) view.findViewById(R.id.icon); if (imageView != null && mIcon != null) { imageView.setImageDrawable(mIcon); } } public void setIcon(Drawable icon) { if ((icon == null && mIcon != null) || (icon != null && !icon.equals(mIcon))) { mIcon = icon; notifyChanged(); } } public Drawable getIcon() { return mIcon; } } Attrs.xml file:
<?xml version="1.0" encoding="utf-8"?> <resources> <declare-styleable name="IconPreferenceScreen"> <attr name="icon" format="reference" /> </declare-styleable> </resources> Layout preference_icon.xml
<?xml version="1.0" encoding="utf-8"?> <LinearLayout android:id="@+android:id/iconpref" xmlns:android="http://schemas.android.com/apk/res/android" android:layout_width="match_parent" android:layout_height="wrap_content" android:minHeight="?android:attr/listPreferredItemHeight" android:gravity="center_vertical" android:paddingRight="?android:attr/scrollbarSize"> <ImageView android:id="@+id/icon" android:layout_width="wrap_content" android:layout_height="wrap_content" android:layout_marginLeft="6dip" android:layout_marginRight="6dip" android:layout_gravity="center" /> <RelativeLayout android:layout_width="wrap_content" android:layout_height="wrap_content" android:layout_marginLeft="2dip" android:layout_marginRight="6dip" android:layout_marginTop="6dip" android:layout_marginBottom="6dip" android:layout_weight="1"> <TextView android:id="@+android:id/title" android:layout_width="wrap_content" android:layout_height="wrap_content" android:singleLine="true" android:textAppearance="?android:attr/textAppearanceLarge" android:ellipsize="marquee" android:fadingEdge="horizontal" /> <TextView android:id="@+android:id/summary" android:layout_width="wrap_content" android:layout_height="wrap_content" android:layout_below="@android:id/title" android:layout_alignLeft="@android:id/title" android:textAppearance="?android:attr/textAppearanceSmall" android:maxLines="2" /> </RelativeLayout> </LinearLayout> Next, in the PreferencesActivity.java class you need to add lines that describe these items.
addPreferencesFromResource(R.xml.preferences); IconPreferenceScreen test = (IconPreferenceScreen) findPreference("key"); Resources res = getResources(); Drawable icon = res.getDrawable(R.drawable.icon1); test.setIcon(icono1); And in the preferences.xml settings file itself IconPreferenceScreen
<com.example.app.IconPreferenceScreen android:title="IconPreferenceScreen" android:key="key" /> But since the IconPreferenceScreen is not a standard PreferenceScreen and it is impossible to add other elements to it, we will add the processing of a click on it and the opening of the activation.
test.setOnPreferenceClickListener(new Preference.OnPreferenceClickListener() { @Override public boolean onPreferenceClick(Preference preference) { startActivity(new Intent(PreferencesActivity.this, PreferencesActivity2.class)); return true; } }); That's all.
As a bonus, you can make the settings window as a dialog by adding the following code to the activation settings in Manifest:
android:theme="@android:style/Theme.Dialog" You can also make a dialog without a title, for which you can create a styles.xml file with the following content:
<?xml version="1.0" encoding="utf-8"?> <resources> <style name="NoTitleDialog" parent="android:style/Theme.Dialog"> <item name="android:windowNoTitle">true</item> </style> </resources> and registering in Manifest to activate
android:theme="@style/NoTitleDialog" Advantages of this approach:
-The ability to make beautiful settings items, as well as standard widgets like CheckBox should be placed in one window;
-Visual aesthetics.
Minuses:
-The need to create additional activations for use with the IconPreferenceScreen as opposed to the standard PreferenceScreen.
Download links:
1. The source code of the example ;
2. Sample application (apk) .
In example 3, activate the first using IconPreferenceScreen and Theme.Dialog style, the second (opens by clicking on any of the two icons), the standard PreferencesActivity with standard widgets and NoTitleDialog style, the third with IconPreferenceScreen and standard widgets without specifying a style, this is exactly the type and is used in Android settings.
Yes, let's make beautiful settings windows in our applications, decorate the world!
Source: https://habr.com/ru/post/125259/
All Articles