Silverlight game loop
In this article, I will describe the use of the game loop in Silverlight. A function that contains all the logic for working with animation and processing user actions that affect the animation. For example, the management machine.
Silverlight has excellent animation support. Pull the properties in Blend, put the keys. And everything works, controls react to user actions. Programmatically, through Storyboard , the animation of a property change from state A to state B, without incident in the middle, is also done easily. But when it comes to complex animation (physics, collision calculation, dynamic change of the animation curve), the implementation of animation through the Storyboard makes the code much more difficult or impossible.
')
The classic approach to this issue is to create a timer and recalculate the animation logic with each update.
In Silverlight, these can be timers:
But more appropriate for the implementation of software animation in Silverlight will use the global rendering event Rendering , the static class System.Windows.Media.CompositionTarget .
Sample code for a simple game loop:
The frameTime variable contains the elapsed time since the last redraw. It should be borne in mind that this time can vary greatly. In order to avoid sharp jerks between frames, it is necessary to make mutable properties dependent on this time. It is important to understand that fps (frame rate per second) equal to 60 does not mean that every frame appears after 16 milliseconds.
In principle, this is all, then it remains only to write your animation logic. Because Silverlight itself is responsible for the redrawing of objects, you only need to fill the properties with values and not take care of the rest
For example, create a "game", the machine in the box. The arrows on the keyboard are driving. Left, right, gas, reverse / brake, everything is like everywhere else.
Create a new Silverlight project. Open "MainPage.xaml". In the main Grid, named "LayoutRoot" put:
Picture “car.png” you can use your own or this:
The main thing is that the nose of the car would look right.
The game world is created. Add logic.
Keys are not so simple. Initially, Silverlight does not support the definition of simultaneously pressed keys, not counting the modifiers: Ctrl, Shift, Alt. The KeyDown event handles only the last key pressed. Those. have to press one key at a time. For example, squeezed the gas, and while gassing, do not turn left. As a solution, hang the gas / brake on Ctrl, Shift and steer with both hands. Awkwardly it turns out ...
But all is not so bad, but even good. On the Internet ( Detecting multiple keypresses in Silverlight ) there was a class that solves this problem and even allows you to handle keystrokes inside the game cycle, which is much more convenient than inside the KeyDown handler.
Add a class to the project:
Add the following global variables to MainPage.xaml.cs:
Car animation will be done through the RenderTransform property. It is responsible for moving, rotating, etc.

Fill in the designer of the main window:
The function of processing the mouse click is needed for the most part just to show that the machine catches mouse events:
When the window is displayed, set the focus to the Silverlight plugin, otherwise it will not catch keystrokes. In some browsers, this does not help, then you need to set the focus manually, i.e. just click on our toy. Also, prepare the game cycle.
Add global variables to be used for animation:
By animating the moving machine. Rotate the direction vector (unit vector) around the origin, multiply the components of the vector by the speed and get the place where the machine should be. At the same time, the resulting angle will be the angle of rotation of the machine.

To calculate the intersection of the car with the border of its container: we calculate the rectangle bounding the car, taking into account the angle of turn of the car.

It's time to go to the heart of the game, the functions of the game cycle:
The cycle function consists of the following steps:
For all changes, we take into account the time elapsed from the previous frame ( delta ). For ease of perception, speed is measured in units per second. The angle of rotation increases with the speed of the car.
It is worth noting the processing of keystrokes. Because they are processed in the game loop, the changes they make do not need to be synchronized separately. And such a problem would arise if the code changing the speed and angle of rotation were called from the KeyDown handler.
The car drives, accelerates by a less complicated algorithm. Of course, you can make more natural-looking animations of acceleration and reversals, the effect of skidding, miscalculation of collisions with old women crossing the road ... but it is sufficiently realized to see: complex animation, it is better to do in the game cycle.
The game cycle also has architectural advantages, everything that is currently taking place is collected in one place, as well as the factors that influence it. In comparison with the animation through the Storyboard , it is easier to debug, there is no asynchrony (In the Storyboard, the whole confusion with the catch of the end of the animation, for the start of the next stage of the animation).
In addition, it is not necessary to implement everything in the forehead. The example above is easy to rewrite in Behavior . We attach this behavior to Blend, to the button, and now it drives around the whole screen (why it is necessary is not clear, but it is possible). In the resources below, the link to the wrapper is above the physical library, which basically does the same thing: in Blend we mark objects and they become sensitive to the laws of physics.
The source code for “cars in a box” can be downloaded here or from the sample page .
Resources:
Silverlight has excellent animation support. Pull the properties in Blend, put the keys. And everything works, controls react to user actions. Programmatically, through Storyboard , the animation of a property change from state A to state B, without incident in the middle, is also done easily. But when it comes to complex animation (physics, collision calculation, dynamic change of the animation curve), the implementation of animation through the Storyboard makes the code much more difficult or impossible.
')
The classic approach to this issue is to create a timer and recalculate the animation logic with each update.
In Silverlight, these can be timers:
- System.Windows.Threading.DispatcherTime r - working in the UI thread
- System.Threading.Timer - running in a separate thread.
But more appropriate for the implementation of software animation in Silverlight will use the global rendering event Rendering , the static class System.Windows.Media.CompositionTarget .
Sample code for a simple game loop:
// private int _lastTime; private void MainPage_Loaded(object sender, RoutedEventArgs e){ // , CompositionTarget.Rendering += _gameLoopUpdate; _lastTime = Environment.TickCount; } private void _gameLoopUpdate(object sender, EventArgs e){ int currentTime = Environment.TickCount; int frameTime = currentTime - _lastTime; _lastTime = currentTime; // } The frameTime variable contains the elapsed time since the last redraw. It should be borne in mind that this time can vary greatly. In order to avoid sharp jerks between frames, it is necessary to make mutable properties dependent on this time. It is important to understand that fps (frame rate per second) equal to 60 does not mean that every frame appears after 16 milliseconds.
In principle, this is all, then it remains only to write your animation logic. Because Silverlight itself is responsible for the redrawing of objects, you only need to fill the properties with values and not take care of the rest
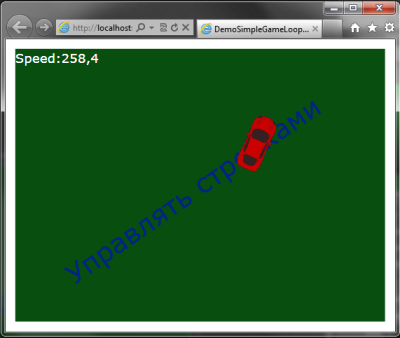
Living example
For example, create a "game", the machine in the box. The arrows on the keyboard are driving. Left, right, gas, reverse / brake, everything is like everywhere else.
Create a new Silverlight project. Open "MainPage.xaml". In the main Grid, named "LayoutRoot" put:
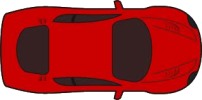
<Grid Margin="12" Background="#FF084E0F"/> <Viewbox IsHitTestVisible="False" Margin="12"> <TextBlock TextWrapping="Wrap" Text=" " Foreground="#FF00228D" RenderTransformOrigin="0.5,0.5" Margin="10,0" Width="129" Height="16"> <TextBlock.RenderTransform> <CompositeTransform Rotation="-35"/> </TextBlock.RenderTransform> </TextBlock> </Viewbox> <Canvas x:Name="ContentPanel" Margin="12"> <TextBlock x:Name="tbInfo" Text="TextBlock" Foreground="White" FontSize="16" /> <Image x:Name="car" Width="70" Source="car.png" Height="35" /> </Canvas> Picture “car.png” you can use your own or this:
The main thing is that the nose of the car would look right.
Dimensional problems with animation.
There are several problems that can arise when working with animation due to the size of animated objects:
- When the width or height dimensions are set in Auto , the change of the rotation center is not taken into account, respectively, there may be problems with the rotation animation. Set dimensions in absolute units.
- At start, ActualWidth and ActualHeight are equal to zero, because Not a single object has been drawn yet. Consider this in calculations.
The game world is created. Add logic.
Keystroke processing
Keys are not so simple. Initially, Silverlight does not support the definition of simultaneously pressed keys, not counting the modifiers: Ctrl, Shift, Alt. The KeyDown event handles only the last key pressed. Those. have to press one key at a time. For example, squeezed the gas, and while gassing, do not turn left. As a solution, hang the gas / brake on Ctrl, Shift and steer with both hands. Awkwardly it turns out ...
But all is not so bad, but even good. On the Internet ( Detecting multiple keypresses in Silverlight ) there was a class that solves this problem and even allows you to handle keystrokes inside the game cycle, which is much more convenient than inside the KeyDown handler.
Add a class to the project:
// . , // , . // public sealed class KeyHandler { private bool[] isPressed = new bool[256]; private UserControl targetCanvas = null; public void ClearKeyPresses(){ for (int i = 0; i < 256; i++){ isPressed[i] = false; } } public void ClearKey(Key k){ isPressed[(int) k] = false; } public void Attach(UserControl target){ ClearKeyPresses(); targetCanvas = target; target.KeyDown += new KeyEventHandler(target_KeyDown); target.KeyUp += new KeyEventHandler(target_KeyUp); target.LostFocus += new RoutedEventHandler(target_LostFocus); } public void Detach(UserControl target){ target.KeyDown -= new KeyEventHandler(target_KeyDown); target.KeyUp -= new KeyEventHandler(target_KeyUp); target.LostFocus -= new RoutedEventHandler(target_LostFocus); ClearKeyPresses(); } private void target_KeyDown(object sender, KeyEventArgs e){ isPressed[(int) e.Key] = true; } private void target_KeyUp(object sender, KeyEventArgs e){ isPressed[(int) e.Key] = false; } private void target_LostFocus(object sender, EventArgs e){ ClearKeyPresses(); } public bool IsKeyPressed(Key k){ int v = (int) k; if (v < 0 || v > 82) return false; return isPressed[v]; } public bool IsKeyPressed(Key[] keys){ foreach (Key k in keys){ if (this.IsKeyPressed(k)) return true; } return false; } } Animation
Add the following global variables to MainPage.xaml.cs:
// private KeyHandler _keyHandler = new KeyHandler(); // private RotateTransform _rotateHelper = new RotateTransform(); // private TranslateTransform _translateTransform = new TranslateTransform(); private RotateTransform _rotateTransform = new RotateTransform(); Car animation will be done through the RenderTransform property. It is responsible for moving, rotating, etc.
Because Transformations animate an object relative to its starting position. Make sure that the car object (our machine) is not set to Canvas.Top and Canvas.Left .
Fill in the designer of the main window:
public MainPage(){ InitializeComponent(); this.Loaded += MainPage_Loaded; // var tg = new TransformGroup(); tg.Children.Add(_rotateTransform); tg.Children.Add(_translateTransform); car.RenderTransform = tg; // _translateTransform.X = 50; _translateTransform.Y = 50; car.MouseLeftButtonDown += car_MouseLeftButtonDown; // _keyHandler.Attach(this); } The function of processing the mouse click is needed for the most part just to show that the machine catches mouse events:
// void car_MouseLeftButtonDown(object sender, MouseButtonEventArgs e){ _speedPerSecond += 300; } When the window is displayed, set the focus to the Silverlight plugin, otherwise it will not catch keystrokes. In some browsers, this does not help, then you need to set the focus manually, i.e. just click on our toy. Also, prepare the game cycle.
private void MainPage_Loaded(object sender, RoutedEventArgs e){ // , System.Windows.Browser.HtmlPage.Plugin.Focus(); // , CompositionTarget.Rendering += _gameLoopUpdate; _lastTime = Environment.TickCount; } Add global variables to be used for animation:
// private Point _direction = new Point(1, 0); // private double _speedPerSecond ; // / , >1 ,<1 private double _accelerationRatioPerSec = 0.60; // private int _lastTime; By animating the moving machine. Rotate the direction vector (unit vector) around the origin, multiply the components of the vector by the speed and get the place where the machine should be. At the same time, the resulting angle will be the angle of rotation of the machine.
To calculate the intersection of the car with the border of its container: we calculate the rectangle bounding the car, taking into account the angle of turn of the car.
It's time to go to the heart of the game, the functions of the game cycle:
private void _gameLoopUpdate(object sender, EventArgs e){ int currentTime = Environment.TickCount; int frameTime = currentTime - _lastTime; _lastTime = currentTime; // // double delta = (double)frameTime / 1000; // double xCurrentPos = _translateTransform.X; double yCurrentPos = _translateTransform.Y; double currentAngle = _rotateTransform.Angle; // double addToSpeedPerSec = 300; if (_keyHandler.IsKeyPressed(Key.Up)){ _speedPerSecond += addToSpeedPerSec*delta; } if (_keyHandler.IsKeyPressed(Key.Down)){ _speedPerSecond -= addToSpeedPerSec * delta; } // double targetAngle = currentAngle; double coefAngle = .5; if (_keyHandler.IsKeyPressed(Key.Right)){ targetAngle += _speedPerSecond * coefAngle*delta; } if (_keyHandler.IsKeyPressed(Key.Left)){ targetAngle -= _speedPerSecond * coefAngle * delta; } // _rotateHelper.CenterX = car.ActualWidth / 2; _rotateHelper.CenterY = car.ActualHeight / 2; _rotateHelper.Angle = targetAngle; // _rotateHelper.CenterX = 0; _rotateHelper.CenterY = 0; _direction = _rotateHelper.Transform(new Point(1, 0)); // _speedPerSecond += (_speedPerSecond*_accelerationRatioPerSec - _speedPerSecond)*delta; // , double stepPerFrame = _speedPerSecond * delta; // double xTargetPos = xCurrentPos + _direction.X * stepPerFrame; double yTargetPos = yCurrentPos + _direction.Y * stepPerFrame; // Rect borderRect = _rotateHelper.TransformBounds(new Rect(0, 0, car.ActualWidth, car.ActualHeight)); borderRect.X = borderRect.X + xTargetPos; borderRect.Y = borderRect.Y + yTargetPos; // if (isInContentPanel(borderRect)){ //// _translateTransform.X = xTargetPos; _translateTransform.Y = yTargetPos; _rotateTransform.Angle = targetAngle; } else{ // , _speedPerSecond = 0; } // tbInfo.Text = string.Format("Speed:{0:F1}", _speedPerSecond); } // , private bool isInContentPanel(Rect shapeBorder){ if (0 <= shapeBorder.Left && shapeBorder.Right <= ContentPanel.ActualWidth) if (0 <= shapeBorder.Top && shapeBorder.Bottom <= ContentPanel.ActualHeight) return true; return false; } The cycle function consists of the following steps:
- We get the current position of the machine
- We set changes, in compliance with pushed keys
- Constantly resetting the speed to 0, this makes the acceleration animation not so linear
- Check if the car got out of the box
- We apply the received changes.
For all changes, we take into account the time elapsed from the previous frame ( delta ). For ease of perception, speed is measured in units per second. The angle of rotation increases with the speed of the car.
It is worth noting the processing of keystrokes. Because they are processed in the game loop, the changes they make do not need to be synchronized separately. And such a problem would arise if the code changing the speed and angle of rotation were called from the KeyDown handler.
Results
The car drives, accelerates by a less complicated algorithm. Of course, you can make more natural-looking animations of acceleration and reversals, the effect of skidding, miscalculation of collisions with old women crossing the road ... but it is sufficiently realized to see: complex animation, it is better to do in the game cycle.
The game cycle also has architectural advantages, everything that is currently taking place is collected in one place, as well as the factors that influence it. In comparison with the animation through the Storyboard , it is easier to debug, there is no asynchrony (In the Storyboard, the whole confusion with the catch of the end of the animation, for the start of the next stage of the animation).
In addition, it is not necessary to implement everything in the forehead. The example above is easy to rewrite in Behavior . We attach this behavior to Blend, to the button, and now it drives around the whole screen (why it is necessary is not clear, but it is possible). In the resources below, the link to the wrapper is above the physical library, which basically does the same thing: in Blend we mark objects and they become sensitive to the laws of physics.
The source code for “cars in a box” can be downloaded here or from the sample page .
Resources:
- Physics Helper for Blend, Silverlight, WP7 and Farseer - Silverlight wrapper over the Farseer Physics Engine physical library (http://farseerphysics.codeplex.com/). It was in her code that I found how complex animation is processed in Silverlight.
- Custom Animations in Silverlight - using the game loop on the example of a pendulum. Article in English.
Source: https://habr.com/ru/post/125037/
All Articles