Creating composite components on Android
Greetings to all Habra residents and Android connoisseurs!
Composite in our case means “consisting of several,” but you already know that.
So, there is a Task:
In practice, this can be anything - a simple row of a table consisting of a pair of text fields.

or complex financial block with graphs

To begin with, consider the alternatives and their disadvantages as applied to our case.
Allows you to change the design and behavior of the component, but only within one component, which is not our definition.
Example:
')
Using this method, you will have to write kilobytes ofkilometers of code, in which you will create each TextView manually, transfer context to it, create LayoutParams for it to describe alignment, put all this into LinearLayout / FrameLayout / RelativeLayout created beforehand, would make a design match.
And as soon as the designer sends you a new version of the design, to put it mildly, you will not be very happy about it ...
An abstract example of creating multiple fields in code:
In essence, this is the same as the previous item, only the cells of the parent table are used for alignment.
This method makes it impossible to subtly follow the design, since all alignment will be only horizontally and vertically, and in order to shift the component to a non-standard position, it will be necessary to resort to merging cells and the layout enclosed in the table cells.
The essence of this method is simple drawing on the canvas of your UI component.
This method not only has the disadvantages of the 2nd item (complex manual adjustment of all UI elements in accordance with the design), but also has another major drawback - the inability to use standard EditText, Botton, CheckBox, SeekBar controls, in this case either have to write manually or overlay our UI. In any case, it will be inadequate time and effort spent on solving the problem.
Finally, we come to the very essence of the article - creating a component for the given task in the optimal way.
To begin with, we are already accustomed to typeset our layout into XML manually or using a visual editor that is part of the Eclipse ADT plugin.
Be sure to give all the key elements of the UI your unique ID.
For layout we use RelativeLayout in order to be able to set the relative position of the components inside the parent and relative to each other. Specifically, in this case, a vertical LinearLayout would suffice, but we are not looking for easy ways for educational purposes.
The width of the component is set rigidly (288dip), which would be the same as in the original image, but nothing prevents you from doing “fill_parent”.
channel_layout.xml:
To set the properties of the text, we could create a couple of styles, but let's do what we have, for clarity. Also, do not kick for not having rendered text inscriptions in strings.xml, readability would deteriorate and you would have to quote another file in the article.
Next, create a class of our component and inherit it from the class that we used in our layout - RelativeLayout.
In order to connect our class and channel_layout layout, we use LayoutInflater.
We also define variables for all fields inside the class in order to associate the class fields with the UI.
Now, in a nutshell, what I have done here: first, we initialize all fields and create convenient methods for setting field values, for example, there are 2 ways to set a logo - by specifying the resource Id and by transferring Bitmap.
Our class is also a wrapper over “TVProgram parentProgram” - this is another way to set the fields of our UI component — by calling setParentProgram and passing the filled program object, we automatically set the values of all UI fields from the parent.
The component is ready, it remains to create instances of it, set the values of the fields and add them to the form:
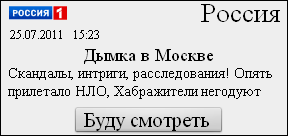
And, lastly, a screenshot of what we got:

And the source code .
Successful projects to you!
Composite in our case means “consisting of several,” but you already know that.
So, there is a Task:
- It is necessary to display a data block, including text, pictures, buttons, etc.
(In our case it will be a short announcement on TV) - the block design is drawn by a specially hired designer and you cannot get a pixel from him
- This block can have some kind of internal logic of operation and components can influence each other (we have “internal logic”, we will set the “*” symbol in the transfer header and change the background color if the “I will watch” button was pressed)
- There may be a lot of such blocks and the information for them is obtained already in the process of the application
- As always, in the process of work, the design can be revised, and you need to quickly make changes to the program without rewriting everything from the very beginning.
In practice, this can be anything - a simple row of a table consisting of a pair of text fields.
or complex financial block with graphs
To begin with, consider the alternatives and their disadvantages as applied to our case.
Custom components
Allows you to change the design and behavior of the component, but only within one component, which is not our definition.
Example:
public class CustomImage extends ImageView { //... public CustomImage(Context context) { super(context); calcSize(); } void calcSize() { // } //... } ')
Dynamic UI creation by software
Using this method, you will have to write kilobytes of
And as soon as the designer sends you a new version of the design, to put it mildly, you will not be very happy about it ...
An abstract example of creating multiple fields in code:
public void generateLayout() { LinearLayout linearLayout = new LinearLayout(getContext()); linearLayout.setOrientation(LinearLayout.VERTICAL); TextView name = new TextView(getContext()); name.setText(getContext().getResources().getText(R.string.channel_name).toString()); name.setTextSize(TypedValue.COMPLEX_UNIT_DIP, 18);//18dip name.setTypeface(null, Typeface.BOLD); name.setPadding(20, 0, 20, 0); ViewGroup.MarginLayoutParams layoutParams = new ViewGroup.MarginLayoutParams( ViewGroup.MarginLayoutParams.FILL_PARENT, ViewGroup.MarginLayoutParams.WRAP_CONTENT); name.setLayoutParams(layoutParams); linearLayout.addView(name); for (int i = 0; i < 5; i++) { TextView subName = new TextView(getContext()); subName.setText(getChannelItemName(i)); subName.setTextSize(TypedValue.COMPLEX_UNIT_DIP, 16); subName.setTypeface(null, Typeface.NORMAL); subName.setPadding(30, 0, 20, 0); ViewGroup.MarginLayoutParams subLayoutParams = new ViewGroup.MarginLayoutParams( ViewGroup.MarginLayoutParams.FILL_PARENT, ViewGroup.MarginLayoutParams.WRAP_CONTENT); subName.setLayoutParams(subLayoutParams); linearLayout.addView(subName); } } Tabular Layout
In essence, this is the same as the previous item, only the cells of the parent table are used for alignment.
This method makes it impossible to subtly follow the design, since all alignment will be only horizontally and vertically, and in order to shift the component to a non-standard position, it will be necessary to resort to merging cells and the layout enclosed in the table cells.
Canvas draw
The essence of this method is simple drawing on the canvas of your UI component.
This method not only has the disadvantages of the 2nd item (complex manual adjustment of all UI elements in accordance with the design), but also has another major drawback - the inability to use standard EditText, Botton, CheckBox, SeekBar controls, in this case either have to write manually or overlay our UI. In any case, it will be inadequate time and effort spent on solving the problem.
public class DrawComponent extends View { public DrawComponent(Context context) { super(context); } @Override protected void onDraw(Canvas canvas) { super.onDraw(canvas); //, , ... } } Creating a composite component using a LayoutInflater
Finally, we come to the very essence of the article - creating a component for the given task in the optimal way.
To begin with, we are already accustomed to typeset our layout into XML manually or using a visual editor that is part of the Eclipse ADT plugin.
Be sure to give all the key elements of the UI your unique ID.
For layout we use RelativeLayout in order to be able to set the relative position of the components inside the parent and relative to each other. Specifically, in this case, a vertical LinearLayout would suffice, but we are not looking for easy ways for educational purposes.
The width of the component is set rigidly (288dip), which would be the same as in the original image, but nothing prevents you from doing “fill_parent”.
channel_layout.xml:
<?xml version="1.0" encoding="utf-8"?> <RelativeLayout xmlns:android="http://schemas.android.com/apk/res/android" android:id="@+id/program_frame" android:layout_width="288dip" android:layout_height="wrap_content" android:padding="5dip"> <ImageView android:id="@+id/channel_logo" android:layout_width="wrap_content" android:layout_height="wrap_content" android:layout_alignParentTop="true" android:layout_alignParentLeft="true" android:src="@drawable/russia"/> <TextView android:id="@+id/program_time" android:layout_width="wrap_content" android:layout_height="wrap_content" android:layout_below="@+id/channel_logo" android:layout_alignLeft="@+id/channel_logo" android:layout_marginTop="5dip" android:singleLine="true" android:textColor="@android:color/black" android:textStyle="normal" android:textSize="12dp" android:text="25.07.2011 15:23"/> <TextView android:id="@+id/channel_name" android:layout_width="wrap_content" android:layout_height="wrap_content" android:layout_alignParentTop="true" android:layout_alignParentRight="true" android:textColor="@android:color/black" android:textStyle="bold" android:textSize="16dp" android:singleLine="true" android:text=""/> <TextView android:id="@+id/program_name" android:layout_width="wrap_content" android:layout_height="wrap_content" android:layout_below="@id/program_time" android:layout_centerHorizontal="true" android:layout_marginTop="5dip" android:textColor="@android:color/black" android:textStyle="bold" android:textSize="15dp" android:singleLine="true" android:text=" "/> <TextView android:id="@+id/program_description" android:layout_width="wrap_content" android:layout_height="wrap_content" android:layout_below="@id/program_name" android:layout_centerHorizontal="true" android:layout_marginTop="5dip" android:textColor="@android:color/black" android:textStyle="normal" android:textSize="12dp" android:lines="3" android:text=", , !"/> <Button android:id="@+id/want_to_watch_button" android:layout_width="wrap_content" android:layout_height="wrap_content" android:layout_below="@id/program_description" android:layout_centerHorizontal="true" android:layout_marginTop="5dip" android:paddingLeft="10dip" android:paddingRight="10dip" android:textColor="@android:color/black" android:textStyle="bold" android:textSize="15dp" android:text=" "/> </RelativeLayout> To set the properties of the text, we could create a couple of styles, but let's do what we have, for clarity. Also, do not kick for not having rendered text inscriptions in strings.xml, readability would deteriorate and you would have to quote another file in the article.
Next, create a class of our component and inherit it from the class that we used in our layout - RelativeLayout.
In order to connect our class and channel_layout layout, we use LayoutInflater.
We also define variables for all fields inside the class in order to associate the class fields with the UI.
public class ChannelFrame extends RelativeLayout { private TVProgram parentProgram; private ImageView channel_logo; private TextView channel_name; private TextView program_time; private TextView program_name; private TextView program_description; private Button want_to_watch_button; private String programName = ""; private boolean isWannaWatch = false; public ChannelFrame(Context context) { super(context); initComponent(); } private void initComponent() { LayoutInflater inflater = (LayoutInflater) getContext().getSystemService(Context.LAYOUT_INFLATER_SERVICE); inflater.inflate(R.layout.channel_layout, this); channel_logo = (ImageView) findViewById(R.id.channel_logo); channel_name = (TextView) findViewById(R.id.channel_name); program_time = (TextView) findViewById(R.id.program_time); program_name = (TextView) findViewById(R.id.program_name); program_description = (TextView) findViewById(R.id.program_description); want_to_watch_button = (Button) findViewById(R.id.want_to_watch_button); want_to_watch_button.setOnClickListener(buttonListener); updateFields(); } private void updateFields() { if (isWannaWatch) { program_name.setText(programName + "*"); this.setBackgroundResource(R.drawable.frame_bg_selected); } else { program_name.setText(programName); this.setBackgroundResource(R.drawable.frame_bg); } } public void setChannelName(String name) { channel_name.setText(name); } public void setChannelLogo(int resourceId) { channel_logo.setImageResource(resourceId); } public void setChannelLogo(Bitmap image) { channel_logo.setImageBitmap(image); } public void setProgramTime(String time) { program_time.setText(time); } public void setProgramName(String name) { programName = name; program_name.setText(programName); } public void setProgramDescription(String name) { program_description.setText(name); } private final OnClickListener buttonListener = new OnClickListener() { public void onClick(View view) { isWannaWatch = !isWannaWatch; updateFields(); } }; public TVProgram getParentProgram() { return parentProgram; } public void setParentProgram(TVProgram parentProgram) { this.parentProgram = parentProgram; updateFieldsByParent(); } private void updateFieldsByParent() { setProgramName(parentProgram.getName()); setProgramDescription(parentProgram.getDesc()); setProgramTime(SimpleDateFormat.getInstance().format(parentProgram.getTime())); setChannelLogo(parentProgram.getChannelLogo()); setChannelName(parentProgram.getChannelName()); } } Now, in a nutshell, what I have done here: first, we initialize all fields and create convenient methods for setting field values, for example, there are 2 ways to set a logo - by specifying the resource Id and by transferring Bitmap.
Our class is also a wrapper over “TVProgram parentProgram” - this is another way to set the fields of our UI component — by calling setParentProgram and passing the filled program object, we automatically set the values of all UI fields from the parent.
The component is ready, it remains to create instances of it, set the values of the fields and add them to the form:
public class StartActivity extends Activity { private LinearLayout framesContainer; /** * Called when the activity is first created. */ @Override public void onCreate(Bundle savedInstanceState) { super.onCreate(savedInstanceState); setContentView(R.layout.main); framesContainer = (LinearLayout) findViewById(R.id.frames_container); for (int i = 0; i < 5; i++) { ChannelFrame frame = new ChannelFrame(getApplicationContext()); frame.setProgramName("............."); frame.setProgramDescription("............."); frame.setProgramTime("............."); framesContainer.addView(frame); } } } And, lastly, a screenshot of what we got:
And the source code .
Successful projects to you!
Source: https://habr.com/ru/post/124879/
All Articles