We write live wallpaper with a clock
 Recently, I decided to figure out how to make live wallpapers for an android, and best understand a good example - one that will come in handy later. I always wanted a comfortable watch. For android, there are already a sufficient number of similar wallpapers, but usually they draw a large clock in some fixed corner of the screen and overlap with widgets, which I have quite a few. I wanted the clock to be scattered across the screen, then the probability of seeing them will be higher.
Live wallpapers for android are a service (background process, in terms of platform), and in the SDK there is already a ready class for live wallpapers in which you need to redefine several methods to get the result.
To begin with, the manifest describes that the application will provide live wallpapers:
<service android:name="LiveWallpaperService" android:enabled="true" android:icon="@drawable/icon" android:label="@string/app_name" android:permission="android.permission.BIND_WALLPAPER"> <intent-filter android:priority="1" > <action android:name="android.service.wallpaper.WallpaperService" /> </intent-filter> <meta-data android:name="android.service.wallpaper" android:resource="@xml/wallpaper" /> </service> The most important lines here are android: permission and intent-filter
')
Then, actually, coding. We will create our own successor class WallpaperService and redefine its methods onCreate, onDestroy, onVisibilityChanged, onSurfaceChanged, onSurfaceCreated, onSurfaceDestroyed
These methods will respond to system events. Their main purpose is to turn wallpaper on and off when their visibility changes, in order to save battery.
In fact, we are only interested in:
@Override public void onVisibilityChanged(boolean visible) { if (visible) { painting.resumePainting(); } else { // remove listeners and callbacks here painting.pausePainting(); } } @Override public void onDestroy() { super.onDestroy(); // remove listeners and callbacks here painting.stopPainting(); } @Override public void onSurfaceChanged(SurfaceHolder holder, int format, int width, int height) { super.onSurfaceChanged(holder, format, width, height); painting.setSurfaceSize(width, height); Log.d("Clock", "Changed"); } @Override public void onSurfaceCreated(SurfaceHolder holder) { super.onSurfaceCreated(holder); painting.start(); } @Override public void onSurfaceDestroyed(SurfaceHolder holder) { super.onSurfaceDestroyed(holder); boolean retry = true; painting.stopPainting(); while (retry) { try { painting.join(); retry = false; } catch (InterruptedException e) {} } } We implement the drawing itself in a separate thread, so that the reactions to user actions are timely and smooth. To do this, create another class-heir Thread . The painting object in the example above is this thread:
public ClockWallpaperPainting(SurfaceHolder surfaceHolder, Context context, int fontColor, int backgroundColor) { this.surfaceHolder = surfaceHolder; this.context_ = context; clockFont_ = Typeface.createFromAsset(context.getAssets(), "digital_font.ttf"); textPainter_.setTypeface(clockFont_); textPainter_.setTextSize(30); setPreferences(fontColor, backgroundColor); this.wait_ = true; } @Override public void run() { this.run_ = true; Canvas c = null; while (run_) { try { c = this.surfaceHolder.lockCanvas(null); synchronized (this.surfaceHolder) { doDraw( c ); } } finally { if (c != null) { this.surfaceHolder.unlockCanvasAndPost( c ); } } // pause if no need to animate synchronized (this) { if (wait_) { try { wait(); } catch (Exception e) {} } } } } public void pausePainting() { this.wait_ = true; synchronized(this) { this.notify(); } } public void resumePainting() { this.wait_ = false; synchronized(this) { this.notify(); } } public void stopPainting() { this.run_ = false; synchronized(this) { this.notify(); } } As you can see, we just endlessly execute the doDraw () method, periodically putting it on pause when the desktop is not visible.
The method itself looks like this:
private void doDraw(Canvas canvas) { Date currentTime = new Date(); //Create text for clock String clockText; if (DateFormat.is24HourFormat(context_)) { if (currentTime.getSeconds()%2 == 0) clockText = DateFormat.format("kk:mm", currentTime).toString(); else clockText = DateFormat.format("kk mm", currentTime).toString(); } else { if (currentTime.getSeconds()%2 == 0) clockText = DateFormat.format("h:mmaa", currentTime).toString(); else clockText = DateFormat.format("h mmaa", currentTime).toString(); } int textSize = (int)textPainter_.getTextSize(); //Erase Background canvas.drawRect(0, 0, width_, height_, backgroundPainter_); int stepX = (width_ - textSize) / (CLOCKS_COUNT + 1); int stepY = (height_ - textSize*CLOCKS_COUNT) / (CLOCKS_COUNT + 1); for (int i=1; i <= CLOCKS_COUNT; ++i) canvas.drawText(clockText, stepX/2 + stepX * (i-1) - absoluteOffset_, height_/20 + stepY * i + textSize*(i-1), textPainter_); } In the service, we will redefine another method so that the wallpaper reacts to the change of desktops:
@Override public void onOffsetsChanged(float xOffset, float yOffset, float xStep, float yStep, int xPixels, int yPixels) { painting.setOffset(xOffset); Log.d("Clock", String.format("off:%f-%f step:%f - %f px: %d - %d", xOffset, yOffset, xStep, yStep, xPixels, yPixels)); } How to make a drawing in a separate stream, perfectly painted in this example .
And finally, the settings. They are made easy, as well as the settings of any other android applications. In the xml file you need to register custom parameters and ranges of values that they can take. In our case, let the user choose the color of the text and background.
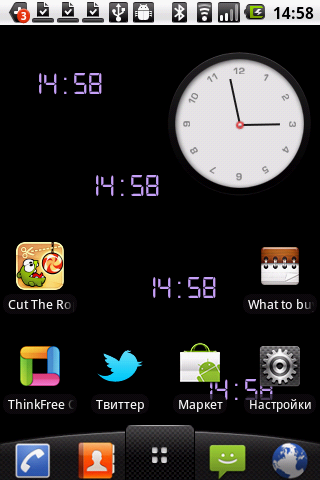
<PreferenceScreen xmlns:android="http://schemas.android.com/apk/res/android" android:title="@string/settings_title"> <ListPreference android:key="preference_font_color" android:title="@string/preference_font_color_title" android:summary="@string/preference_font_color_summary" android:entries="@array/color_names" android:entryValues="@array/color_values" /> <ListPreference android:key="preference_background_color" android:title="@string/preference_background_color_title" android:summary="@string/preference_background_color_summary" android:entries="@array/color_names" android:entryValues="@array/color_values" /> </PreferenceScreen> This is how it looks in the end:
You can download it here .
To write your wallpaper, you can start from here.
Source: https://habr.com/ru/post/124322/
All Articles