Osmand User Guide
Osmand is a program for Android that allows you to work with offline maps of OpenStreetMap and not only use voice navigation, recording, display and navigation of GPX tracks, as well as a number of OSM editing features. Judging by the previous topic , among habrovchan there is a sufficiently large number of users of this program who would like to know the subtleties of the work of this program.
 Of course, writing manuals for users has recently been considered a bad tone, since the user interface should be absolutely clear to everyone and in any situation, but the reality, unfortunately, suggests otherwise. This is especially critical when users do not understand the basic concepts of the application or are guided by an understatement or overestimation of its capabilities.
Osmand, like most Linux applications, is designed for everyone, so it’s hard to even name a specific target audience. This is both a plus and a minus application. In principle, all open source develops according to this scenario, because the community constantly adds small and necessary patches and rarely adds large and necessary ones. This is how applications with a bunch of settings, a bunch of overlapping functions and thousands of usage scenarios are obtained.
')
Briefly, the topics covered below:
First of all, it should be noted that the documentation in Russian still exists, albeit a bit outdated
There are 2 types of maps: vector and raster. Raster maps are maps that are represented by pictures (tiles), vector maps are a binary data set, on which there are still to draw tiles for display. In general, the fundamental difference is that raster maps are drawn very quickly and take up a lot of space for detailed areas. For example, Google Maps / Yandex maps - raster maps, Garmin / Navitel - vector. When you first download Osmand uses raster maps, and loads them from the Internet to an SD card, then these cards are used. Vector maps need to be loaded in a special dialog - Settings → Indexes → Download indexes. To switch between maps, use the menu → Layers → Source Map ...
Raster maps are convenient enough if the display speed is critical to you and you don’t want to clutter up an SD card with internet access at hand. By default, 2 sources of raster maps are created, but you can download others via “Install ..”. At the time of installation of the source, a folder is created on the SD card (/ sdcard / osmand / tiles / <source name>), where all tiles will be loaded. By deleting this folder, the program will assume that there is no source. This is a fairly convenient way to make a list of sources on your own.
Also, there is a way to create your own source of tiles (Own rendering, WMS). If you enter / sdcard / osmand / tiles / <source name>, then you can find the .metainfo file, which contains all the necessary information about loading tiles. Easier and better way to use OsmandMapCreator . With this program, you can select and load the area of interest (large), and then copy it to an SD card. You can download a large area using Wifi on your phone: context menu → Download map. The main advantage of using a PC to prepare a map is that you can put tiles into a single file (Create sqlite database), then copy the file to osmand / tiles /. This is very important for Flash Cards, since a large number of files excessively degrades the file system operation. SQlite file will also download tiles from the Internet.
There are settings for those who monitor Internet traffic (Settings - Map / General): you can turn off the Internet in general to download tiles and you can specify a zoom level from which it is not necessary to load tiles. For example, 14-15 is quite sufficient for car navigation, since Osmand can increase tiles by 2-4 times, respectively 16-17, the traffic savings are obvious :)
To display vector maps you need to load these same maps. The screen will display a huge list of downloads with a filter, the list of downloads is the same as Downloads . It is recommended to download in addition to your region 1) Voice data and 2) Basemap (World Map 1-7 zoom 3 Mb). The advantage of vector maps is that they can rotate and support different rendering styles. Rendering styles depend on the current profile (described below), but they can be specified manually. You can even create your own style and put it in (osmand / rendering), some even create maps with elevation profiles . Also, vector maps change their style depending on the day and night (can be found in the settings) and can transliterate the names into English.
Vector maps can be quite slow on small details, so there is an option to go to raster maps with zoom <= N. This is quite an effective combination of memory consumption and rendering time.
The application has the ability to use any map as a substrate or coating with the required level of transparency. Naturally, this slows down the rendering process + spends a very precious memory for the application (may fall).
 Depending on the situation, the map displays the speed indicator, arrival time indicator (when you press the remaining time indicator), the detail indicator (zoom), the distance indicator from the center of the map to the destination point (when pressed, goes to the destination point), the arrow - return to the current position, the compass (when pressed rotates the map on the compass or turns off the rotation), the profile settings (when pressed, you can choose).
The destination point is displayed on the map with a red dot with a flag, when it is not visible, a red arrow appears, which indicates the direction + the distance to it is always visible on the screen, which is quite convenient when walking on foot. You can select the destination point through any search (Go To), sometimes you have to use a long press, or through the context menu of the map. When routing the destination point must be selected. It can be removed via Menu → Unmark.
Map context menu is a menu whose actions are tied to the selected point on the map. You can choose in 3 ways: pressing the trackpoint, long pressing on the map + pressing on the appeared area (long pressing hides the area), through the menu. In this menu, the selected point 1) can be selected as the destination point 2) can be used as the starting point of the route (for viewing only) 3) will be the starting point for POI search, transport 4) can be sent to a friend via SMS, email 5) ...
In the application there are general settings and profile settings. General settings:
- screen orientation - you can set so that the card does not get lost when you carry the phone in your hand
- application directory - you can change / sdcard / osmand.
- localization, units of measurement of distance, use of trackpoint ...
There are 4 profiles in the application: by default (map view), auto, bicycle and pedestrian. All settings selected in each profile are stored in it. For example, for a pedestrian, daytime rendering was always chosen to be displayed, respectively, when changing to auto, this setting will be reset and another one will be set as autoscaling. When navigating, the settings profile changes automatically. There are default settings for each profile, but all of them can be changed and configured.
At the moment maps and layers, although displayed in the settings, are separate application settings and do not change by profiles.
 You can search by coordinates, by address, favorites, POI, transport and in the search history. For the address, POI, transport, vector data is required. You can visualize the search on the map by turning on the necessary layers (Menu → Layers), filter POI layer, favorites layer or transport stops layer. For all searches, 2 buttons are active, “show on map” and “go to”; for selected ones, the history of the option “go to” appears with a long press. You can get into the search by clicking the search button on the device. The search is affected by the "show English names" option.
Everything is quite simple: choose a region (the name of vector maps), a city, a street, etc. There is also an option to search through Osm Nominatim, uses the Internet and is recommended for those who know how to form requests.
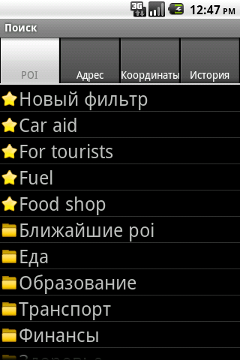
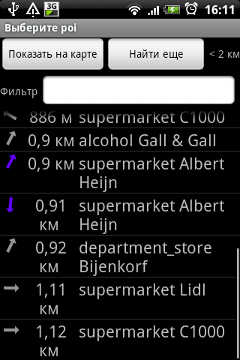 To search for POI filters are applied. Edited and created by the user are displayed with an asterisk, standard OSM - folder. To edit, you need a long press on the filter or select a new filter, then through the menu you can “save as” or “delete” the filter. When you select a filter, 2 options appear: search next to you (it will take time until the application finds satellites) or search around the last selected part of the map. There is a way to filter the found POI by name - menu button → filter.
You can add to favorites through the context menu on the map. There is also a separate “replace” option, for dynamic favorites such as car, hotel, last meeting place in the forest :) Favorite points can be exported and imported (GPX file), it is important when you uninstall the application and reinstall it. It is not recommended to import a large number of selected points, it is better to use the “GPX file” layer for this.
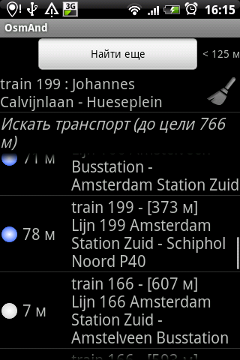 Search for transport can also be called as manual route planning. When searching, you need a starting point (the final one at discretion), therefore a search for a vehicle is available from the context menu of the map. The inscription to search for transport to the target is clickable, in one case the target is taken into account, in the other there is none. When searching for transport - the results are sorted by the smallest amount from the start to the route + from the route to the destination. When choosing a route, it is proposed to choose a stop at which to exit. After this, the search will be repeated, but the starting point will be the stopping point of the previous route (Search after). Thus, you can build a route with transfers, but you will have to choose stops for transfers manually.
Background service can be useful if you want to turn off the screen and not use GPS continuously. The background service starts GPS positioning at regular intervals and performs 2 functions: recording a GPX track and navigating (including voice). Enable background service can be in the settings.
In order to get a route, you must select a destination point, and then Menu - a route. There are 2 modes for building a route: follow (navigate) and view the route. You can view information about the route laid Menu - Route - About route. When you select the mode to follow, the profile automatically changes and the route is plotted from the current location, and voice navigation is activated.
There are 3 sources for building routes: an online source (Cloudmade, Yours), offline vector data navigation (unstable), and GPX track navigation. The most optimal is Cloudmade, but requires an internet connection. Navigation on vector data is under development and can only be used for short distances and does not yet determine ramps / circles and more. You can navigate on the GPX track, built, for example, maps.cloudmade.com (Map - Menu - GPX Navigation).
 Monitoring and recording GPX files in / sdcard / osmand / tracks is enabled by default for some profiles (auto, bike), so the history of your movements is stored in GPX files by day. These settings can be turned off and on for other profiles by selecting the desired tracking interval.
In the application, you can view the recorded tracks, as well as those created by other users. This requires GPX files to be in / sdcard / osmand / tracks. You can turn on through Layers - GPX, while all segments will be displayed as lines on the map, and all points in the track will be displayed as favorites. They will also be available in the favorites list as long as the layer is on.
At any time, a point with a description can be added to the recorded GPX file, this can be done via the context menu of the map. This is useful for recording some POIs in the absence of the Internet.
PS If I missed something, some interesting and small moments, I will add to the “other”.
Thanks for attention
Of course, writing manuals for users has recently been considered a bad tone, since the user interface should be absolutely clear to everyone and in any situation, but the reality, unfortunately, suggests otherwise. This is especially critical when users do not understand the basic concepts of the application or are guided by an understatement or overestimation of its capabilities.Osmand, like most Linux applications, is designed for everyone, so it’s hard to even name a specific target audience. This is both a plus and a minus application. In principle, all open source develops according to this scenario, because the community constantly adds small and necessary patches and rarely adds large and necessary ones. This is how applications with a bunch of settings, a bunch of overlapping functions and thousands of usage scenarios are obtained.
')
Briefly, the topics covered below:
- Map - vector and raster maps, various settings
- Maps screen - indicators on the main screen of the application and context menu
- Application Settings - Settings Profiles and Overview of Basic Settings
- Background service - application operation with the screen off and with the specified activation period
- Monitoring - recording GPX tracks
- Navigation - online and offline navigation
- Search - search POI, transport, addresses
- OSM editing - POI and Osm bugs
First of all, it should be noted that the documentation in Russian still exists, albeit a bit outdated
Map
There are 2 types of maps: vector and raster. Raster maps are maps that are represented by pictures (tiles), vector maps are a binary data set, on which there are still to draw tiles for display. In general, the fundamental difference is that raster maps are drawn very quickly and take up a lot of space for detailed areas. For example, Google Maps / Yandex maps - raster maps, Garmin / Navitel - vector. When you first download Osmand uses raster maps, and loads them from the Internet to an SD card, then these cards are used. Vector maps need to be loaded in a special dialog - Settings → Indexes → Download indexes. To switch between maps, use the menu → Layers → Source Map ...
Raster maps
Raster maps are convenient enough if the display speed is critical to you and you don’t want to clutter up an SD card with internet access at hand. By default, 2 sources of raster maps are created, but you can download others via “Install ..”. At the time of installation of the source, a folder is created on the SD card (/ sdcard / osmand / tiles / <source name>), where all tiles will be loaded. By deleting this folder, the program will assume that there is no source. This is a fairly convenient way to make a list of sources on your own.
Also, there is a way to create your own source of tiles (Own rendering, WMS). If you enter / sdcard / osmand / tiles / <source name>, then you can find the .metainfo file, which contains all the necessary information about loading tiles. Easier and better way to use OsmandMapCreator . With this program, you can select and load the area of interest (large), and then copy it to an SD card. You can download a large area using Wifi on your phone: context menu → Download map. The main advantage of using a PC to prepare a map is that you can put tiles into a single file (Create sqlite database), then copy the file to osmand / tiles /. This is very important for Flash Cards, since a large number of files excessively degrades the file system operation. SQlite file will also download tiles from the Internet.
There are settings for those who monitor Internet traffic (Settings - Map / General): you can turn off the Internet in general to download tiles and you can specify a zoom level from which it is not necessary to load tiles. For example, 14-15 is quite sufficient for car navigation, since Osmand can increase tiles by 2-4 times, respectively 16-17, the traffic savings are obvious :)
Vector cards
To display vector maps you need to load these same maps. The screen will display a huge list of downloads with a filter, the list of downloads is the same as Downloads . It is recommended to download in addition to your region 1) Voice data and 2) Basemap (World Map 1-7 zoom 3 Mb). The advantage of vector maps is that they can rotate and support different rendering styles. Rendering styles depend on the current profile (described below), but they can be specified manually. You can even create your own style and put it in (osmand / rendering), some even create maps with elevation profiles . Also, vector maps change their style depending on the day and night (can be found in the settings) and can transliterate the names into English.
Vector maps can be quite slow on small details, so there is an option to go to raster maps with zoom <= N. This is quite an effective combination of memory consumption and rendering time.
Substrate and Coating Cards
The application has the ability to use any map as a substrate or coating with the required level of transparency. Naturally, this slows down the rendering process + spends a very precious memory for the application (may fall).
Map screen
Depending on the situation, the map displays the speed indicator, arrival time indicator (when you press the remaining time indicator), the detail indicator (zoom), the distance indicator from the center of the map to the destination point (when pressed, goes to the destination point), the arrow - return to the current position, the compass (when pressed rotates the map on the compass or turns off the rotation), the profile settings (when pressed, you can choose).The destination point is displayed on the map with a red dot with a flag, when it is not visible, a red arrow appears, which indicates the direction + the distance to it is always visible on the screen, which is quite convenient when walking on foot. You can select the destination point through any search (Go To), sometimes you have to use a long press, or through the context menu of the map. When routing the destination point must be selected. It can be removed via Menu → Unmark.
Map context menu is a menu whose actions are tied to the selected point on the map. You can choose in 3 ways: pressing the trackpoint, long pressing on the map + pressing on the appeared area (long pressing hides the area), through the menu. In this menu, the selected point 1) can be selected as the destination point 2) can be used as the starting point of the route (for viewing only) 3) will be the starting point for POI search, transport 4) can be sent to a friend via SMS, email 5) ...
General Settings and Settings Profiles
In the application there are general settings and profile settings. General settings:
- screen orientation - you can set so that the card does not get lost when you carry the phone in your hand
- application directory - you can change / sdcard / osmand.
- localization, units of measurement of distance, use of trackpoint ...
There are 4 profiles in the application: by default (map view), auto, bicycle and pedestrian. All settings selected in each profile are stored in it. For example, for a pedestrian, daytime rendering was always chosen to be displayed, respectively, when changing to auto, this setting will be reset and another one will be set as autoscaling. When navigating, the settings profile changes automatically. There are default settings for each profile, but all of them can be changed and configured.
At the moment maps and layers, although displayed in the settings, are separate application settings and do not change by profiles.
Search
You can search by coordinates, by address, favorites, POI, transport and in the search history. For the address, POI, transport, vector data is required. You can visualize the search on the map by turning on the necessary layers (Menu → Layers), filter POI layer, favorites layer or transport stops layer. For all searches, 2 buttons are active, “show on map” and “go to”; for selected ones, the history of the option “go to” appears with a long press. You can get into the search by clicking the search button on the device. The search is affected by the "show English names" option.Address
Everything is quite simple: choose a region (the name of vector maps), a city, a street, etc. There is also an option to search through Osm Nominatim, uses the Internet and is recommended for those who know how to form requests.
POI
To search for POI filters are applied. Edited and created by the user are displayed with an asterisk, standard OSM - folder. To edit, you need a long press on the filter or select a new filter, then through the menu you can “save as” or “delete” the filter. When you select a filter, 2 options appear: search next to you (it will take time until the application finds satellites) or search around the last selected part of the map. There is a way to filter the found POI by name - menu button → filter.Favorites
You can add to favorites through the context menu on the map. There is also a separate “replace” option, for dynamic favorites such as car, hotel, last meeting place in the forest :) Favorite points can be exported and imported (GPX file), it is important when you uninstall the application and reinstall it. It is not recommended to import a large number of selected points, it is better to use the “GPX file” layer for this.
Transport
Search for transport can also be called as manual route planning. When searching, you need a starting point (the final one at discretion), therefore a search for a vehicle is available from the context menu of the map. The inscription to search for transport to the target is clickable, in one case the target is taken into account, in the other there is none. When searching for transport - the results are sorted by the smallest amount from the start to the route + from the route to the destination. When choosing a route, it is proposed to choose a stop at which to exit. After this, the search will be repeated, but the starting point will be the stopping point of the previous route (Search after). Thus, you can build a route with transfers, but you will have to choose stops for transfers manually.Background service
Background service can be useful if you want to turn off the screen and not use GPS continuously. The background service starts GPS positioning at regular intervals and performs 2 functions: recording a GPX track and navigating (including voice). Enable background service can be in the settings.
Navigation and route planning
In order to get a route, you must select a destination point, and then Menu - a route. There are 2 modes for building a route: follow (navigate) and view the route. You can view information about the route laid Menu - Route - About route. When you select the mode to follow, the profile automatically changes and the route is plotted from the current location, and voice navigation is activated.
There are 3 sources for building routes: an online source (Cloudmade, Yours), offline vector data navigation (unstable), and GPX track navigation. The most optimal is Cloudmade, but requires an internet connection. Navigation on vector data is under development and can only be used for short distances and does not yet determine ramps / circles and more. You can navigate on the GPX track, built, for example, maps.cloudmade.com (Map - Menu - GPX Navigation).
Monitoring and GPX files
Monitoring and recording GPX files in / sdcard / osmand / tracks is enabled by default for some profiles (auto, bike), so the history of your movements is stored in GPX files by day. These settings can be turned off and on for other profiles by selecting the desired tracking interval.In the application, you can view the recorded tracks, as well as those created by other users. This requires GPX files to be in / sdcard / osmand / tracks. You can turn on through Layers - GPX, while all segments will be displayed as lines on the map, and all points in the track will be displayed as favorites. They will also be available in the favorites list as long as the layer is on.
At any time, a point with a description can be added to the recorded GPX file, this can be done via the context menu of the map. This is useful for recording some POIs in the absence of the Internet.
Other
- The application has functions for editing and annotating OSM maps: Osm bugs layer, creating / editing POI (via the context menu), creating Osm bugs. To edit a POI, you must specify your username in the settings.
- Do not forget to view useful tips (question icon): the latest changes in the application are published there.
- You can create your own vector maps, for example, to display geocaching as POIs. To do this, you need to convert the source data in the Osm format and index it using OsmAndMapCreator.
PS If I missed something, some interesting and small moments, I will add to the “other”.
Thanks for attention
Source: https://habr.com/ru/post/124295/
All Articles