Save your data safely: p2p file system with encryption in the cloud
Today, the idea of cloud file storage is popular with everyone. About this technology is written on the Internet, talk on television. However, not everyone is ready to trust their personal data to other servers and foreign server administrators, because, as it were, they would not encrypt (proprietary) programs, it is still possible that you can read your data. Therefore, for the safe storage of personal data is to think about using open technologies with encryption.
For encryption was selected Tahoe-Lafs distributed file system, built on p2p technology. The advantage of this technology is that files are encrypted and written to nodes in the form of pieces (like bittorrent). And we will save the data into the wuala program (a cloudy proprietary file system, analogous to the dropbox).
With the help of SuseStudio my own development was cloned ( Tahoe-Lafs live disk based on OpenSuse 11.4 ) and the following was finalized: x11, icewm, java, missing components were installed and thus the assembly began to look like this:

')
I also had to modify the files: permissions.local, windowmanager, without which x11 would not run from under a regular user (not root), since suid programs are almost completely excluded in the new linux build.
We collect the image in a web studio in OFV image format, download it and import it into VirtualBox and launch our virtual machine.

In the console, using the root user, create the folder / tahoe in non-folder / tahoe / 1, / tahoe / 2, / tahoe / 3, because the minimum number of nod for 3 pieces and the folder for introducer (bittorrent tracker): / tahoe / intro. Change permissions for this folder for all: chmod + x -R 777 / tahoe / *
We close the super user console and create a file in the home directory and in the /home/tahoe/allmydata-tahoe-1.8.2/bin folder with the contents:
createall.sh
# / bin / sh
./tahoe create-introducer / tahoe / intro &
./tahoe create-node / tahoe / 1 &
./tahoe create-node / tahoe / 2 &
./tahoe create-node / tahoe / 3 &
startall.sh
# / bin / sh
./tahoe restart / tahoe / intro &
./tahoe restart / tahoe / 1 &
./tahoe restart / tahoe / 2 &
./tahoe restart / tahoe / 3 &
Making them run: chmod + x * .sh
It remains to configure the Tahoe. In each folder we edit /tahoe/number/tahoe.cfg
In it we give the name of the node and change the port number of the web interface, because otherwise there will be a conflict:
i.e. The first file looks like this: /tahoe/1/tahoe.cfg
[node]
nickname = Tahoe-Wuala1
web.port = tcp: 3456: interface = 127.0.0.1
web.static = public_html
# tub.port =
# tub.location =
# log_gatherer.furl =
# timeout.keepalive =
# timeout.disconnect =
# ssh.port = 8022
# ssh.authorized_keys_file = ~ / .ssh / authorized_keys
In the section where the number of nodes to save is changed by 3:
[client]
# Which services should this client connect to?
introducer.furl = None
helper.furl =
# key_generator.furl =
# stats_gatherer.furl =
# What is the encoding parameters for uploads?
shares.needed = 3
shares.happy = 3
shares.total = 3
Now this tahoe.cfg file can be copied to the second folder with the file replacement, and in the second folder only the port and the name of the node should be changed: nickname = Tahoe-Wuala2
web.port = tcp: 3457: interface = 127.0.0.1 and in the third: nickname = Tahoe-Wuala3
web.port = tcp: 3458: interface = 127.0.0.1
It's time to start our web service. Run the file we created in /home/tahoe/allmydata-tahoe-1.8.2/bin/startall.sh
After launch, the address for our host introducer will appear in the / tahoe / intro folder. The cat introducer.furl file is copied to each folder / tahoe / 1, / tahoe / 2, and / tahoe / 3.
Install the client, downloading it from wuala.com, in the console from under the root user:
rpm -ihv cdn.wuala.com/repo/suse/wuala-current.i386.rpm
We start it already under normal users and register. You can use my promo code NNJFMJAK3HGH7P4J7GAC, because the default is only 1 GB, and with the help of invitations you can get more free storage space. Create folders for storage in wuala:
www.wuala.com/referral/NNJFMJAK3HGH7P4J7GAC
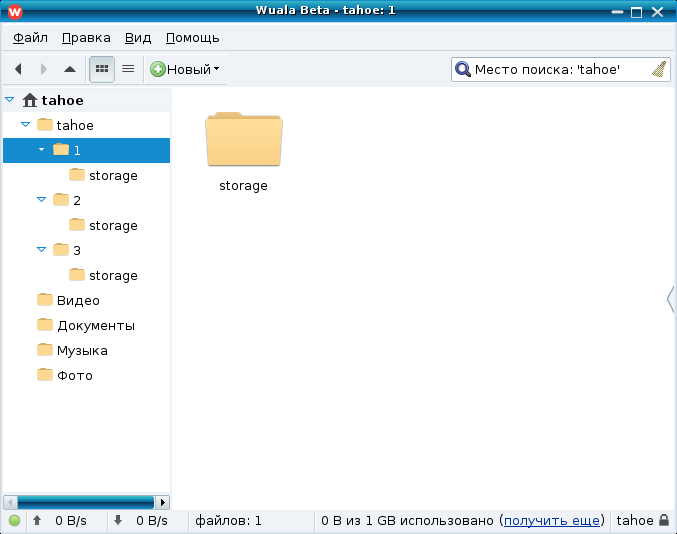
In the program we create the tahoe folder and in it there are subfolders 1,2,3 and in each of them storage - the encrypted files from tahoe will be uploaded there
Now you need to put the sim links (links) to the real file system opensuse. Using mc and the File-Symlink menu:

That is. Folder / tahoe / 1 / storage is linked to a folder on the Internet in wuala: / home / tahoe / WualaDrive / Your loginWuala / tahoe / 1 / storage; / tahoe / 2 / storage is referenced in wuala: / home / tahoe / WualaDrive / VashloginWuala / tahoe / 2 / storage and the third folder is in / tahoe / 3 / storage respectively in the folder in the Internet in wuala: / home / tahoe / WualaDrive / VashloginWuala / tahoe / 3 / storage
Restart our tahoe script startall.sh. We start the ssh: service sshd start service in the console from under the root and connect to the other machine to the tahoe via port forwarding:
ssh -C tahoe @ ip-virtual -L localhost: 3456: localhost: 3456
Open our browser and see what we did:

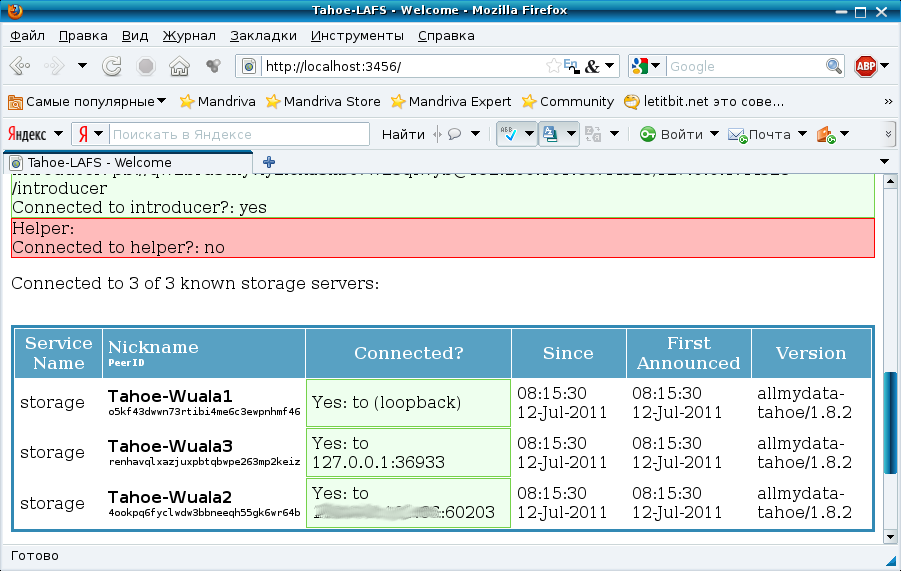
Everything is fine, the nodes are connected. We try to create a folder, click Create a directory.
We look at the information about it: More info on this directory and see the address: Directory writecap URI: DIR2: 7awqdjdkkkwookbhc4eigffgu4: vbnajdeshk4hgb6eatamfycdfolydafy42hm6uv7d7xmajhu4mpa. It remains to add a frontend (sftp). To do this, in the / tahoe / 1 / private folder, create an ftp.accounts file with the contents:
renat renat URI: DIR2: 7awqdjdkkkwookbhc4eigffgu4: vbnajdeshk4hgb6eatamfycdfolydafy42hm6uv7d7xmajhu4mpa
In the file /tahoe/1/tahoe.cfg we add about the section that we have sftp:
[sftpd]
enabled = true
port = tcp: 8022: interface = ip virtual machine
host_pubkey_file = private / ssh_host_rsa_key.pub
host_privkey_file = private / ssh_host_rsa_key
accounts.file = private / ftp.accounts
Start the generation of encryption keys for sftp in the folder / tahoe / 1
ssh-keygen -f private / ssh_host_rsa_key
Restart the tahoe again using the startall.sh script. And on any computer on any system (including windows), you can now configure FileZilla using the name and password: renat (we set it up earlier in the ftp.accounts file):

In the FileZilla Transfer menu, we set Save File Timestamps so that when uploading files to the tahoe we keep the date.
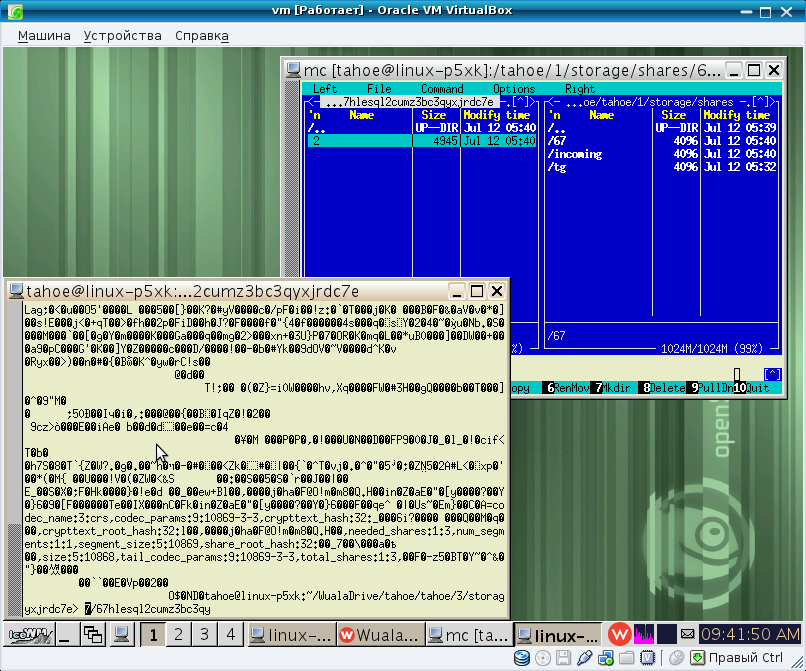
Connect and can upload files. Here is the result of uploading the file FTP-and-SFTP.rst from the folder /home/allmydata-tahoe-1.8.2/docs/frontends/. As you can see, the 10.8 kb file was broken into pieces of 4.9 kb and was uploaded in encrypted form:
Thus, we store in Wuala pieces of encrypted files in obscure names. Access to the link is available only for us, since the node's encryption keys are stored on the local system (OpenSuse). For those who especially suffer from paranoia, we can recommend the following: Use the first node in wuala, use the second node in DropBox, and store the third node generally locally in a virtual machine. Thus, if administrators even get access to your information, they will have access to a piece of the file 1/3 of the content, and the remaining pieces lie in other places and in other services. It is also possible an interesting option when you store 2 nodes in wuala, 2 nodes in a dropbox and 1 node in a local folder. Thus, even if your hard drive fails, then, as configured in this article, we get that 4 nodes are available (with a minimum of 3) to recover information, as well as if one of the services, for example wuala, is not available using 2 node dropbox and local node, you can read and write your information.
If users are interested or have any questions, I will try to answer them.
For encryption was selected Tahoe-Lafs distributed file system, built on p2p technology. The advantage of this technology is that files are encrypted and written to nodes in the form of pieces (like bittorrent). And we will save the data into the wuala program (a cloudy proprietary file system, analogous to the dropbox).
With the help of SuseStudio my own development was cloned ( Tahoe-Lafs live disk based on OpenSuse 11.4 ) and the following was finalized: x11, icewm, java, missing components were installed and thus the assembly began to look like this:
')
I also had to modify the files: permissions.local, windowmanager, without which x11 would not run from under a regular user (not root), since suid programs are almost completely excluded in the new linux build.
We collect the image in a web studio in OFV image format, download it and import it into VirtualBox and launch our virtual machine.
In the console, using the root user, create the folder / tahoe in non-folder / tahoe / 1, / tahoe / 2, / tahoe / 3, because the minimum number of nod for 3 pieces and the folder for introducer (bittorrent tracker): / tahoe / intro. Change permissions for this folder for all: chmod + x -R 777 / tahoe / *
We close the super user console and create a file in the home directory and in the /home/tahoe/allmydata-tahoe-1.8.2/bin folder with the contents:
createall.sh
# / bin / sh
./tahoe create-introducer / tahoe / intro &
./tahoe create-node / tahoe / 1 &
./tahoe create-node / tahoe / 2 &
./tahoe create-node / tahoe / 3 &
startall.sh
# / bin / sh
./tahoe restart / tahoe / intro &
./tahoe restart / tahoe / 1 &
./tahoe restart / tahoe / 2 &
./tahoe restart / tahoe / 3 &
Making them run: chmod + x * .sh
It remains to configure the Tahoe. In each folder we edit /tahoe/number/tahoe.cfg
In it we give the name of the node and change the port number of the web interface, because otherwise there will be a conflict:
i.e. The first file looks like this: /tahoe/1/tahoe.cfg
[node]
nickname = Tahoe-Wuala1
web.port = tcp: 3456: interface = 127.0.0.1
web.static = public_html
# tub.port =
# tub.location =
# log_gatherer.furl =
# timeout.keepalive =
# timeout.disconnect =
# ssh.port = 8022
# ssh.authorized_keys_file = ~ / .ssh / authorized_keys
In the section where the number of nodes to save is changed by 3:
[client]
# Which services should this client connect to?
introducer.furl = None
helper.furl =
# key_generator.furl =
# stats_gatherer.furl =
# What is the encoding parameters for uploads?
shares.needed = 3
shares.happy = 3
shares.total = 3
Now this tahoe.cfg file can be copied to the second folder with the file replacement, and in the second folder only the port and the name of the node should be changed: nickname = Tahoe-Wuala2
web.port = tcp: 3457: interface = 127.0.0.1 and in the third: nickname = Tahoe-Wuala3
web.port = tcp: 3458: interface = 127.0.0.1
It's time to start our web service. Run the file we created in /home/tahoe/allmydata-tahoe-1.8.2/bin/startall.sh
After launch, the address for our host introducer will appear in the / tahoe / intro folder. The cat introducer.furl file is copied to each folder / tahoe / 1, / tahoe / 2, and / tahoe / 3.
Install the client, downloading it from wuala.com, in the console from under the root user:
rpm -ihv cdn.wuala.com/repo/suse/wuala-current.i386.rpm
We start it already under normal users and register. You can use my promo code NNJFMJAK3HGH7P4J7GAC, because the default is only 1 GB, and with the help of invitations you can get more free storage space. Create folders for storage in wuala:
www.wuala.com/referral/NNJFMJAK3HGH7P4J7GAC
In the program we create the tahoe folder and in it there are subfolders 1,2,3 and in each of them storage - the encrypted files from tahoe will be uploaded there
Now you need to put the sim links (links) to the real file system opensuse. Using mc and the File-Symlink menu:
That is. Folder / tahoe / 1 / storage is linked to a folder on the Internet in wuala: / home / tahoe / WualaDrive / Your loginWuala / tahoe / 1 / storage; / tahoe / 2 / storage is referenced in wuala: / home / tahoe / WualaDrive / VashloginWuala / tahoe / 2 / storage and the third folder is in / tahoe / 3 / storage respectively in the folder in the Internet in wuala: / home / tahoe / WualaDrive / VashloginWuala / tahoe / 3 / storage
Restart our tahoe script startall.sh. We start the ssh: service sshd start service in the console from under the root and connect to the other machine to the tahoe via port forwarding:
ssh -C tahoe @ ip-virtual -L localhost: 3456: localhost: 3456
Open our browser and see what we did:
Everything is fine, the nodes are connected. We try to create a folder, click Create a directory.
We look at the information about it: More info on this directory and see the address: Directory writecap URI: DIR2: 7awqdjdkkkwookbhc4eigffgu4: vbnajdeshk4hgb6eatamfycdfolydafy42hm6uv7d7xmajhu4mpa. It remains to add a frontend (sftp). To do this, in the / tahoe / 1 / private folder, create an ftp.accounts file with the contents:
renat renat URI: DIR2: 7awqdjdkkkwookbhc4eigffgu4: vbnajdeshk4hgb6eatamfycdfolydafy42hm6uv7d7xmajhu4mpa
In the file /tahoe/1/tahoe.cfg we add about the section that we have sftp:
[sftpd]
enabled = true
port = tcp: 8022: interface = ip virtual machine
host_pubkey_file = private / ssh_host_rsa_key.pub
host_privkey_file = private / ssh_host_rsa_key
accounts.file = private / ftp.accounts
Start the generation of encryption keys for sftp in the folder / tahoe / 1
ssh-keygen -f private / ssh_host_rsa_key
Restart the tahoe again using the startall.sh script. And on any computer on any system (including windows), you can now configure FileZilla using the name and password: renat (we set it up earlier in the ftp.accounts file):
In the FileZilla Transfer menu, we set Save File Timestamps so that when uploading files to the tahoe we keep the date.
Connect and can upload files. Here is the result of uploading the file FTP-and-SFTP.rst from the folder /home/allmydata-tahoe-1.8.2/docs/frontends/. As you can see, the 10.8 kb file was broken into pieces of 4.9 kb and was uploaded in encrypted form:
Thus, we store in Wuala pieces of encrypted files in obscure names. Access to the link is available only for us, since the node's encryption keys are stored on the local system (OpenSuse). For those who especially suffer from paranoia, we can recommend the following: Use the first node in wuala, use the second node in DropBox, and store the third node generally locally in a virtual machine. Thus, if administrators even get access to your information, they will have access to a piece of the file 1/3 of the content, and the remaining pieces lie in other places and in other services. It is also possible an interesting option when you store 2 nodes in wuala, 2 nodes in a dropbox and 1 node in a local folder. Thus, even if your hard drive fails, then, as configured in this article, we get that 4 nodes are available (with a minimum of 3) to recover information, as well as if one of the services, for example wuala, is not available using 2 node dropbox and local node, you can read and write your information.
If users are interested or have any questions, I will try to answer them.
Source: https://habr.com/ru/post/123936/
All Articles