The play "Developing a multiplayer online game." Part 2: This is a scary word "protocol"

Part 1: Architecture
Part 3: Client-server communication
Part 4: Moving to 3D
So, let's continue the creation of a multiplayer game.
Today we look at creating a data transfer protocol.
And also create a TCP procurement server and, accordingly, the client.
')
Part two. Step One: Data Transfer Protocol.
Just in case, let me remind especially annoying readers that we are not developing a quake, SC or something like that. The main task is to show general principles and approaches on the example of a working application.
In appearance, it sounds very scary and difficult to “create a data transfer protocol,” but the devil is not so terrible as he is painted ...
What is generally understood as a protocol in game devs? No, this is not its own implementation of the
Therefore, there are various implementations of this process. Globally, they can be divided into two types: binary and text. Text is like XML and JSON. It is very easy to work with them. XML is probably the most popular option. But for real-time games, they are not suitable. The high overhead of parsing XML and the very large amount of data transferred (there is a lot of markup in xml) actually puts an end to its use. JSON is more lightweight, the markup takes up much less space than XML, but still it doesn’t compare with binary protocols. Although for turn-based games, they are quite suitable.
As for binary protocols, there is no markup in them like in XML or JSON, due to which the volume of transmitted data and the time for parsing the message are significantly reduced. Examples of binary protocols are AMF, protobuf. Protobuf is generally very good. It was developed and used by Google in its services. He has a realization in many languages. And in general, I would advise using it or analogs.
But we are learning here and we have a relatively simple project. Therefore, we will make your comfortable bike.
Let's imagine that we generally need to transfer between the server and the client?
Messages from client to server
1. Authorization (login)
2. Coordinates of the tank when moving (x, y)
3. Coordinates of the shot (x, y) the place in which the player pressed the fire to calculate whether the server was hit
4. Team request the number of players on the server
5. Quit Team
Messages from server to client
1. Confirm authorization
2. Coordinates of the enemy tank and its state (alive / killed), (x, y, s)
3. The team "got into us"
4. Number of players
5. Disable client on request
Summarizing, we obtain that all the transmitted data can fit in 7 bytes.
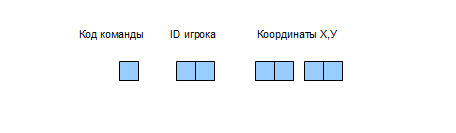
This is the main transmitted packet with the coordinates of the tank during movement and when fired. In the case when we need to transfer other data, we will place them in these 7 bytes. For example, the number of active users will be transmitted instead of the X, Y coordinates.
As a result, we received a very compact, fast, although very simplified version, but it is quite suitable for our purposes. We have very little transmitted data.
In the future, we will improve our protocol. But it will be in the following parts.
Part two. Step two: TCP server.
At the moment we need to create a server stub. The tasks are as follows:
1. Connecting customers
2. Assigning ID to the connected client
Everything, at this stage, we do not need anything else, so the code is very simple.
Here we have created scala application
def main(args: Array[ String ]): Unit =
{
val port = 7777

try
{
val listener = new ServerSocket(port)
var numClients = 1

println( "Listening on port " + port)

while ( true )
{
new ClientHandler(listener.accept(), numClients).start()
numClients += 1
}

listener.close()
}
catch
{
case e: IOException =>
System.err.println( "Could not listen on port: " + port + "." )
System.exit(-1)
}
}

* This source code was highlighted with Source Code Highlighter .
def main(args: Array[ String ]): Unit =
{
val port = 7777
try
{
val listener = new ServerSocket(port)
var numClients = 1
println( "Listening on port " + port)
while ( true )
{
new ClientHandler(listener.accept(), numClients).start()
numClients += 1
}
listener.close()
}
catch
{
case e: IOException =>
System.err.println( "Could not listen on port: " + port + "." )
System.exit(-1)
}
}
* This source code was highlighted with Source Code Highlighter .and a connection handler.
class ClientHandler (socket : Socket, clientId : Int) extends Actor
{
def act
{
try
{
val out = new PrintWriter( socket.getOutputStream(), true )
val in = new BufferedReader( new InputStreamReader(socket.getInputStream()) )

print( "Client connected from " + socket.getInetAddress() + ":" + socket.getPort )
println( " assigning id " + clientId)

var inputLine = in .readLine()
while (inputLine != null )
{
println(clientId + ") " + inputLine)

inputLine = in .readLine()
}

socket.close()

println( "Client " + clientId + " exit" )
}
catch
{
case e: SocketException => System.err.println(e)

case e: IOException => System.err.println(e.getMessage)

case e => System.err.println( "Unknown error " + e)
}
}
}

* This source code was highlighted with Source Code Highlighter .
class ClientHandler (socket : Socket, clientId : Int) extends Actor
{
def act
{
try
{
val out = new PrintWriter( socket.getOutputStream(), true )
val in = new BufferedReader( new InputStreamReader(socket.getInputStream()) )
print( "Client connected from " + socket.getInetAddress() + ":" + socket.getPort )
println( " assigning id " + clientId)
var inputLine = in .readLine()
while (inputLine != null )
{
println(clientId + ") " + inputLine)
inputLine = in .readLine()
}
socket.close()
println( "Client " + clientId + " exit" )
}
catch
{
case e: SocketException => System.err.println(e)
case e: IOException => System.err.println(e.getMessage)
case e => System.err.println( "Unknown error " + e)
}
}
}
* This source code was highlighted with Source Code Highlighter .The code is not the ultimate truth. I will try to write it with maximum clarity for everyone, without optimizations. Therefore, do not kick much, and if there is constructive criticism, as they say, welcome to kamenty.
I hope the code to explain inappropriately? It is very simple.
This is just a stub, so things like the port number for the hart. In the next part we will refactor, we’ll comb our server.
Part two. Action three: Client.
For the implementation and verification of the protocol, we also need the client procurement.
The tasks required at this stage are very simple:
1. Connect to the server.
2. Display your status.
And all ... more now we do not need anything.
The client code is also very simple and I will not comment on it.
public class Main extends Sprite
{
public var socket:Socket = new Socket();

public var host: String = "127.0.0.1" ;
public var port: int = 7777;

public var status:TextField = new TextField();

public function Main(): void
{
if (stage) init();
else addEventListener(Event.ADDED_TO_STAGE, init);
}

private function init(e:Event = null ): void
{
removeEventListener(Event.ADDED_TO_STAGE, init);
// entry point

status.text = "Player" ;
addChild( status );

socket.addEventListener(Event.CONNECT, socketConnectHandler);
socket.addEventListener(IOErrorEvent.IO_ERROR, ioErrorHandler);
socket.addEventListener(DataEvent.DATA, dataHandler);

socket.connect(host, port);
}


//
private function socketConnectHandler(e:Event): void
{
status.text = "Player - connectrd" ;
}

//
private function ioErrorHandler(e:IOErrorEvent): void
{
status.text = "Player - error" ;
}

//
private function dataHandler(e:DataEvent): void
{
switch (e.data)
{
//
}
}

//
public function sendMessage(val: String ): void {
if (val != "" && socket.connected)
{
//socket.writeBytes( val);
}
}

public function exitGame(): void
{
if (socket.connected)
{
socket.close();
}
}

}

* This source code was highlighted with Source Code Highlighter .
public class Main extends Sprite
{
public var socket:Socket = new Socket();
public var host: String = "127.0.0.1" ;
public var port: int = 7777;
public var status:TextField = new TextField();
public function Main(): void
{
if (stage) init();
else addEventListener(Event.ADDED_TO_STAGE, init);
}
private function init(e:Event = null ): void
{
removeEventListener(Event.ADDED_TO_STAGE, init);
// entry point
status.text = "Player" ;
addChild( status );
socket.addEventListener(Event.CONNECT, socketConnectHandler);
socket.addEventListener(IOErrorEvent.IO_ERROR, ioErrorHandler);
socket.addEventListener(DataEvent.DATA, dataHandler);
socket.connect(host, port);
}
//
private function socketConnectHandler(e:Event): void
{
status.text = "Player - connectrd" ;
}
//
private function ioErrorHandler(e:IOErrorEvent): void
{
status.text = "Player - error" ;
}
//
private function dataHandler(e:DataEvent): void
{
switch (e.data)
{
//
}
}
//
public function sendMessage(val: String ): void {
if (val != "" && socket.connected)
{
//socket.writeBytes( val);
}
}
public function exitGame(): void
{
if (socket.connected)
{
socket.close();
}
}
}
* This source code was highlighted with Source Code Highlighter .So everything is ready to make the first connection between the server and the client.
We start the server, we start the client ... and voila ...
Result on the client
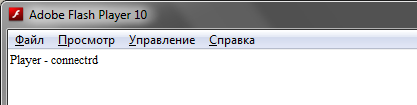
We see that the client has successfully connected to the server.
Result on the server
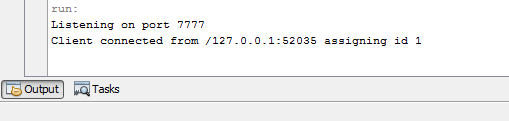
We see that the server started on port 7777, received a connection from the client and gave it an ID.
That's all for today.
In the next part, we will implement the protocol, and actually verify the resulting client-server interaction.
As always, all the sources can be viewed on Github
upd. Commenting, please note that this is not a tutorial “how to write your quake in 5 minutes” ... this is a consistent, from simple to complex, presentation of the development of a network game. The initial task is to make the network interaction between the Scala server and the Flash client. And then, based on this interaction, make a game.
Source: https://habr.com/ru/post/123748/
All Articles