We write a game for Android using AndEngine. Part 4
Hello to all!
The fourth part promises to be very interesting. In it, I'm going to consider creating laser guns, mirrors and reflections. Before reading, read the previous parts.
Part 1.
Part 2.
Part 3
')
Interesting?
Step 1. Restrictions.
Let's start a little from afar. As everyone knows, an ideal laser moves at the speed of light, and if there is no obstacle to his path, he is unlikely to ever stop. Our LaserLine will not be perfect and the first thing to do is to prevent it from “flying out” beyond the playing field. To do this, add a method to the GameObjectsMap class:
We will check the position of the laser by this method when building it.
Step 2. LaserGun.
I hope everyone remembers the second part of the article, where, in addition to the class of the laser, we had a class of laser gun that could turn and hinder the movement of the laser. Add a field to it:
In the constructor, add:
In the attachTo method, add:
Well, now our gun has a laser, only it is not visible. To see him you need to ask him a sequence of points through which he will pass. To do this, in the LaserGun class, write the method:
Here, at first glance, everything is clear, the laser path depends on the initial direction and on the objects in its path, just for this we needed a map. But the LaserLine.build () method does not yet exist. Let's do it.
The method is short but I haven’t told about sBuilder yet. Magic is hidden there. Don't forget to add to the LaserLine class:
By making it static, we will be sure that we will not have a separate copy for each laser, which will save us some memory and will have a positive effect on speed.
Step 3. LaserBuilder
It's time to show how the construction of the laser looks like:
We go in order. The limit of 200 steps of the laser I think why. Further, the first point of the laser is added during creation and coincides with the coordinates of the LaserGun, the rest of the points are added at the exit from the playing area, at the stop and at reflection. I note that initially the points were added by the passage of each cell, in the Mirrors Maze so far. But there was not used AndEngine.
nextPosition, I hope, does not need an explanation.
Step 4. Mirror.
Until now, we did not have objects that can reflect lasers. Now we need to make one such, and check whether everything works as intended. Do not forget to add the necessary textures.
Creating a new game object is easy. We will do without spoilers and I will give the interested reader to figure out how the onLaser method works. Bilateral mirror is ready. It remains to add its initialization in GameObjectsMap.
Step 4. Laser initialization.
After all the manipulations, the add method now looks like this:
But we were not limited to adding a mirror, even for more convenient work and with guns, we will need:
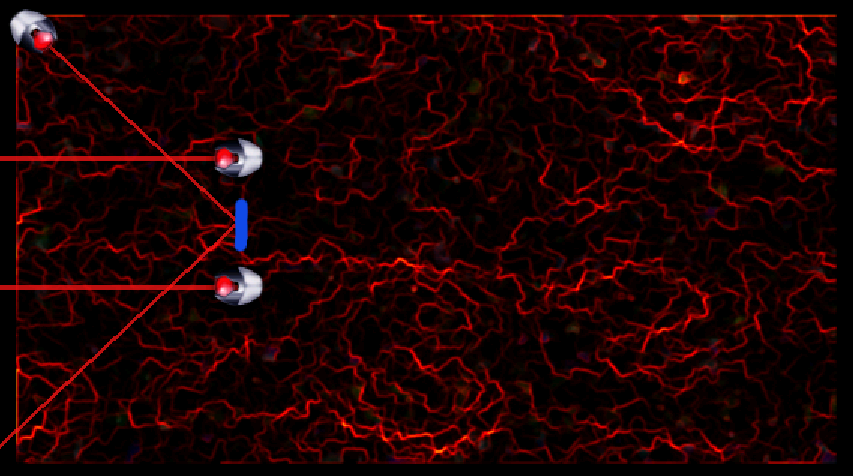
Well, now let's see what we did. Add with StageActivity code:
As a result, we will see something to do:
It's enough for today. Thanks for attention. I will be glad questions, suggestions and suggestions.
Source.
The fourth part promises to be very interesting. In it, I'm going to consider creating laser guns, mirrors and reflections. Before reading, read the previous parts.
Part 1.
Part 2.
Part 3
')
Interesting?
Step 1. Restrictions.
Let's start a little from afar. As everyone knows, an ideal laser moves at the speed of light, and if there is no obstacle to his path, he is unlikely to ever stop. Our LaserLine will not be perfect and the first thing to do is to prevent it from “flying out” beyond the playing field. To do this, add a method to the GameObjectsMap class:
public static boolean outOfArea(Point pos) {
return pos.x < 0 || pos.y < 0 || pos.x > WIDTH - 1
|| pos.y > HEIGHT - 1;
}

* This source code was highlighted with Source Code Highlighter .
We will check the position of the laser by this method when building it.
Step 2. LaserGun.
I hope everyone remembers the second part of the article, where, in addition to the class of the laser, we had a class of laser gun that could turn and hinder the movement of the laser. Add a field to it:
private LaserLine mLaserLine;In the constructor, add:
mLaserLine = new LaserLine(new Point(posX, posY), angle);In the attachTo method, add:
scene.getChild(GameObjectsMap.LASER_LAYER).attachChild(mLaserLine);Well, now our gun has a laser, only it is not visible. To see him you need to ask him a sequence of points through which he will pass. To do this, in the LaserGun class, write the method:
public void buildLaser(GameObject[][] map) {
mLaserLine.setAngle(getAngle());
mLaserLine.build(map);
}

* This source code was highlighted with Source Code Highlighter .
Here, at first glance, everything is clear, the laser path depends on the initial direction and on the objects in its path, just for this we needed a map. But the LaserLine.build () method does not yet exist. Let's do it.
public void build(GameObject[][] map) {
sBuilder.buildPath( this , map);
buildLines();
}

* This source code was highlighted with Source Code Highlighter .
The method is short but I haven’t told about sBuilder yet. Magic is hidden there. Don't forget to add to the LaserLine class:
private static LaserLineBuilder sBuilder = new LaserLineBuilder();By making it static, we will be sure that we will not have a separate copy for each laser, which will save us some memory and will have a positive effect on speed.
Step 3. LaserBuilder
It's time to show how the construction of the laser looks like:
public class LaserLineBuilder {

private static final int MAX_STEPS = 200;

public void buildPath(LaserLine laserLine, GameObject[][] map) {
laserLine.clearPoints();
int step = 0;
int angle = laserLine.getAngle();
Point position = new Point(laserLine.getStartPosition());
GameObject gameObject;
while (step < MAX_STEPS) {
nextPosition(position, angle);
if (GameObjectsMap.outOfArea(position)) {
laserLine.addPoint(position);
return ;
}
gameObject = map[position.x][position.y];
if (gameObject == null ) {
continue ;
} else {
laserLine.addPoint(position);
int reflection = gameObject.onLaser(angle);
if (reflection < 0) {
return ;
} else {
angle = reflection;
}
}
}
laserLine.addPoint(position);
}

private void nextPosition(Point position, final int angle) {
switch (angle) {
case DynamicGameObject.DEG_0:
position.x++;
break ;
case DynamicGameObject.DEG_90:
position.y++;
break ;
case DynamicGameObject.DEG_180:
position.x--;
break ;
case DynamicGameObject.DEG_270:
position.y--;
break ;
case DynamicGameObject.DEG_45:
position.x++;
position.y++;
break ;
case DynamicGameObject.DEG_135:
position.x--;
position.y++;
break ;
case DynamicGameObject.DEG_225:
position.x--;
position.y--;
break ;
case DynamicGameObject.DEG_315:
position.x++;
position.y--;
break ;
default :
break ;
}
}
}

* This source code was highlighted with Source Code Highlighter .
We go in order. The limit of 200 steps of the laser I think why. Further, the first point of the laser is added during creation and coincides with the coordinates of the LaserGun, the rest of the points are added at the exit from the playing area, at the stop and at reflection. I note that initially the points were added by the passage of each cell, in the Mirrors Maze so far. But there was not used AndEngine.
nextPosition, I hope, does not need an explanation.
Step 4. Mirror.
Until now, we did not have objects that can reflect lasers. Now we need to make one such, and check whether everything works as intended. Do not forget to add the necessary textures.
public class Mirror extends DynamicGameObject {

public Mirror(final int posX, final int posY, final int angle,
final TextureRegion region) {
super(posX, posY, angle, region);
}

@Override
void attachTo(Scene scene) {
scene.getChild(GameObjectsMap.GAME_OBJECTS_LAYER).attachChild(
getSprite());
}

@Override
int onLaser( int angle) {
int a = getAngle() % 4;
if (angle == (a + 1) % 8) return (a + 7) % 8;
if (angle == (a + 7) % 8) return (a + 1) % 8;
if (angle == (a + 3) % 8) return (a + 5) % 8;
if (angle == (a + 5) % 8) return (a + 3) % 8;
return -1;
}

}

* This source code was highlighted with Source Code Highlighter .
Creating a new game object is easy. We will do without spoilers and I will give the interested reader to figure out how the onLaser method works. Bilateral mirror is ready. It remains to add its initialization in GameObjectsMap.
Step 4. Laser initialization.
After all the manipulations, the add method now looks like this:
public void add(Type type, final int posH, final int posW, final int angle) {
GameObject object = null ;
switch (type) {
case lasergun:
LaserGun l = new LaserGun(posH, posW, angle, mTextures
.getLaserGun());
mLaserGuns.add(l);
object = l;
break ;
case mirror:
object = new Mirror(posH, posW, angle, mTextures.getMirror());
break ;
case target:

break ;
default :
break ;
}
mMap[posH][posW] = object ;
}

* This source code was highlighted with Source Code Highlighter .
But we were not limited to adding a mirror, even for more convenient work and with guns, we will need:
private LinkedList mLaserGuns;
andpublic void buildLasers() {
for (LaserGun gun : mLaserGuns) {
gun.buildLaser(mMap);
}
}
* This source code was highlighted with Source Code Highlighter .Well, now let's see what we did. Add with StageActivity code:
private void initMap() {
mGameObjectsMap = new GameObjectsMap(mTextures);
mGameObjectsMap.add(Type.lasergun, 0, 0, 3);
mGameObjectsMap.add(Type.lasergun, 3, 2, 7);
mGameObjectsMap.add(Type.lasergun, 3, 4, 4);
mGameObjectsMap.add(Type.mirror, 3, 3, 3);
mGameObjectsMap.addToScene(mEngine.getScene());
mGameObjectsController = new GameObjectsController(mGameObjectsMap, this );
final Scene scene = getEngine().getScene();
mGameObjectsMap.buildLasers();
}

* This source code was highlighted with Source Code Highlighter .
As a result, we will see something to do:
It's enough for today. Thanks for attention. I will be glad questions, suggestions and suggestions.
Source.
Source: https://habr.com/ru/post/123516/
All Articles