SNORT as a service IPS
Introduction
Much has been said about SNORT, but most articles deal with SNORT as a means of total network monitoring, which collects all data from the network interface. In this article I will explain how to build a structure in which SNORT will not monitor all traffic on the interface in IPS mode, but only traffic that can be described using iptables rules. I will not deal with setting up rules, it will be solely about how to build a SNORT on a bare system to work in IPS mode and how to approach the protection of an abstract service. The assembly and launch of SNORT will also be described.
How does it work?
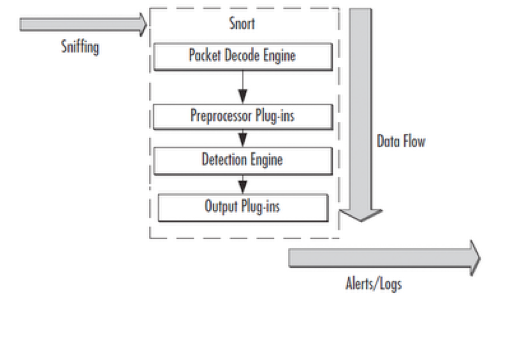
Having entered SNORT, the packet passes through decoders and preprocessors successively and only then it enters the detector, which begins to apply the rules. The task of the decoders is to “pull out” the data of the network and transport layer (IP, TCP, UDP) from the data link layer protocols (Ethernet, 802.11, Token Ring ...).
')
The task of preprocessors is to prepare data from transport and network protocols to the process of applying the rules. For our case, we will use a preprocessor for working with TCP, the list of tasks it solves in general is:
- Condition monitoring (protocol monitoring)
- Session assembly (merging data from multiple session packages)
- Protocol normalization (rather slippery feature with editing the packet header on the fly)
Competent preprocessing can significantly improve system performance and reduce the amount of garbage data entering the detector. Also, due to the peculiarities of the architecture, it is possible to connect a self-written preprocessor to SNORT relatively easily.
As a result, “overpacks” are formed before being sent to the detector, to which the rules begin to apply. The process of applying the rules is reduced to searching in the “overpack” defined in the rule signatures. The rules themselves consist of a description of the traffic, the desired signature, a description of the threat and a description of the reaction to detection.
Compile SNORT.
Downloading the latest Ubuntu 11.04. The installation is described for a 32-bit system. Download everything you need:
daq-0.5.tar.gz
libdnet-1.11.tar.gz
libnetfilter_queue-1.0.0.tar
libnfnetlink-1.0.0.tar
libpcap-1.1.1.tar.gz
pcre-8.12.zip
snort-2.9.0.5.tar.gz
snortrules-snapshot-2903.tar.gz
Install the necessary bags:
apt-get install bison flex gcc g++ zlib1g-devWe configure and install downloaded software from source in the following order:
pcre-8.12.zip
libpcap-1.1.1.tar.gz
libdnet-1.11.tar.gz
libnfnetlink-1.0.0.tar
libnetfilter_queue-1.0.0.tar
daq-0.5.tar.gz
For configure scripts, it is better to force the installation directories in order to avoid unpleasant surprises.
./configure --libdir=/usr/lib --includedir=/usr/includeIf during the daq configuration we see the line “Build NFQ DAQ module ...: yes” and everything compiles without problems, then we are on the right track. Now the key moment of the whole undertaking is the assembly of SNORT:
./configure --libdir=/usr/lib --includedir=/usr/include --enable-ipv6 --enable-gre --enable-targetbased --enable-decoder-preprocessor-rules --enable-active-response --enable-normalizer --enable-reload --enable-react --enable-zlib--enable-ipv6 - IP v6 support (all of a sudden, captain!).
--enable-gre - GRE support encapsulation.
--enable-targetbased - support the collection of fragmented packets.
--enable-decoder-preprocessor-rules - support for rules for reacting to anomalies detected in traffic when preprocessors and decoders work.
--enable-active-response - support for embedding in a packet session when a rule is triggered.
--enable-normalizer - support for protocol normalizer.
--enable-reload - the ability to load / unload rules without restarting SNORT.
--enable-react - support immediate session break (RST) when the rule is triggered.
--enable-zlib - support for processing compressed traffic.
Next make; make install . SNORT is installed.
Set up a combat start.
The freshly downloaded snort config makes a heavy impression on an inexperienced user, but if you understand its structure, then it’s easy to understand. A shortened version of the minimal config itself, which solves our problem in general, looks like this:
# 1:
#
var HOME_NET any
var RULE_PATH ../rules
# 2:
config disable_decode_alerts
……
# 3:
#
config pcre_match_limit: 3500
……
# 5:
#
# , ,,
preprocessor normalize_ip4
….
#
preprocessor frag3_global: max_frags 65536
…
#
preprocessor stream5_global: max_tcp 8192, track_tcp yes, track_udp ….
…
# 6:
include classification.config
…..
# 7:
include $RULE_PATH/test.rules
For simplicity, in the test.rules file we will have only one rule:
reject tcp any any -> any any (msg:"Test pattern for snort abc123"; content:"abc123"; classtype:shellcode-detect; sid:310; rev:1;)This rule says that if an abc123 substring is detected in incoming tcp packets, then an RST will be sent to the source immediately and the session will be terminated. Dangerous package on the IPS will not get into the system. Run SNORT:
snort -Q --daq nfq --daq-var queue=2 -c /home/ubuntu/Downloads/snort/etc/snort.conf -l /var/log/snort -A full-Q - work in IPS mode
--daq - package source
--daq-var - package source options
-c - path to config
-l - path to logs
-A full - detailed logs (description of attacks and traffic dumps)
-D - work in daemon mode (use when everything is debugged)
If the launch has broken off with errors, then you should not be sad - most likely you need to correct the paths to the files in the config file.
Creating a queue.
The system packet filter can be configured to transfer the received packet from the kernel level to the user level, where the user program will process it and send it back to the kernel level, in our case this program is SNORT. Since SNORT is running in order to work with a numbered queue (NFQUEUE), we need to supply filtered traffic in this queue:
iptables -t nat -A PREROUTING -p tcp --dport 8080 -j NFQUEUE --queue-num 2
Why was the PREROUTING chain chosen?
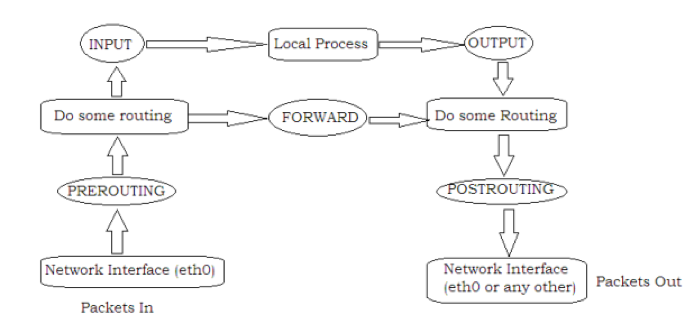
In the Iptables model, the packet enters the PREROUTING base queue before any routing rules are applied to it. Sending a packet to SNORT at this stage is convenient in that we can either process it locally or forward it further, for example, using NAT. The advantage of using numbered queues is that you can create several queues and pass traffic from each queue through a snort running with a set of rules sharpened by the filtered traffic. A serious disadvantage of this approach is that in case of a SNORT crash, the protected service becomes unavailable, since there is no one to transfer data from user mode back to the kernel. After starting SNORT and creating a queue, you should immediately check the operation, sending, for example, via netcat, the signature from the rule - abc123 to the queue. If everything was done correctly, the connection will be immediately terminated.
Monitoring
Starting with the described parameters, SNORT will, for each identified threat, write an alert file (it can also write to the database or send a syslog):
[**] [1:310:1] Test pattern for snort abc123 [**]
[Classification: Executable Code was Detected] [Priority: 1]
01/19-12:03:12.155213136 172.16.249.1:56473 -> 172.16.249.130:8080
TCP TTL:64 TOS:0x0 ID:1241 IpLen:20 DgmLen:59 DF
***AP*** Seq: 0x9510F391 Ack: 0xC40C0E14 Win: 0x8218 TcpLen: 32
TCP Options (3) => NOP NOP TS: 125531844 9470333
And to write to the log file a piece of the session in which the signature was detected, this can be useful for detecting detection errors. This is where SNORT’s work ends and “SNORT log analysis systems” come into play. De facto, these are sets of scripts of varying degrees of wretchedness, to which, in some cases, the heartbreaking “web interface” is attached (BASE, ACID ...). Their main disadvantages are the inability to perform flexible data analysis and inefficient work with the DBMS, which results in the inability to work with large amounts of data. In my experience, the only solution that makes working with snort logs bearable is Splunk. In general, Splunk is a log management system that saves them, indexes and provides a convenient interface for working with the resulting database. This is proprietary software, which is conditionally free (the amount of indexed data per day is not more than 500Mb, which is more than enough for snort). The system combines the convenience of management and the ability to work with large amounts of data, and most importantly: for this system there is a plug-in, specially sharpened to work with the SNORT logs. Download Splunk here.
Install splunk:
dpkg -i splunk-4.2.1-98164-linux-2.6-intel.debRun:
/opt/splunk/bin/splunk startWe go to the web-face, we find and install the plugin:

Next, add the data source - the file. There, everything is intuitive and the only subtle point is that the Source Type must be manually set: snort_alert_full . When everything is ready, we generate an alert (via netcat we send abc123 to the protected port). And we see in splunk:
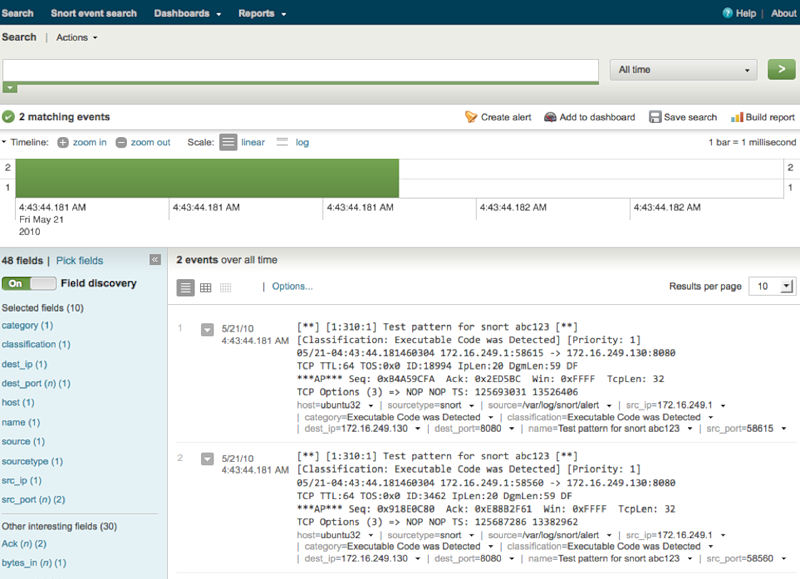
The column to the left shows the data that the parser recognized and on which indexes are built for the incoming data. Using this data, you can analyze using the built-in query language, you can build graphs, you can display sources on the map, and much, much more.

In addition, the process of creating your own plug-ins is described on the manufacturer's website, which allows you to create your own plugin, which will be customized for a specific task.
Conclusion
Before launching a snort into a production unit, so that it doesn’t have excruciating pain later,
- Build a version control system for rules and store rules on a third-party host (SVN is quite suitable).
- Develop a plan for emergency operation (if snort fell, and traffic does not go).
- Recovery plan in case the hardware snort fails with data loss.
- Create a test rule of the type described above abc123, which should check the work of the snort every time after making any changes.
I am pleased to answer questions.
Source: https://habr.com/ru/post/123474/
All Articles