Maps in your Android application
Quite often, a mobile application developer needs to display something on a map. What options does a developer have?
I considered two options.
Option 1. External application with a map
Perhaps the easiest option to implement. When needed, you simply open a side application with a map — create a uri of the form geo: latitude, longitude , in the z parameter you can specify the scale (from 1 to 23):
')
String uri = String.format("geo:%s,%s?z=16", Double.toString(lat), Double.toString(lng)); Intent intent = new Intent(Intent.ACTION_VIEW, Uri.parse(uri)); startActivity(intent); At the same time, if several applications with maps are installed on the user's device, the user will be asked to select in which application the given point should be shown:
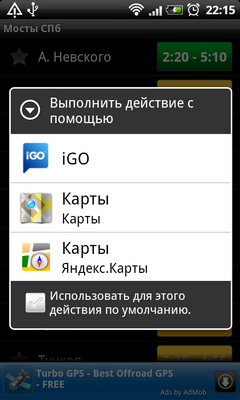
Yes Yes. This way the given point is shown, and not just a map (although Yandex.Maps show just a map and, judging by my correspondence with them, they think that this is necessary).
The advantages of this option:
- ease of implementation;
- all features of an external application (for example, in iGo, you can immediately make a route to the point shown; maps in some applications will be available offline).
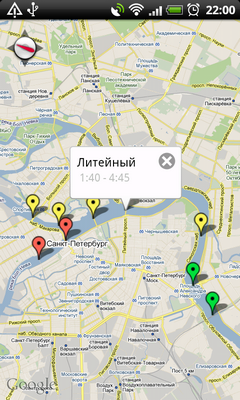
- There is no possibility to display additional information (as, for example, on the first screenshot in this article - tags, tooltips, etc.).
Option 2. Built-in card
The built-in map is more difficult to implement. I will not dwell on all the details, the main is well described in the documentation .
I will dwell only on some subtleties.
Maps API Key
To use the built-in card you need to get the keys. The keys, not the key, because for the debug version and for the release version of your application, the keys will be different.
In order not to change the keys manually every time, you can create two layouts with the map and write something like this in the code:
// choose layout with correct API key if (debug) { setContentView(R.layout.map_debug); } else { setContentView(R.layout.map_release); } Other options (including to determine the debug / release version of the build) can be found here .
current position
To display the current position on the map you need to write the following:
private MyLocationOverlay myLocationOverlay; MapView mapView = (MapView) findViewById(R.id.mapview); myLocationOverlay = new MyLocationOverlay(this, mapView); myLocationOverlay.enableMyLocation(); mapView.getOverlays().add(myLocationOverlay); Do not forget to disable the location when stopping / closing the activity:
myLocationOverlay.disableMyLocation(); Markers
Markers are simply added to the map:
List<Overlay> mapOverlays; Drawable drawable; MapOverlay itemizedOverlay; mapOverlays = mapView.getOverlays(); drawable = this.getResources().getDrawable(R.drawable.map_dot_green); itemizedOverlay = new MapOverlay(drawable, mapView); GeoPoint markerPoint = new GeoPoint(lat, lng); OverlayItem overlayItem = new OverlayItem(markerPoint, "name", "description"); itemizedOverlay.addOverlay(overlayItem); mapOverlays.add(itemizedOverlay); Moreover, if you add multiple markers, then all markers on the same layer will be the same. How to make the markers different (as in the screenshot above - yellow, red, green)? Either create several layers or use the SetMarker method:
int w = drawable.getIntrinsicWidth(); int h = drawable.getIntrinsicHeight(); drawable.setBounds(-w / 2, -h, w / 2, 0); overlayItem.setMarker(drawable); Without the first three lines, a void will be shown instead of a marker.
If you do not use negative values of w and h and do not divide them in half, then the markers will have the wrong shadow.
Advantages and disadvantages of this option
Benefits:
- the ability to create your own layers and your own labels;
- the ability to leave the user in your application (adding, for example, the title of the window).
- relative complexity of implementation;
- not all features of third-party applications;
- activity with the map runs for a long time.
Conclusion
As a result, I could not make a choice for the user. Therefore, in my application both options are supported - in the settings the user can indicate whether he wants to use external applications (by default, the built-in map is used).
Source: https://habr.com/ru/post/123403/
All Articles