Android + Arduino = ♥
Not so long ago, Google opened an API for Android devices to work with USB. Today it's time to feel what it is and find out what opportunities are opening up for us.

So, we have Arduino Mega 2560, USB Host Shield and HTC Desire with firmware cyanogen 7.1.0 RC1 (Android 2.3.4). Just in case, let me remind you that everything that will be described further - works only starting from Android 2.3.4 for phones and Android 3.1 for tablets.
SPI-Billed Board
')
1. If not already installed, then download and install software for Arduino .
2. Download and unpack the ADK package (contains the DemoKit application). The
3. Download the CapSense library
4. Copy
5. Create a CapSense directory at
Google kindly provides its DemoKit sketch for Arduino. All you need is to open it from
The DemoKit package also contains the source code of the Android application to demonstrate the capabilities. Google offers us to create our own Android project and build this application. First we need to install API Level 10 . Then everything is simple - we create an Android project and specify the path to the
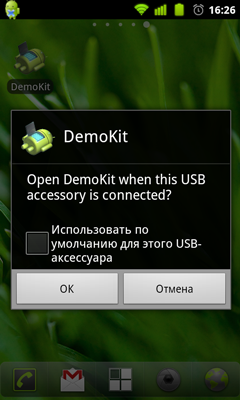
Just connect our phone to USB Host Shield. If we did everything correctly, then the screen will ask you to launch the DemoKit application.
The application itself contains two tabs - In (buttons, joystick and sensors) and Out (LEDs, relays and servo drives).


I decided that a couple of LEDs and a button are enough to demonstrate. How this miracle works can be seen on video.
In this example, messages transmitted via USB consist of three bytes:
The 1st byte defines a command or group of devices, for example, LEDs - 0x2
The 2nd byte indicates a specific device, for example a green LED - 0x1
The 3rd byte contains the value transmitted to the device, for example, the maximum brightness - 0xff
Opening such opportunities, Google primarily counts on the appearance of a large number of active Android accessories, but the fact that we get a convenient device for interacting with various sensors, sensors and actuators is far from the last. Such a device can easily become the brain of something robotic.
Also, we must not forget that the Android device for the Arduino can serve as an expansion card, which has GPS, Bluetooth, WiFi, an accelerometer and much more.
1. Android USB Accessory
2. Android Open Accessory Development Kit
So, we have Arduino Mega 2560, USB Host Shield and HTC Desire with firmware cyanogen 7.1.0 RC1 (Android 2.3.4). Just in case, let me remind you that everything that will be described further - works only starting from Android 2.3.4 for phones and Android 3.1 for tablets.
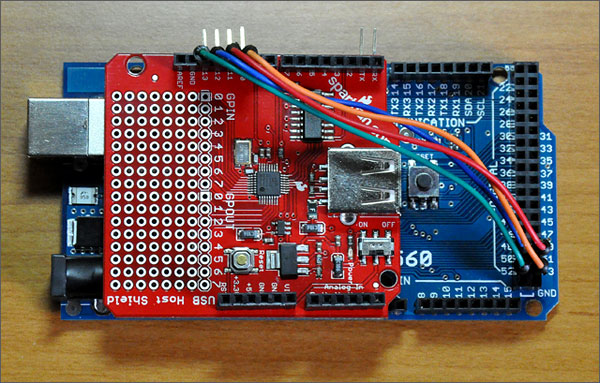
It is worth noting that this USB Host Shield is not entirely successful, especially in combination with the Arduino Mega 2560. The first problem was that this expansion card was made for the Arduino UNO, and it differs from the Mega in the SPI pin positions, so I had to throw jumpers (see a photo). The second problem, although quite expected, was the need for an external power source for the operation of this expansion card. USB Host Shield 2.0 from Circuits @ Home is considered more successful, but it is also more expensive.
SPI-Billed Board
')
Configuring Arduino software
1. If not already installed, then download and install software for Arduino .
2. Download and unpack the ADK package (contains the DemoKit application). The
app , firmware , and hardware folders should appear.3. Download the CapSense library
4. Copy
firmware/arduino_libs/AndroidAccessory and firmware/arduino_libs/USB_Host_Shield to <arduino_installation_root>/libraries/ .5. Create a CapSense directory at
<arduino_installation_root>/libraries/ and copy CapSense.cpp and CapSense.h into it from the CapSense archive.Firmware download
Google kindly provides its DemoKit sketch for Arduino. All you need is to open it from
firmware/demokit/demokit.pde , compile it and firmware/demokit/demokit.pde to the board.Test Android application
The DemoKit package also contains the source code of the Android application to demonstrate the capabilities. Google offers us to create our own Android project and build this application. First we need to install API Level 10 . Then everything is simple - we create an Android project and specify the path to the
app folder, in the Build Target we specify Google APIs (Platform 2.3.3 , API Level 10). We assemble the application and install it on the phone. Who does not want to mess with the assembly - can download the finished APK .Launch
Just connect our phone to USB Host Shield. If we did everything correctly, then the screen will ask you to launch the DemoKit application.
The application itself contains two tabs - In (buttons, joystick and sensors) and Out (LEDs, relays and servo drives).
I decided that a couple of LEDs and a button are enough to demonstrate. How this miracle works can be seen on video.
Some code
In this example, messages transmitted via USB consist of three bytes:
The 1st byte defines a command or group of devices, for example, LEDs - 0x2
The 2nd byte indicates a specific device, for example a green LED - 0x1
The 3rd byte contains the value transmitted to the device, for example, the maximum brightness - 0xff
Arduino
... /* */ AndroidAccessory acc("Google, Inc.", "DemoKit", "DemoKit Arduino Board", "1.0", "http://www.android.com", "0000000012345678"); void setup() { .... acc.powerOn(); } void loop() { byte msg[3]; /* */ if (acc.isConnected()) { /* Android */ int len = acc.read(msg, sizeof(msg), 1); if (len > 0) { /* */ if (msg[0] == 0x2) { if (msg[1] == 0x0) analogWrite(LED3_RED, msg[2]); else if (msg[1] == 0x1) analogWrite(LED3_GREEN, msg[2]); else if (msg[1] == 0x2) analogWrite(LED3_BLUE, msg[2]); } } msg[0] = 0x1; b = digitalRead(BUTTON1); if (b != b1) { msg[1] = 0; msg[2] = b ? 1 : 0; /* */ acc.write(msg, 3); b1 = b; } } } Android
import com.android.future.usb.UsbAccessory; import com.android.future.usb.UsbManager; ... public class DemoKitActivity extends Activity implements Runnable { private UsbManager mUsbManager; UsbAccessory mAccessory; FileInputStream mInputStream; FileOutputStream mOutputStream; ... private void openAccessory(UsbAccessory accessory) { mFileDescriptor = mUsbManager.openAccessory(accessory); if (mFileDescriptor != null) { mAccessory = accessory; FileDescriptor fd = mFileDescriptor.getFileDescriptor(); mInputStream = new FileInputStream(fd); mOutputStream = new FileOutputStream(fd); Thread thread = new Thread(null, this, "AccessoryThread"); thread.start(); } } public void run() { int ret = 0; byte[] buffer = new byte[16384]; int i; while (ret >= 0) { // ret = mInputStream.read(buffer); i = 0; while (i < ret) { int len = ret - i; switch (buffer[i]) { case 0x1: // if (len >= 3) { Message m = Message.obtain(mHandler, MESSAGE_SWITCH); m.obj = new SwitchMsg(buffer[i + 1], buffer[i + 2]); mHandler.sendMessage(m); } i += 3; break; } } } } // - : // mActivity.sendCommand((byte)2, (byte)0, (byte)255) public void sendCommand(byte command, byte target, int value) { byte[] buffer = new byte[3]; if (value > 255) value = 255; buffer[0] = command; buffer[1] = target; buffer[2] = (byte) value; if (mOutputStream != null && buffer[1] != -1) { try { mOutputStream.write(buffer); } catch (IOException e) { ... } } } } findings
Opening such opportunities, Google primarily counts on the appearance of a large number of active Android accessories, but the fact that we get a convenient device for interacting with various sensors, sensors and actuators is far from the last. Such a device can easily become the brain of something robotic.
Also, we must not forget that the Android device for the Arduino can serve as an expansion card, which has GPS, Bluetooth, WiFi, an accelerometer and much more.
Links
1. Android USB Accessory
2. Android Open Accessory Development Kit
Source: https://habr.com/ru/post/123361/
All Articles