USB dongle support in Thinstation
I was puzzled by the use of two-factor authentication for terminal access on thin clients based on Thinstation and was a little surprised. It turns out that at the moment no assembly or designer of Thinstation supports USB dongles such as eToken, RuToken, iKey. Despite the fact that the Thinstation distribution is so popular that it is used instead of standard software on HP thin clients, and the eToken authentication tools are more common in the post-Soviet space than solutions from other companies, but the fact remains that Thinstation does not support electronic USB keys.
And in order to fill this gap, we had to spend a lot of time searching for a working solution. Strictly speaking, and bring him.
To use two-factor authentication for terminal access via RDP in Thinstation, you need three components: an RDP client, an application that provides co operation with smart cards (electronic keys), and a smart card driver. The first two components (rdesktop and pcsc) are initially present in the Thinstation designer, and we will not focus on them, except to make sure that rdesktop has support for smart cards, and pcsc versions not lower than 1.5.5. The third component, driver, as well as a link for pcsc is the OpenCT package. OpenCT supports a relatively large number of USB readers and tokens and, most importantly, it works correctly with rdesktop. So we will pay more attention to it.
')
The build order of the Thinstation distribution with the support of USB dongles is as follows: we collect from OpenCT sources, create a package for Thinstation, edit configuration files, and assemble a Thinstation image.
The build will take place on Ubuntu, respectively, the commands are given for this Linux distribution, for other versions of Linux the commands will be different
First, install the necessary packages for the assembly:
$ sudo apt-get install libhal1 libltdl7 dpkg-dev build-essential fakeroot
Create a folder in the home directory in which we will collect OpenCT from sources:
$ mkdir ~ / openct
$ mkdir ~ / openct / build
$ cd ~ / openct / build
Download the source and install the dependencies to compile the package.
$ sudo apt-get source openct
$ sudo apt-get build-dep openct
Unpack:
$ sudo dpkg-source -x openct_0.6.20-1.1.dsc
Build an OpenCT package with the necessary options - enable-pcsc and enable-usb:
$ cd openct-0.6.20
$ sudo DEB_BUILD_OPTIONS = "- enable-pcsc - enable-usb" fakeroot debian / rules binary
$ cd ...
Openct ready, create a package structure for Thinstation
$ mkdir ~ / openct / packages
$ mkdir ~ / openct / packages / openct
$ mkdir ~ / openct / packages / openct / bin
$ mkdir ~ / openct / packages / openct / etc
$ mkdir ~ / openct / packages / openct / etc / udev /
$ mkdir ~ / openct / packages / openct / etc / udev / scripts
$ mkdir ~ / openct / packages / openct / lib
$ mkdir ~ / openct / packages / openct / usr
$ mkdir ~ / openct / packages / openct / usr / sbin
$ mkdir ~ / openct / packages / openct / var
$ mkdir ~ / openct / packages / openct / var / run
$ mkdir ~ / openct / packages / openct / var / run / openct
Copy the necessary files
$ cp ~ / openct / build / openct-0.6.20 / debian / openct / usr / bin / openct-tool ~ / openct / packages / openct / bin / openct-tool
$ cp ~ / openct / build / openct-0.6.20 / debian / openct / usr / sbin / openct-control ~ / openct / packages / openct / bin / openct-control
$ cp ~ / openct / build / openct-0.6.20 / debian / openct / usr / sbin / if * ~ / openct / packages / openct / usr / sbin /
$ cp -r ~ / openct / build / openct-0.6.20 / debian / openct / usr / lib / ~ / openct / packages / openct /
$ cp -r ~ / openct / build / openct-0.6.20 / debian / openct / lib / udev / rules.d ~ / openct / packages / openct / etc / udev
$ cp ~ / openct / build / openct-0.6.20 / debian / openct / lib / udev / openct * ~ / openct / packages / openct / etc / udev / scripts
$ cp ~ / openct / build / openct-0.6.20 / debian / openct / etc / openct.conf ~ / openct / packages / openct / etc / openct.conf
$ cp -r ~ / openct / build / openct-0.6.20 / debian / libopenct1 / usr / lib / * ~ / openct / packages / openct / lib
$ cp -r / lib / libdbus * ~ / openct / packages / openct / lib
$ cp -r /usr/lib/libhal.so* ~ / openct / packages / openct / lib
$ cp -r /usr/lib/libltdl.so* ~ / openct / packages / openct / lib
Although the udev rule is already present, it needs to be corrected.
$ nano ~ / openct / packages / openct / etc / udev / rules.d / 60-openct.rules
After line
ACTION! = "Add", GOTO = "openct_usb_rules_end" must be added:
SUBSYSTEM == "usb", ACTION == "add", ENV {DEVTYPE} == "usb_device", \
NAME = "bus / usb / $ env {BUSNUM} / $ env {DEVNUM}", MODE = "0644"
And also make sure that the rules relating to the necessary electronic keys are not commented out, and the paths to the executable squeaks are correct. In Thinstation, they are located / etc / udev / scripts
The openct_usb file is undergoing a more "serious" modification.
$ nano ~ / openct / packages / openct / etc / udev / scripts / openct_usb
We take out everything and prescribe only:
#! / bin / sh
/ bin / openct-control shutdown
/ bin / openct-control init
exit 0
It will not be superfluous to look into openct.conf, to make sure that the necessary electronic key driver will be loaded.
$ nano ~ / openct / packages / openct / etc / openct.conf
Create an openct package dependency on Thinstation from pcscd:
$ echo 'pcscd' | cat> ~ / openct / packages / openct / dependencies
The openct package created in the packages folder:
$ cp -r ~ / openct / packages / openct ~ / Thinstation-2.2.2 / packages
We inform the designer about the need to include the openct package in the assembly of the Thinstation distribution:
$ nano ~ / Thinstation-2.2.2 / build.conf
packages openct
We collect the image of a thin client
$ cd ~ / Thinstation-2.2.2
$ sudo ./build
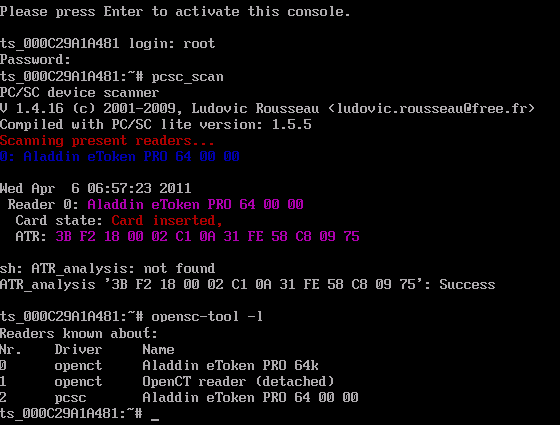
The image is ready. Boot, connect token and check in console with commands pcscd_scan and / or opensc-tool –l
If everything is good, then connect to the terminal server, not forgetting to specify –r scard in the connection options to the server.
And in order to fill this gap, we had to spend a lot of time searching for a working solution. Strictly speaking, and bring him.
To use two-factor authentication for terminal access via RDP in Thinstation, you need three components: an RDP client, an application that provides co operation with smart cards (electronic keys), and a smart card driver. The first two components (rdesktop and pcsc) are initially present in the Thinstation designer, and we will not focus on them, except to make sure that rdesktop has support for smart cards, and pcsc versions not lower than 1.5.5. The third component, driver, as well as a link for pcsc is the OpenCT package. OpenCT supports a relatively large number of USB readers and tokens and, most importantly, it works correctly with rdesktop. So we will pay more attention to it.
')
The build order of the Thinstation distribution with the support of USB dongles is as follows: we collect from OpenCT sources, create a package for Thinstation, edit configuration files, and assemble a Thinstation image.
We collect OpenCT
The build will take place on Ubuntu, respectively, the commands are given for this Linux distribution, for other versions of Linux the commands will be different
First, install the necessary packages for the assembly:
$ sudo apt-get install libhal1 libltdl7 dpkg-dev build-essential fakeroot
Create a folder in the home directory in which we will collect OpenCT from sources:
$ mkdir ~ / openct
$ mkdir ~ / openct / build
$ cd ~ / openct / build
Download the source and install the dependencies to compile the package.
$ sudo apt-get source openct
$ sudo apt-get build-dep openct
Unpack:
$ sudo dpkg-source -x openct_0.6.20-1.1.dsc
Build an OpenCT package with the necessary options - enable-pcsc and enable-usb:
$ cd openct-0.6.20
$ sudo DEB_BUILD_OPTIONS = "- enable-pcsc - enable-usb" fakeroot debian / rules binary
$ cd ...
We assemble package for Thinstation
Openct ready, create a package structure for Thinstation
$ mkdir ~ / openct / packages
$ mkdir ~ / openct / packages / openct
$ mkdir ~ / openct / packages / openct / bin
$ mkdir ~ / openct / packages / openct / etc
$ mkdir ~ / openct / packages / openct / etc / udev /
$ mkdir ~ / openct / packages / openct / etc / udev / scripts
$ mkdir ~ / openct / packages / openct / lib
$ mkdir ~ / openct / packages / openct / usr
$ mkdir ~ / openct / packages / openct / usr / sbin
$ mkdir ~ / openct / packages / openct / var
$ mkdir ~ / openct / packages / openct / var / run
$ mkdir ~ / openct / packages / openct / var / run / openct
Copy the necessary files
$ cp ~ / openct / build / openct-0.6.20 / debian / openct / usr / bin / openct-tool ~ / openct / packages / openct / bin / openct-tool
$ cp ~ / openct / build / openct-0.6.20 / debian / openct / usr / sbin / openct-control ~ / openct / packages / openct / bin / openct-control
$ cp ~ / openct / build / openct-0.6.20 / debian / openct / usr / sbin / if * ~ / openct / packages / openct / usr / sbin /
$ cp -r ~ / openct / build / openct-0.6.20 / debian / openct / usr / lib / ~ / openct / packages / openct /
$ cp -r ~ / openct / build / openct-0.6.20 / debian / openct / lib / udev / rules.d ~ / openct / packages / openct / etc / udev
$ cp ~ / openct / build / openct-0.6.20 / debian / openct / lib / udev / openct * ~ / openct / packages / openct / etc / udev / scripts
$ cp ~ / openct / build / openct-0.6.20 / debian / openct / etc / openct.conf ~ / openct / packages / openct / etc / openct.conf
$ cp -r ~ / openct / build / openct-0.6.20 / debian / libopenct1 / usr / lib / * ~ / openct / packages / openct / lib
$ cp -r / lib / libdbus * ~ / openct / packages / openct / lib
$ cp -r /usr/lib/libhal.so* ~ / openct / packages / openct / lib
$ cp -r /usr/lib/libltdl.so* ~ / openct / packages / openct / lib
Rule configuration files
Although the udev rule is already present, it needs to be corrected.
$ nano ~ / openct / packages / openct / etc / udev / rules.d / 60-openct.rules
After line
ACTION! = "Add", GOTO = "openct_usb_rules_end" must be added:
SUBSYSTEM == "usb", ACTION == "add", ENV {DEVTYPE} == "usb_device", \
NAME = "bus / usb / $ env {BUSNUM} / $ env {DEVNUM}", MODE = "0644"
And also make sure that the rules relating to the necessary electronic keys are not commented out, and the paths to the executable squeaks are correct. In Thinstation, they are located / etc / udev / scripts
The openct_usb file is undergoing a more "serious" modification.
$ nano ~ / openct / packages / openct / etc / udev / scripts / openct_usb
We take out everything and prescribe only:
#! / bin / sh
/ bin / openct-control shutdown
/ bin / openct-control init
exit 0
It will not be superfluous to look into openct.conf, to make sure that the necessary electronic key driver will be loaded.
$ nano ~ / openct / packages / openct / etc / openct.conf
Create an openct package dependency on Thinstation from pcscd:
$ echo 'pcscd' | cat> ~ / openct / packages / openct / dependencies
Putting Thinstation
The openct package created in the packages folder:
$ cp -r ~ / openct / packages / openct ~ / Thinstation-2.2.2 / packages
We inform the designer about the need to include the openct package in the assembly of the Thinstation distribution:
$ nano ~ / Thinstation-2.2.2 / build.conf
packages openct
We collect the image of a thin client
$ cd ~ / Thinstation-2.2.2
$ sudo ./build
The image is ready. Boot, connect token and check in console with commands pcscd_scan and / or opensc-tool –l
If everything is good, then connect to the terminal server, not forgetting to specify –r scard in the connection options to the server.
Source: https://habr.com/ru/post/123142/
All Articles