Reading an XML file using App Inventor
Hello. I want to dedicate this topic to Google App Inventor (hereinafter simply inventor), with which I think you are familiar from previous topics of other people. He is accused of a small functional. I also thought so, and when it first started, I could only make a couple of trinkets. But, having come the other day to the inventor, I was pleasantly surprised, because in the June update, many interesting blocks were added, such as:
Web, TinyWebDB, TinyDB, Notifier. In this topic, we will look at how to read the XML file using the example of getting the user's karma (I thought of using this example after one of the users wrote a topic about Python and SL4A). The interface will not be considered in detail, it is easy to understand and so.
First, I will show what kind of scheme we end up with:

Open the appinventor.googlelabs.com page in the browser, create a new project and add the following components to the screen layout:
Web, Notifier, Button, Label, TextBox, if necessary, change the labels on them.
I did it like this:

Open the Block Editor (such as the top right button) and start creating blocks of code.
First you need to make two variables: lworking and lCopyofWorking .
Creating variables is done like this:
On the left, go through the tabs in the Built-In → Definition menu and drag the def variable to the workspace. Both variables will be of the list type, so go to Built-In → Lists and drag make a list to variables twice. After that, you need to add to the list variable two item type text ( Built-In → Text ) with the value> and <.
This is what should have happened:

')
Button click processing can be found in My Blocks → Button1 , this block is called Button1.Click . Transfer it to the work area. What will be done by pressing? It is necessary to make it so that when the button is pressed, the url is set to request the XML file and the request itself is sent. To do this, go to My Blocks → Web1 and drag the set Web1.Url and call Web1.Get blocks to the workspace , then paste them into Button1.Click . Now it is necessary to make the url itself, for which we need the join ( Built-In → Text ), text (ibid) blocks, into which we need to drive the http: //habrahabr.ru/api/profile/ and TextBox1.Text ( My Blocks → TextBox1 ). From their name, I think it is clear what they are doing and in what order to place them. Here's how I did:

Add a Web1.GotText block ( My Blocks → Web1 ) to the workspace . This block is triggered when the Web1.Url command is successfully executed and a response is received from the server.
First you need to separate the text using this design:

The first block sets the value of the variable (It is located in My Blocks → My Definitions ).
The second divides the text responseContent using lCopyofWorking . (As a result, the resulting text will be approximately login nick / login karma 66 / karma ...).
After that, you need to check if there is such a user. Due to the fact that in case of incorrect spelling of the user name, Habr returns a file with an error, then we can easily check if there is such a user with the help of such blocks:
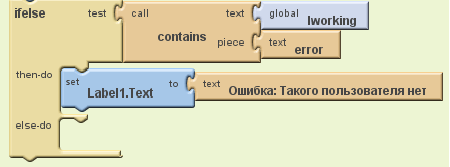
I think everything is clear with the appointment of blocks. ifelse is located in Built-In → Control . contains in Built-In → Text . global in My Blocks → My Definitions .
Now you need to loop through all the items in the lworking sheet using the foreach function ( Built-In → Control ).
Here's what it looks like:

It is necessary to substitute this construction in else-do .
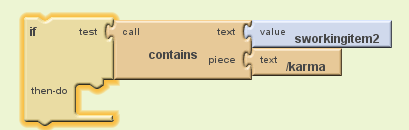
It remains only to find out: is there a karma tag in the current case and output its value.
You can find out with the help of the already known to us contains , if (to be in the same place as ifelse), the text / karma, and the sworkingitem2 variable like this:
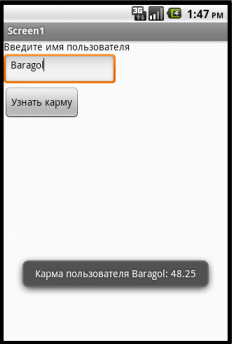
Everything! It remains only to derive the value of karma, which we will do with the help of the Notifier1.ShowAlert function ( My Blocks → Notifier1 ). There is nothing difficult with it, so we will only consider the construction of the message text:

As you can see, I got this pretty cumbersome. With join you are already familiar, we will not dwell on it. But the second part should be disassembled.
select list item ( Built-In → Lists ), as the name implies, selects an item from the lworking sheet. Attach the subtraction function ( Built-In → Math ) to the index argument in which the number ( Built-In → Math ) variable with value 1 will be subtracted from the position of the current tag ( / karma ) with the value 1. The function of determining the position of the current tag is called position in list and is located in Built-In → Lists .
We connect our blocks as shown in the first screenshot and test.
As you can see, in fact, App Inventor is not such a bauble, which, at first glance, is only suitable for creating a meowing cat.
The lesson from which this article was made
Download the application:

Web, TinyWebDB, TinyDB, Notifier. In this topic, we will look at how to read the XML file using the example of getting the user's karma (I thought of using this example after one of the users wrote a topic about Python and SL4A). The interface will not be considered in detail, it is easy to understand and so.
First, I will show what kind of scheme we end up with:
Add components
Open the appinventor.googlelabs.com page in the browser, create a new project and add the following components to the screen layout:
Web, Notifier, Button, Label, TextBox, if necessary, change the labels on them.
I did it like this:
Creating variables
Open the Block Editor (such as the top right button) and start creating blocks of code.
First you need to make two variables: lworking and lCopyofWorking .
Creating variables is done like this:
On the left, go through the tabs in the Built-In → Definition menu and drag the def variable to the workspace. Both variables will be of the list type, so go to Built-In → Lists and drag make a list to variables twice. After that, you need to add to the list variable two item type text ( Built-In → Text ) with the value> and <.
This is what should have happened:
')
Button click processing
Button click processing can be found in My Blocks → Button1 , this block is called Button1.Click . Transfer it to the work area. What will be done by pressing? It is necessary to make it so that when the button is pressed, the url is set to request the XML file and the request itself is sent. To do this, go to My Blocks → Web1 and drag the set Web1.Url and call Web1.Get blocks to the workspace , then paste them into Button1.Click . Now it is necessary to make the url itself, for which we need the join ( Built-In → Text ), text (ibid) blocks, into which we need to drive the http: //habrahabr.ru/api/profile/ and TextBox1.Text ( My Blocks → TextBox1 ). From their name, I think it is clear what they are doing and in what order to place them. Here's how I did:
Getting and opening XML
Add a Web1.GotText block ( My Blocks → Web1 ) to the workspace . This block is triggered when the Web1.Url command is successfully executed and a response is received from the server.
First you need to separate the text using this design:
The first block sets the value of the variable (It is located in My Blocks → My Definitions ).
The second divides the text responseContent using lCopyofWorking . (As a result, the resulting text will be approximately login nick / login karma 66 / karma ...).
After that, you need to check if there is such a user. Due to the fact that in case of incorrect spelling of the user name, Habr returns a file with an error, then we can easily check if there is such a user with the help of such blocks:
I think everything is clear with the appointment of blocks. ifelse is located in Built-In → Control . contains in Built-In → Text . global in My Blocks → My Definitions .
Now you need to loop through all the items in the lworking sheet using the foreach function ( Built-In → Control ).
Here's what it looks like:
It is necessary to substitute this construction in else-do .
It remains only to find out: is there a karma tag in the current case and output its value.
You can find out with the help of the already known to us contains , if (to be in the same place as ifelse), the text / karma, and the sworkingitem2 variable like this:
Everything! It remains only to derive the value of karma, which we will do with the help of the Notifier1.ShowAlert function ( My Blocks → Notifier1 ). There is nothing difficult with it, so we will only consider the construction of the message text:
As you can see, I got this pretty cumbersome. With join you are already familiar, we will not dwell on it. But the second part should be disassembled.
select list item ( Built-In → Lists ), as the name implies, selects an item from the lworking sheet. Attach the subtraction function ( Built-In → Math ) to the index argument in which the number ( Built-In → Math ) variable with value 1 will be subtracted from the position of the current tag ( / karma ) with the value 1. The function of determining the position of the current tag is called position in list and is located in Built-In → Lists .
Completion
We connect our blocks as shown in the first screenshot and test.
As you can see, in fact, App Inventor is not such a bauble, which, at first glance, is only suitable for creating a meowing cat.
The lesson from which this article was made
Download the application:
Source: https://habr.com/ru/post/122824/
All Articles