MBR for a flash drive with your own hands or how to make three of one device
My respect to the reader!
The topic could have been simply disastrously huge, so let's get straight to the point. Ahead of you is waiting for a story about how you can make one flash drive at the same time bootable for both Windows operating systems and * nix, and also make it live-usb. I apologize in advance for the jargon, not a supporter, but so shorter.
Once I had to install a bunch of different operating systems on the same machine many times in a row, both fromfellow gentlemen from Microsoft and from all of us loved by * nix `s. At the same time, installers of newly installed OSs periodically rubbed loaders previously installed, so you had to manually restore them, booting from live-usb. But the worst thing is that with all of this there was only one flash drive at hand (and another 15 computers were true, but there was little use for them, since it was impossible to disassemble them for reasons of warranty in the hope of an extra hard drive). The flash drive fortunately was large. It was then that the idea arose of making two of one flash drive, and preferably three (although it is possible 4) different devices.
How to make several flash drives out of a single flash drive in order to install several OS installers and a live OS at the same time? The answer is obvious - make several sections on a flash drive!
')
Having rummaged on theInternet, the depths of the subconscious mind recalled from the institute course that information about partitions is stored in the first sector of a flash drive disk , called the Master Boot Table ( MBR ), or rather in a separate part of it, called partitions. This part is located at offset 0x01BE and consists of 4 fields of 16 bytes each, each of which is a record of a separate section. At the same time, in principle, it is possible to have a larger number of partitions on one device, but it is more difficult and four will be enough for a flash drive.
In fortochny OS there is an unpleasant limit on the number of partitions of flash drives. It should not exceed 1 . More precisely, the sections can be any number, but the OS will see only the first of the entries in the partitions. Actually this determined the choice of means for formatting a flash drive. We will work with Linux fdiskʻom!
The loader itself will be written in FASM , since for programming code running outside the OS, it is most convenient in my opinion.
You can work with a flash drive in the form of a block device using the awful destroy data ( dd ), but since there is such a jumble of OSes, then we will use a more friendly windowed DMDE .
Short lyrical digression
In fact, the feature of the Windows operating system family with flash drives allows using the technology offered by me absolutely painlessly in relation to the further use of flash drives as an ordinary data storage device. Cutting off a couple of 16 GB in the end, I became the owner of a 14-gig flash drive that works from the point of view of Windows as before (i.e., other sections were not visible), but at the same time when I tried to download it from BIOS allows you to install OSi from two gigabyte partitions created at the end.
Let's start with the simplest, mark up the file system on our flash drive. In particular, I used a Transcend JetFlash 16 GB flash drive (it was received as a gift, and the gift horse is known ... Although I have no complaints about it for 1.5 years of use). As I said before, we’ll use Linux fdisk (there is an old Ubuntu 9 virtual machine on hand).
So, we mount the flash drive (as we sit under X, then we just stick it into the port). Get the device / dev / sdb.
Run fdisk by setting it on a new device:
root @ kubuntu: / # fdisk / dev / sdb
We have exhaust:
We believe that the disk is clean and does not contain any partitions. Otherwise, the d command fixes this flaw (do not forget to copy the necessary data in advance).
The task is simple - create three sections. Sections will be created basic (primary), so that all information about them is stored in the partitions MBRʻa. Use the n command.
The first partition is the largest (14 GB), since Windows will later see it, and we will use it as a regular USB flash drive:
The second and third gigabyte:
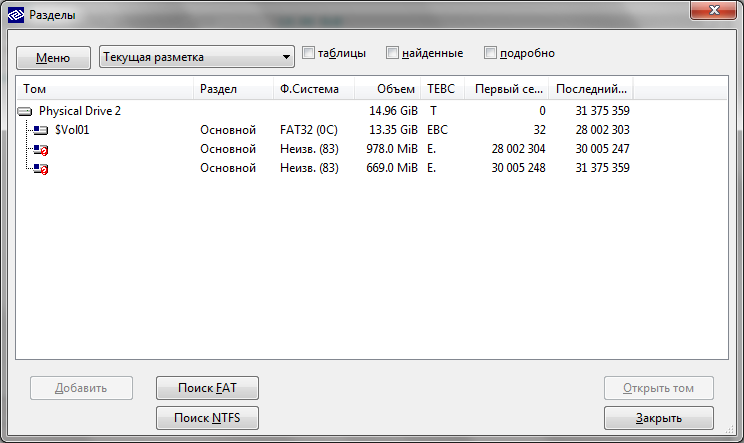
Check the results obtained by printing the partition table with the p command:
As you can see, we have three sections: 14 GB, 1 GB and remnants (slightly less gig). It remains to save the changes with the w command
Disconnect the flash drive from the virtual machine and instantly see the pop-up window of the following form:

It can be seen that the flash drive began to be perceived by Windows as a device of a much smaller size. Well, formatting! We get the first section, ready to use. But what to do with the other two? The first is not the fact that the smartest (but most importantly, working!) That came to mind is to deceive old Windows and swap entries in the partition table.
So, let's use the DMDE program, open the USB flash drive as a block device and dig into the boot sector boot loops.

Chose the right device size.
They opened it and the first thing we see is a partition table, divided by fields. Not satisfied, we climb to the raw bytes. Press F2 and see the contents of the MBR. Remember that partitions (partition records) are stored with 446 bytes.
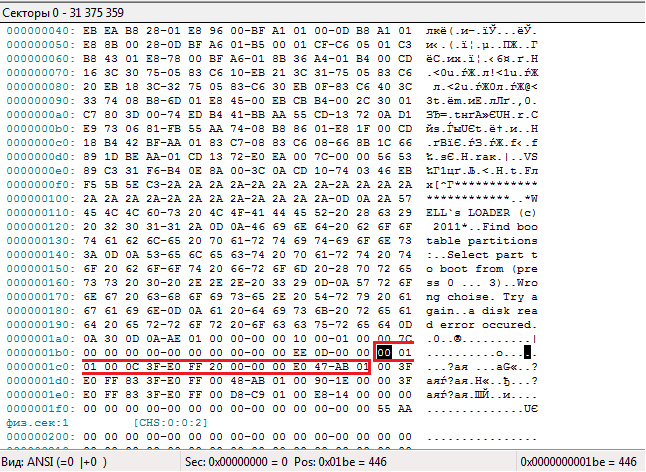
Red highlighted the record of the first section. Next, we make a knight's move! We save all three records somewhere in a notebook, and in the place of the first record we write the second (crtl + e, write, ctrl + w save). Close DMDE, poke a flash drive and ... bingo! We see the following window:
Windows this time saw the second partition in size. We rub hands and we format.
As it is not difficult to guess, then it is worth recording the third one in place of the first one, and copying it in the second place from the first one. Again, format and return the resulting record to the third position (do not forget that the record is 16 bytes, and when formatting, the file system identifier byte changes). At the last step we return the first entry from the notebook to the place. As a result, if you mount such a flash drive to Ubuntu, we get three different partitions, and in the case of Windows - only one - the first.
In a way similar to the formatting of partitions, various operating systems are easily installed on a USB flash drive. I installed the following on mine:
What's next? We have an excellent flash drive with three operating systems and ... a huge minus! In order for the computer to boot from the flash drive after loading the BIOS, one of its partitions must be active (the value of the first byte in the partitions 0x01 entry). It’s easy, you say, using the same beloved DMDE. Perhaps, but here we are faced with another problem - what if we often change our minds about which partition of the flash drive to boot from? Do not edit the partition table each time from DMDE manually. Of course not, automate this process!
What does the MBR consist of? MBR is a bootloader + partition table entry. After the BIOS firmware checks the computer ( POST ), it copies the first sector of the disk from which the operating system is supposed to be loaded into memory at 0x7C00 (the processor operates in the real address mode) and transfers control there. Next, the MBR loader code (everything up to the 446th byte) checks the disk readiness, checks the partition table entries (only one must be active!) And select the active partition with subsequent transfer of control to the OS loader.
To get rid of the restrictions on the number of simultaneous active partitions on the disk, replace the bootloader code from the MBR with your own, which will check the records, find those marked as active and wait for the user to press the key with the number corresponding to the partition number from which to load.
As I said, we will write the code in FASM (and debugging was done in Bochs ). The following is a listing without much explanation, otherwise the topic will never end. I would just like to note that it so happened that this is my first assembler program, so do not judge strictly. What the code does is described above.
As you can see, the loader program is a pure binary without any entry points, sections, and other complexity. Processor mode - real (16-bit).
To use this bootloader, you need to fill it with a flash drive in the first sector (using DMDE, for example), while maintaining the intact partition table. The size of the compiled binary file is 442 bytes.
If such a solution becomes popular, then the bootloader functionality can be easily extended, for example, by adding the output of information about partitions to the screen during the selection process. For the convenience of downloading the bootloader to the USB flash drive and selecting which of the sections will be active, you can write a small tool. In general, your wishes and suggestions are accepted in the comments.
Download the source code and the bootloader binary from here .
The topic could have been simply disastrously huge, so let's get straight to the point. Ahead of you is waiting for a story about how you can make one flash drive at the same time bootable for both Windows operating systems and * nix, and also make it live-usb. I apologize in advance for the jargon, not a supporter, but so shorter.
annotation
Once I had to install a bunch of different operating systems on the same machine many times in a row, both from
A bit of theory
How to make several flash drives out of a single flash drive in order to install several OS installers and a live OS at the same time? The answer is obvious - make several sections on a flash drive!
')
Having rummaged on the
Tools
In fortochny OS there is an unpleasant limit on the number of partitions of flash drives. It should not exceed 1 . More precisely, the sections can be any number, but the OS will see only the first of the entries in the partitions. Actually this determined the choice of means for formatting a flash drive. We will work with Linux fdiskʻom!
The loader itself will be written in FASM , since for programming code running outside the OS, it is most convenient in my opinion.
You can work with a flash drive in the form of a block device using the awful destroy data ( dd ), but since there is such a jumble of OSes, then we will use a more friendly windowed DMDE .
Short lyrical digression
In fact, the feature of the Windows operating system family with flash drives allows using the technology offered by me absolutely painlessly in relation to the further use of flash drives as an ordinary data storage device. Cutting off a couple of 16 GB in the end, I became the owner of a 14-gig flash drive that works from the point of view of Windows as before (i.e., other sections were not visible), but at the same time when I tried to download it from BIOS allows you to install OSi from two gigabyte partitions created at the end.
Zubo flash crushing machine
Let's start with the simplest, mark up the file system on our flash drive. In particular, I used a Transcend JetFlash 16 GB flash drive (it was received as a gift, and the gift horse is known ... Although I have no complaints about it for 1.5 years of use). As I said before, we’ll use Linux fdisk (there is an old Ubuntu 9 virtual machine on hand).
So, we mount the flash drive (as we sit under X, then we just stick it into the port). Get the device / dev / sdb.
Run fdisk by setting it on a new device:
root @ kubuntu: / # fdisk / dev / sdb
We have exhaust:
  Set to 1953.
 But this is larger than 1024,
 setups cause problems with:
 1) software that runs at boot time (eg, old versions of LILO)
 2) booting and partitioning software from other OSs
    (eg, DOS FDISK, OS / 2 FDISK)

 Command (m for help): m
 Command action
    a toggle a bootable flag
    b edit bsd disklabel
    c toggle the dos compatibility flag
    d delete a partition
    l list known partition types
    m print this menu
    n add a new partition
    o create a new empty DOS partition table
    p print the partition table
    q quit without saving changes
    s create a new empty Sun disklabel
    t change a partition's system id
    u change display / entry units
    v verify the partition table
    write table to disk and exit
    x extra functionality (experts only)
We believe that the disk is clean and does not contain any partitions. Otherwise, the d command fixes this flaw (do not forget to copy the necessary data in advance).
The task is simple - create three sections. Sections will be created basic (primary), so that all information about them is stored in the partitions MBRʻa. Use the n command.
The first partition is the largest (14 GB), since Windows will later see it, and we will use it as a regular USB flash drive:
  Command (m for help): n
 Command action
    e extended
    p primary partition (1-4)
 p
 Partition number (1-4): 1
 First cylinder (1-15320, default 1): 1
 Last cylinder or + size or + sizeM or + sizeK (1-15320, default 15320): + 14336M
The second and third gigabyte:
  Command (m for help): n
 Command action
    e extended
    p primary partition (1-4)
 p
 Partition number (1-4): 2
 First cylinder (13674-15320, default 13674):
 Using default value 13674
 Last cylinder or + size or + sizeM or + sizeK (13674-15320, default 15320): + 1024M

 Command (m for help): n
 Command action
    e extended
    p primary partition (1-4)
 p
 Partition number (1-4): 3
 First cylinder (14652-15320, default 14652):
 Using default value 14652
 Last cylinder or + size or + sizeM or + sizeK (14652-15320, default 15320):
 Using default value 15320
Check the results obtained by printing the partition table with the p command:
  Command (m for help): p

 Disk / dev / sdb: 16.0 GB, 16064184320 bytes
 64 heads, 32 sectors / track, 15320 cylinders
 Units = cylinders of 2048 * 512 = 1048576 bytes
 Disk identifier: 0x0dee0000

    Device Boot Start End Blocks Id System
 / dev / sdb1 1 13673 14001136 83 Linux
 / dev / sdb2 13674 14651 1001472 83 Linux
 / dev / sdb3 14652 15320 685056 83 Linux
As you can see, we have three sections: 14 GB, 1 GB and remnants (slightly less gig). It remains to save the changes with the w command
  Command (m for help): w
 The partition table has been altered!

 Calling ioctl () to re-read partition table.
 Syncing disks.
 root @ kubuntu: / #
Disconnect the flash drive from the virtual machine and instantly see the pop-up window of the following form:
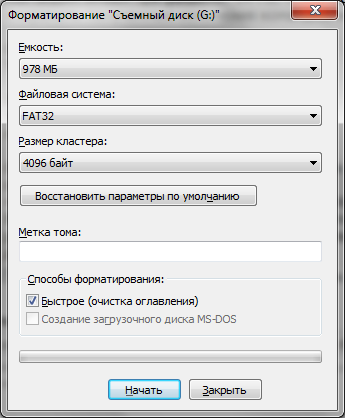
It can be seen that the flash drive began to be perceived by Windows as a device of a much smaller size. Well, formatting! We get the first section, ready to use. But what to do with the other two? The first is not the fact that the smartest (but most importantly, working!) That came to mind is to deceive old Windows and swap entries in the partition table.
So, let's use the DMDE program, open the USB flash drive as a block device and dig into the boot sector boot loops.
Chose the right device size.
They opened it and the first thing we see is a partition table, divided by fields. Not satisfied, we climb to the raw bytes. Press F2 and see the contents of the MBR. Remember that partitions (partition records) are stored with 446 bytes.
Red highlighted the record of the first section. Next, we make a knight's move! We save all three records somewhere in a notebook, and in the place of the first record we write the second (crtl + e, write, ctrl + w save). Close DMDE, poke a flash drive and ... bingo! We see the following window:
Windows this time saw the second partition in size. We rub hands and we format.
As it is not difficult to guess, then it is worth recording the third one in place of the first one, and copying it in the second place from the first one. Again, format and return the resulting record to the third position (do not forget that the record is 16 bytes, and when formatting, the file system identifier byte changes). At the last step we return the first entry from the notebook to the place. As a result, if you mount such a flash drive to Ubuntu, we get three different partitions, and in the case of Windows - only one - the first.
In a way similar to the formatting of partitions, various operating systems are easily installed on a USB flash drive. I installed the following on mine:
- Section 1 (14 GB) - Windows 7 Installer (+ is also used as a regular USB flash drive)
- Section 2 (1 GB) - live-usb Windows (bartPE)
- Section 3 - Linux live-usb (backtrack)
And where is the code?
What's next? We have an excellent flash drive with three operating systems and ... a huge minus! In order for the computer to boot from the flash drive after loading the BIOS, one of its partitions must be active (the value of the first byte in the partitions 0x01 entry). It’s easy, you say, using the same beloved DMDE. Perhaps, but here we are faced with another problem - what if we often change our minds about which partition of the flash drive to boot from? Do not edit the partition table each time from DMDE manually. Of course not, automate this process!
Some more theory
What does the MBR consist of? MBR is a bootloader + partition table entry. After the BIOS firmware checks the computer ( POST ), it copies the first sector of the disk from which the operating system is supposed to be loaded into memory at 0x7C00 (the processor operates in the real address mode) and transfers control there. Next, the MBR loader code (everything up to the 446th byte) checks the disk readiness, checks the partition table entries (only one must be active!) And select the active partition with subsequent transfer of control to the OS loader.
What we will do
To get rid of the restrictions on the number of simultaneous active partitions on the disk, replace the bootloader code from the MBR with your own, which will check the records, find those marked as active and wait for the user to press the key with the number corresponding to the partition number from which to load.
As I said, we will write the code in FASM (and debugging was done in Bochs ). The following is a listing without much explanation, otherwise the topic will never end. I would just like to note that it so happened that this is my first assembler program, so do not judge strictly. What the code does is described above.
; dl c ! use16 ;======== 0000:0600h =================== mov ax, 7C0h mov ds, ax xor si, si mov ax, 60h mov es, ax xor di, di mov cx, 0FFh ; cx ;[DS:SI] => [ES:DI]; SI += 2; DI += 2; rep movsw ; jmp 0000:0618h ;======== =================================== mov ax, hello_msg_1 call print mov ax, hello_msg_2 call print ;======== =================================== mov si, [part_adr] mov bh, 80h mov cl, -1 partitions_chek: cmp cl, 3 ; 4 , je partition_select add si, 10h inc cl mov bl, [es:si] cmp bl, bh jne partitions_chek ; call partitions_process ; ! ;[es:si] ;cl - jmp partitions_chek ;======== ============================= partitions_process: mov ax, boot_part_msg call print mov di, part_num add [ds:di], cl mov ax, part_num call print sub [ds:di], cl mov di, boot_flags mov ch, 0 add di, cx mov byte[ds:di], 1 ret; ;======================================================================= partition_select: ; mov ax, select_part_msg call print choise: mov di, boot_flags mov si, [part_adr] mov ah, 0 int 16h p0: cmp al, 48 jne p1 add si, 10h jmp disk p1: cmp al, 49 jne p2 add si, 20h jmp disk p2: cmp al, 50 jne p3 add si, 30h jmp disk p3: add si, 40h cmp al, 51 je disk wrong_choise: mov ax, wrong_input_msg call print jmp choise disk: mov ah, 0 sub al, 48 ; , add di, ax cmp byte [ds:di], 0 je wrong_choise ; [es:si] ; mov ah, 41h ; (> 8 GB) ; dl mov bx, 55AAh int 13h jc ext_not_present_error shr cx, 1 jnb ext_not_present_error cmp bx, 0AA55h je read_boot_sect ext_not_present_error: mov ax, ext_not_pres_msg call print int 18h read_boot_sect: mov ah, 42h mov di, DAP_structure add di, 8 add si, 8 mov ebx, [ds:si] mov [ds:di], ebx mov si, DAP_structure int 13h jc ext_not_present_error jmp 0000:7C00h ;======== ================================ print: push si push bx mov bx, ax xor si, si mov ah, 0Eh p: mov al, [bx + si] cmp al, 0Ah int 10h je end_print inc si jmp p end_print: pop bx pop si ret ;======================================================================= hello_msg_1 db '************************', 0Dh, 0Ah hello_msg_2 db '*WELL`s LOADER (c) 2011*', 0Dh, 0Ah boot_part_msg db 'Find bootable partitions:', 0Dh, 0Ah select_part_msg db 'Select part to boot from (press 0 ... 3)', 0Dh, 0Ah wrong_input_msg db 'Wrong choise. Try again', 0Dh, 0Ah ext_not_pres_msg db 'a disk read error occured', 0Dh, 0Ah part_num db '0', 0Dh, 0Ah part_adr dw 1AEh boot_flags db 4 dup (0) DAP_structure db 10h, 0, 1, 0, 0, 7Ch, 0, 0, 8 dup (0) As you can see, the loader program is a pure binary without any entry points, sections, and other complexity. Processor mode - real (16-bit).
To use this bootloader, you need to fill it with a flash drive in the first sector (using DMDE, for example), while maintaining the intact partition table. The size of the compiled binary file is 442 bytes.
Perspectives
If such a solution becomes popular, then the bootloader functionality can be easily extended, for example, by adding the output of information about partitions to the screen during the selection process. For the convenience of downloading the bootloader to the USB flash drive and selecting which of the sections will be active, you can write a small tool. In general, your wishes and suggestions are accepted in the comments.
Download the source code and the bootloader binary from here .
Source: https://habr.com/ru/post/122699/
All Articles