Practical experience using Blynk for a CO2 sensor. Part 1
Hello. This is another article from the category of ESP8266 + Blynk = ♡ . Please do not take it as an advertisement, but only as a tribute to the developers of the Blynk platform and personal experience that may be useful to someone else besides me.
The idea of the project was born a few years ago, when, in a fit of DYI-enthusiasm, Ali bought the air quality sensor MQ-135 . According to the specification, this sensor reacts to the presence in the air of such substances as: NH3, NOx, alcohol, gasoline, smoke and CO2 and gives its abstract assessment of the air quality at the analog output [yes, I know that there are trimmers and calibration methods, but it's too hard].
The tests showed that the sensor responds perfectly to any harmful and "smelly" compounds, showing a rather drastic change in the output level. The situation was worse with the definition of an invisible enemy, namely carbon dioxide CO2. A lot has been said about the harm and the apparent ubiquity of this dioxide, we will not repeat.
')
Therefore, for me, the MQ-135 sensor turned out to be useless, since it could not “notice” the significant difference in air quality in a room crowded with people and in fresh air. But the challenge was already accepted, so a few iterations later, the last (current) version of the OpenWindAir board with an MH-Z19 IR sensor was born [yes not perfect, but Chinese]. More information about the resulting piece of hardware and its hardware capabilities is described in the article Data acquisition system on ESP. Part I.
For the task of measuring the level of carbon dioxide in a residential area, the sensor turned out to be an ideal and optimal solution (1,200 rubles for Ali with delivery).
A lot of good things have already been said about the Blynk platform, for example here . The capabilities of the platform simply amaze with their thoughtfulness and usability. So when it came time to choose the development environment for ESP8266 and write the program, the choice immediately fell on the Arduino IDE and the Blynk library.
Running the test sketch BlynkSimpleEsp8266 caused no problems. However, as the complexity and increasing functionality - had to face some difficulties, which I want to talk more about.
The main advantage of software development for ESP8266 in the Arduino IDE is that you can combine completely different libraries in one sketch and there’s almost nothing for you.
Before the beginning of the development of TK was formulated thesis and included the following items:
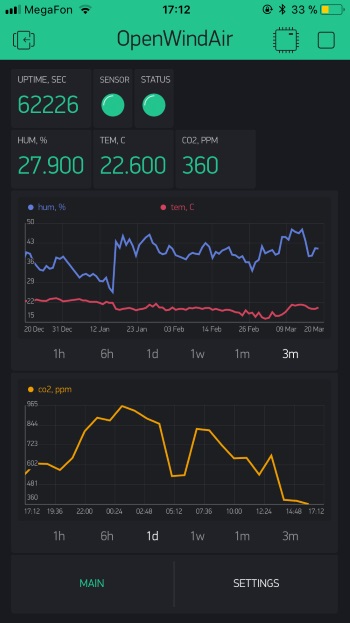
1. It is necessary to read the CO2 sensor readings (MH-Z19) with a certain interval and display the results using three (green, yellow, red) LEDs. The limits were chosen almost taking into account GOST 30494-2011 (Residential and public buildings. Indoor microclimate parameters.): Up to 900 PPM - green , from 901 to 1400 PPM - yellow , above 1401 PPM - red . We also have a beeper, the beeping threshold of which is set at the level of 1100 PPM, but it can be configured or even disabled via Blynk. During debugging, it turned out that the MH-Z19 can sometimes bump and give its maximum value (depending on the set limit: 1000, 2000, 3000 or 5000 PPM) instead of actually measured. This slightly complicated the processing of the results and could lead to false messages to the user, and the user's nerves should be protected. And since there is no absolutely correct (except for multiple measurements) way to distinguish incorrectly measured 2000 PPM (wild value for a dwelling) from the situation when the user sits and specially breathes into the sensor. Then two measures were taken to disguise this problem: a measurement limit of 2000 PPM was set (the device is supposed to be used in residential premises and everything that is greater than 1400 is already a red zone for us) and the averaging of the last 10 measurements is added. As a result, single false positives (for 2000 PPM) do not produce large bursts on the average graph. But if you wish, you can adjust the sensor measurement limit via Blynk and see the actual (non-averaged CO2 value).
2. To work with the temperature / humidity sensor ( AM2302 ) Adafruit DHT Sensor Library was used. Two small changes were made: the AM2302 was re-read (sometimes not read the first time) and correction factors were introduced for the temperature and humidity values. If the built-in sensor is used, it is empirically established that the air inside the device is “dry” by 15% and warmer by 2 degrees C (1 degree F) than outside when using the remote sensor (selected by the jumper) - no correction to the measured results is necessary and can be disabled.
3. The user should be able to configure the device (connect to WiFi, specify auth token, etc.) without additional software or flashing. The most optimal solution was to use the WiFiManager library, which translates ESP into an access point mode and allows the Captive portal to save WiFi network settings and other parameters to the USB flash drive.
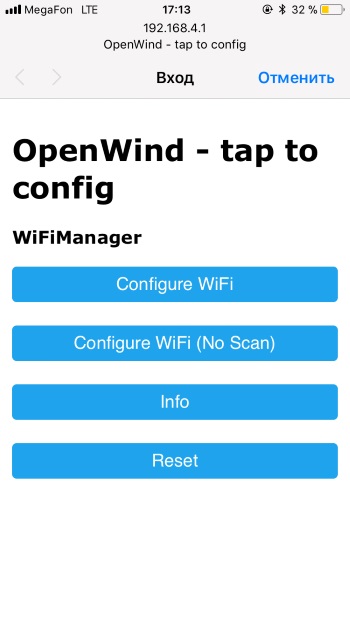
Later, when starting, the library tries to connect to the saved WiFi point and, in case of failure, goes back to the access point and the portal's Captive mode. And if the user suddenly doesn’t want to use Blynk or he doesn’t have a WiFi router, then OpenWindAir will never load and will only start in AP mode and reboot by timeout.
The way out of this hopeless situation was found next, if we have saved non-zero connection parameters to Blynk or MQTT server, then at the start we will try to connect and reboot, otherwise we may not connect to WiFi, but work offline.
4. Blynk requires an Internet connection (if the server is not local) and therefore it is necessary to monitor the availability of a WiFi connection. The WiFiManager library currently does not know how to reestablish the WiFi connection, and if the light blinks in the apartment and the router restarts, then only the reboot will help restore the ESP8266 connection to WiFi. Therefore, we had to add a simple timer, which after 60 continuous seconds of a lack of connection will reboot the device.
5. As an alternative to using Blynk, the user can choose to send readings using the MQTT protocol to the People’s Monitoring Server or any other similar service. For these purposes, the PubSubClient library was chosen, which is written in the most understandable C language for me and the only one (from those presented in the Arduino IDE catalog) that had clear examples.
6. Re-flashing the device is a matter, though not frequent and not very complicated (especially with the integrated CP2102 ), but I still wanted to simplify this process as much as possible. The ArduinoOTA library allows you to easily download a new binary and flash it. OTA can be activated either by a button on the device or remotely via a telephone. However, there were no surprises, it turns out I bought ESP8266-12E modules with different file system sizes (SPIFFS).
Externally non-distinguishable modules, ESP8266-12E can have a file system of 1 MB or 3 MB in size and require different firmware (build options in the Arduino IDE). Therefore, in order to avoid possible problems, you need to check the actual memory size during the download and request the corresponding binary on the server with the OTA upgrade (not done yet). Or you can go a little more simple way and collect all the firmware under SPIFFS with a smaller nominal value of 1 MB, since they work quite well on the ESP8266-12E with a large amount of memory.
For such checks in the SDK there are convenient functions that allow you to determine the size of the actual and selected memory in IDE.
7. In order not to be confused in different software versions and to distinguish them from each other, the arduino-1.8.5 \ hardware \ platform.txt file from the Arduino IDE was slightly rewritten so that the bat file that makes a copy of the current sketch is run during compilation. and the resulting binary, and automatically increment the version number.
Thus, after each build / firmware, we have a version number sewn into the binary and a copy of the sketch with the same number. And if you put a folder with a sketch in Dropbox - then you’ll have a self-made version control system.
Instructions for setting up the auto-increment version for the Arduino IDE and the bat-file are laid out on the github.
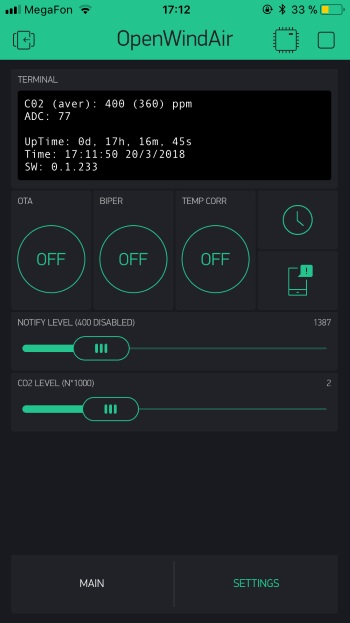
8. Well, since there is a built-in USB-UART adapter (with the driver for the CP2102 there are no problems in Windows and Linux), it was impossible not to add the output of measurement results through the Terminal (at a speed of 9600). Once every twenty seconds, measurement results and error messages are displayed.
And by pressing the Enter button you can get a message with system information.
The most unpleasant thing you had to deal with during development was when, at the same time, sending measurement results to the MQTT server and to Blynk, some of the data may start to get lost and not reach the server. As it turned out, connecting to the MQTT server and sending data — it may take several seconds and during this time the Blynk library has time to lose connection with its server and, as a result, if you do not manually initiate reconnection to the server — it can take quite a long time and some of the results measurements will be lost. I had to add a check of the WiFi client status _blynkWifiClient and in case of no connection, do a forced stop _blynkWifiClient.stop (), and then connect to the Blynk server again.
This is my first article, although 7 years have passed since the registration on Habré. Please do not judge very strictly and do not pay attention to govnokod, which is the only programming language that I own.
You can view the entire project in the githaba repository .
Having a CO2 sensor prevents me (and my family) from staying in the stuffy room once again. But most importantly, he stopped the eternal war between the camps of those who are hot and those who blow (it was me), in favor of the first.
Next will be the QR code, having scanned that with the Blynk application ( AppSore , Android ) you can find out what microclimate I have been at home for the last 3 months.

The project is working, please do not break anything.
Start
The idea of the project was born a few years ago, when, in a fit of DYI-enthusiasm, Ali bought the air quality sensor MQ-135 . According to the specification, this sensor reacts to the presence in the air of such substances as: NH3, NOx, alcohol, gasoline, smoke and CO2 and gives its abstract assessment of the air quality at the analog output [yes, I know that there are trimmers and calibration methods, but it's too hard].
The tests showed that the sensor responds perfectly to any harmful and "smelly" compounds, showing a rather drastic change in the output level. The situation was worse with the definition of an invisible enemy, namely carbon dioxide CO2. A lot has been said about the harm and the apparent ubiquity of this dioxide, we will not repeat.
')
Therefore, for me, the MQ-135 sensor turned out to be useless, since it could not “notice” the significant difference in air quality in a room crowded with people and in fresh air. But the challenge was already accepted, so a few iterations later, the last (current) version of the OpenWindAir board with an MH-Z19 IR sensor was born [yes not perfect, but Chinese]. More information about the resulting piece of hardware and its hardware capabilities is described in the article Data acquisition system on ESP. Part I.
For the task of measuring the level of carbon dioxide in a residential area, the sensor turned out to be an ideal and optimal solution (1,200 rubles for Ali with delivery).
Blynk - helps connect iron, cloud and phone
A lot of good things have already been said about the Blynk platform, for example here . The capabilities of the platform simply amaze with their thoughtfulness and usability. So when it came time to choose the development environment for ESP8266 and write the program, the choice immediately fell on the Arduino IDE and the Blynk library.
Running the test sketch BlynkSimpleEsp8266 caused no problems. However, as the complexity and increasing functionality - had to face some difficulties, which I want to talk more about.
Software architecture
The main advantage of software development for ESP8266 in the Arduino IDE is that you can combine completely different libraries in one sketch and there’s almost nothing for you.
Before the beginning of the development of TK was formulated thesis and included the following items:
1. It is necessary to read the CO2 sensor readings (MH-Z19) with a certain interval and display the results using three (green, yellow, red) LEDs. The limits were chosen almost taking into account GOST 30494-2011 (Residential and public buildings. Indoor microclimate parameters.): Up to 900 PPM - green , from 901 to 1400 PPM - yellow , above 1401 PPM - red . We also have a beeper, the beeping threshold of which is set at the level of 1100 PPM, but it can be configured or even disabled via Blynk. During debugging, it turned out that the MH-Z19 can sometimes bump and give its maximum value (depending on the set limit: 1000, 2000, 3000 or 5000 PPM) instead of actually measured. This slightly complicated the processing of the results and could lead to false messages to the user, and the user's nerves should be protected. And since there is no absolutely correct (except for multiple measurements) way to distinguish incorrectly measured 2000 PPM (wild value for a dwelling) from the situation when the user sits and specially breathes into the sensor. Then two measures were taken to disguise this problem: a measurement limit of 2000 PPM was set (the device is supposed to be used in residential premises and everything that is greater than 1400 is already a red zone for us) and the averaging of the last 10 measurements is added. As a result, single false positives (for 2000 PPM) do not produce large bursts on the average graph. But if you wish, you can adjust the sensor measurement limit via Blynk and see the actual (non-averaged CO2 value).
2. To work with the temperature / humidity sensor ( AM2302 ) Adafruit DHT Sensor Library was used. Two small changes were made: the AM2302 was re-read (sometimes not read the first time) and correction factors were introduced for the temperature and humidity values. If the built-in sensor is used, it is empirically established that the air inside the device is “dry” by 15% and warmer by 2 degrees C (1 degree F) than outside when using the remote sensor (selected by the jumper) - no correction to the measured results is necessary and can be disabled.
3. The user should be able to configure the device (connect to WiFi, specify auth token, etc.) without additional software or flashing. The most optimal solution was to use the WiFiManager library, which translates ESP into an access point mode and allows the Captive portal to save WiFi network settings and other parameters to the USB flash drive.
Later, when starting, the library tries to connect to the saved WiFi point and, in case of failure, goes back to the access point and the portal's Captive mode. And if the user suddenly doesn’t want to use Blynk or he doesn’t have a WiFi router, then OpenWindAir will never load and will only start in AP mode and reboot by timeout.
The way out of this hopeless situation was found next, if we have saved non-zero connection parameters to Blynk or MQTT server, then at the start we will try to connect and reboot, otherwise we may not connect to WiFi, but work offline.
if (!wifiManager.autoConnect("OpenWind - tap to config")){ if (mqtt_server[0] != '\0' || blynk_token[0] != '\0'){ Serial.println("Failed to go online for Blynk and MQTT, restarting.."); ESP.restart(); } else{ Serial.println("Failed to go online, offline mode activated"); online = false; } 4. Blynk requires an Internet connection (if the server is not local) and therefore it is necessary to monitor the availability of a WiFi connection. The WiFiManager library currently does not know how to reestablish the WiFi connection, and if the light blinks in the apartment and the router restarts, then only the reboot will help restore the ESP8266 connection to WiFi. Therefore, we had to add a simple timer, which after 60 continuous seconds of a lack of connection will reboot the device.
if (WiFi.status() != WL_CONNECTED && online){ if (!wifilost_flag){ wifilost_timer_start = uptime; wifilost_flag = true; } if (((uptime - wifilost_timer_start) > wifilost_timer_max) && wifilost_flag){ Serial.print("\n\rWiFi connection lost, restarting.."); wifilost_flag = false; ESP.restart(); } } 5. As an alternative to using Blynk, the user can choose to send readings using the MQTT protocol to the People’s Monitoring Server or any other similar service. For these purposes, the PubSubClient library was chosen, which is written in the most understandable C language for me and the only one (from those presented in the Arduino IDE catalog) that had clear examples.
6. Re-flashing the device is a matter, though not frequent and not very complicated (especially with the integrated CP2102 ), but I still wanted to simplify this process as much as possible. The ArduinoOTA library allows you to easily download a new binary and flash it. OTA can be activated either by a button on the device or remotely via a telephone. However, there were no surprises, it turns out I bought ESP8266-12E modules with different file system sizes (SPIFFS).
Flash

Externally non-distinguishable modules, ESP8266-12E can have a file system of 1 MB or 3 MB in size and require different firmware (build options in the Arduino IDE). Therefore, in order to avoid possible problems, you need to check the actual memory size during the download and request the corresponding binary on the server with the OTA upgrade (not done yet). Or you can go a little more simple way and collect all the firmware under SPIFFS with a smaller nominal value of 1 MB, since they work quite well on the ESP8266-12E with a large amount of memory.
For such checks in the SDK there are convenient functions that allow you to determine the size of the actual and selected memory in IDE.
String realSize = String(ESP.getFlashChipRealSize()); String ideSize = String(ESP.getFlashChipSize()); bool flashCorrectlyConfigured = realSize.equals(ideSize); if(flashCorrectlyConfigured){ Serial.println("flash correctly configured, SPIFFS starts, IDE size: " + ideSize + ", match real size: " + realSize); } else{ Serial.println("flash incorrectly configured, SPIFFS cannot start, IDE size: " + ideSize + ", real size: " + realSize); } 7. In order not to be confused in different software versions and to distinguish them from each other, the arduino-1.8.5 \ hardware \ platform.txt file from the Arduino IDE was slightly rewritten so that the bat file that makes a copy of the current sketch is run during compilation. and the resulting binary, and automatically increment the version number.
recipe.hooks.sketch.prebuild.0.pattern=D:\arduino-1.8.5\hardware\increment.bat {build.path} {build.source.path} {build.project_name} Thus, after each build / firmware, we have a version number sewn into the binary and a copy of the sketch with the same number. And if you put a folder with a sketch in Dropbox - then you’ll have a self-made version control system.
Instructions for setting up the auto-increment version for the Arduino IDE and the bat-file are laid out on the github.
8. Well, since there is a built-in USB-UART adapter (with the driver for the CP2102 there are no problems in Windows and Linux), it was impossible not to add the output of measurement results through the Terminal (at a speed of 9600). Once every twenty seconds, measurement results and error messages are displayed.
Reading MHZ19 sensor: ok
Reading DHT22 sensor: ok
===================================================

Humidity: 36.20%
Temperature: 27.20C \ 83.56F
C02: 1153 ppm
C02 average: 462 ppm
ADC: 99
UpTime: 0 days, 0 hours, 3 minutes, 45 seconds.
Time: 16:25:56 20/3/2018
===================================================
And by pressing the Enter button you can get a message with system information.
======SYSTEM-STATUS================================
Device name: OpenWindAir
Software version: 0.1.235
FreeHeap: 33824
ChipId: 13704617
FlashChipId: 1405167
FlashChipSize: 4194304
FlashChipSpeed: 40000000
CycleCount: 2204474679
Time: 16:27:6 20/3/2018
UpTime: 295
======BLYNK-STATUS=================================
Blynk token: 65a99f9e363a421c8b22d5b0162cce27
Blynk connected: 1
Notify level: 1100
Beep: 1
CO2 limit: 2000
Temperature correction: 1
======NETWORK-STATUS===============================
WiFi network: adakta2
WiFi status: 3
RSSI: -70
MAC: 18FE34D11DA9
IP: 192.168.0.152
Online: 1
======MQTT-STATUS==================================
MQTT server:narodmon.ru
MQTT port:1883
MQTT login:login
MQTT key:key
MQTT topics:
/OpenWindAir/h
/OpenWindAir/t
/OpenWindAir/f
/OpenWindAir/ppm
/OpenWindAir/status
======END-of-STATUS================================
Most unpleasant problem
The most unpleasant thing you had to deal with during development was when, at the same time, sending measurement results to the MQTT server and to Blynk, some of the data may start to get lost and not reach the server. As it turned out, connecting to the MQTT server and sending data — it may take several seconds and during this time the Blynk library has time to lose connection with its server and, as a result, if you do not manually initiate reconnection to the server — it can take quite a long time and some of the results measurements will be lost. I had to add a check of the WiFi client status _blynkWifiClient and in case of no connection, do a forced stop _blynkWifiClient.stop (), and then connect to the Blynk server again.
if (WiFi.status() == WL_CONNECTED){ wifilost_flag = false; if (blynk_token[0] != '\0'){ if (Blynk.connected() && _blynkWifiClient.connected()){ Blynk.run(); } else{ Serial.print("\n\rReconnecting to blynk.. "); Serial.print(Blynk.connected()); if (!_blynkWifiClient.connected()){ _blynkWifiClient.stop(); Return _blynkWifiClient.connect(BLYNK_DEFAULT_DOMAIN, BLYNK_DEFAULT_PORT); } Blynk.connect(4000); Serial.print(Blynk.connected()); } } Conclusion
This is my first article, although 7 years have passed since the registration on Habré. Please do not judge very strictly and do not pay attention to govnokod, which is the only programming language that I own.
You can view the entire project in the githaba repository .
Having a CO2 sensor prevents me (and my family) from staying in the stuffy room once again. But most importantly, he stopped the eternal war between the camps of those who are hot and those who blow (it was me), in favor of the first.
Next will be the QR code, having scanned that with the Blynk application ( AppSore , Android ) you can find out what microclimate I have been at home for the last 3 months.
The project is working, please do not break anything.
Source: https://habr.com/ru/post/122601/
All Articles