Secured data channel using self-signed SSL certificates and Stunnel
Good day, % username% !
Sooner or later the management comes to all network administrators and asks to make access to the company's internal resources via the Internet. Management, it is extremely pleasant to drink juice, on the shores of Maldives, to monitor the progress of solving tasks in the corporate project management system. That becomes the task of organizing access.
After reading the literature, I stopped at the method of creating self-signed SSL certificates and the Stunnel program. A self-signed (self-signed) certificate is a special type of certificate signed by its creator. Technically, this type is no different from a certificate certified by the signature of the certification authority (CA), but instead of sending it to the CA, the user creates his own signature.
Very briefly, the essence of the technology is as follows:
We create our certificate authority. With the help of it we create secret keys and certificates signed by our certificate authority. The root certificate is placed on the server. The client key and certificate is entered into the client’s browser. When you try to connect to a protected resource, the key pair is checked. If all is well, then a secure channel is created between the server and the browser, in which the data is “packed” into an SSL or TLS cryptographic protocol, thereby ensuring the protection of this data.
')
We will create certificates using the open-source XCA program. The program supports:
• all 32-bit MS Windows (95/98 / NT / 2000 / XP);
• all BSD platforms (FreeBSD / NetBSD / OpenBSD / Apple Mac OS X);
• all POSIX (Linux / BSD / UNIX-like OSes), OS X, FreeBSD, Linux.
In it, we create a database of our future certification center where our certificates will be stored.
Now you need to create a root certificate and key of our certification authority.
The tab Private Keys-> New Keys -> In the field “Name” enter the CA and press the button “Create” . Thus, we created the secret key of our certification authority.
Create a certificate to our key.
Certificates tab -> New certificates , in the window that opens, in the "Template for the new certificate" field , select "[default] CA" , click the "Apply" button. With this we have chosen a template for creating a self-signed root certificate. Next, go to the Subjects tab. We need to fill in the fields that will be entered in the root certificate. An example of filling is presented in the screenshot.
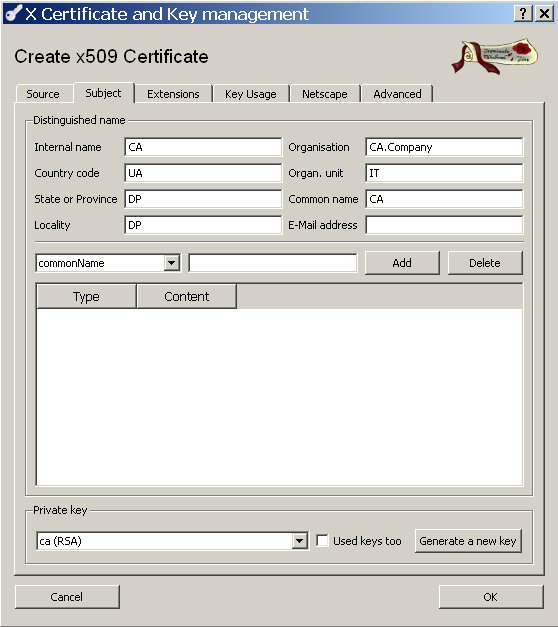
Pay attention to the field “Private key”. It should contain the name of our secret key for which we are doing the root certificate.
Go to the Advanced tab and click the "Validate" button, then the "OK" button .
Now we have our own small certificate authority.
We need to create keys and certificates of the user and server. This is done extremely simply.
The tab Certificate signing request -> New Request , in the window that appears, go to the Subject tab and fill in by analogy with the root certificate. Then click the button “Generate a new key” and create a secret key, and then click the button “OK” .
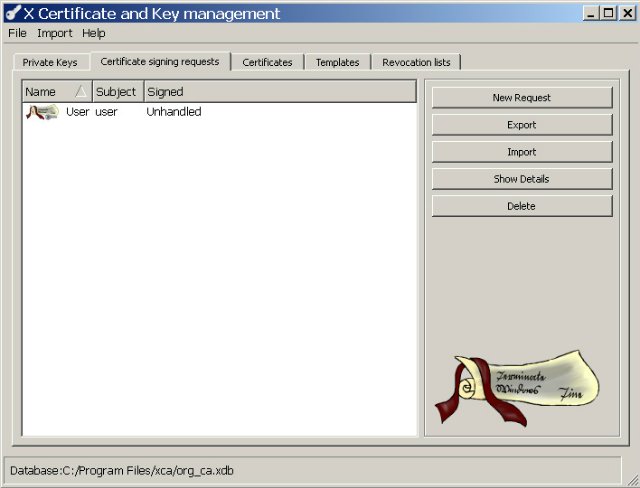
We have just created a request to our certificate authority, which we see on the tab Certificate signing request . Click on it with the right mouse button and select Sign . In the window that appears in the Signing field, select Use this Certificate for signing . In the input field we see our root CA certificate, click "OK" . So, our client key and certificate are signed by a certificate authority.

In the same way we create a key and certificate for the Stunnel server.
We export the secret keys of the server and user in the PEM format. The user certificate is exported in the “PKCS # 12 with Certificate chain” format.
PKCS # 12 is one of the standards of the Public-Key Cryptography Standards (PKCS) family published by RSA Laboratories. It defines the file format used to store secret keys accompanied with certificates, protected with a password based symmetric key.
When exporting, the program will request a password for the file.

Feel free to drive the password invented. Next time we will be asked to enter it when importing the file into the user's browser, so we don’t forget the password.
The certificate of our certification center and server is exported to the “CRT” format.
A description of all other tabs and fields can be found in the program documentation.
As a result, we should have:
• CA.crt - Root Certificate Authority ;
• Server.crt - Server certificate;
• Server.pem - Server secret key;
• User.pkcs12 - secret key + client certificate.
Now set up the stunnel .
An example stunnel.conf configuration file :
It remains to import User.pkcs12 and CA.crt into the user's browser. When importing User.pkcs12, we will be asked to enter a password, the same one that we specified when exporting from our certificate authority.
After all, we get a secure data channel between the browser and our resource on the local network.
References:
1. xca.sourceforge.net - The official site of the XCA program;
2. www.stunnel.org - The official site of the Stunnel program.
Sooner or later the management comes to all network administrators and asks to make access to the company's internal resources via the Internet. Management, it is extremely pleasant to drink juice, on the shores of Maldives, to monitor the progress of solving tasks in the corporate project management system. That becomes the task of organizing access.
After reading the literature, I stopped at the method of creating self-signed SSL certificates and the Stunnel program. A self-signed (self-signed) certificate is a special type of certificate signed by its creator. Technically, this type is no different from a certificate certified by the signature of the certification authority (CA), but instead of sending it to the CA, the user creates his own signature.
Very briefly, the essence of the technology is as follows:
We create our certificate authority. With the help of it we create secret keys and certificates signed by our certificate authority. The root certificate is placed on the server. The client key and certificate is entered into the client’s browser. When you try to connect to a protected resource, the key pair is checked. If all is well, then a secure channel is created between the server and the browser, in which the data is “packed” into an SSL or TLS cryptographic protocol, thereby ensuring the protection of this data.
')
We will create certificates using the open-source XCA program. The program supports:
• all 32-bit MS Windows (95/98 / NT / 2000 / XP);
• all BSD platforms (FreeBSD / NetBSD / OpenBSD / Apple Mac OS X);
• all POSIX (Linux / BSD / UNIX-like OSes), OS X, FreeBSD, Linux.
In it, we create a database of our future certification center where our certificates will be stored.
Now you need to create a root certificate and key of our certification authority.
The tab Private Keys-> New Keys -> In the field “Name” enter the CA and press the button “Create” . Thus, we created the secret key of our certification authority.
Create a certificate to our key.
Certificates tab -> New certificates , in the window that opens, in the "Template for the new certificate" field , select "[default] CA" , click the "Apply" button. With this we have chosen a template for creating a self-signed root certificate. Next, go to the Subjects tab. We need to fill in the fields that will be entered in the root certificate. An example of filling is presented in the screenshot.
Pay attention to the field “Private key”. It should contain the name of our secret key for which we are doing the root certificate.
Go to the Advanced tab and click the "Validate" button, then the "OK" button .
Now we have our own small certificate authority.
We need to create keys and certificates of the user and server. This is done extremely simply.
The tab Certificate signing request -> New Request , in the window that appears, go to the Subject tab and fill in by analogy with the root certificate. Then click the button “Generate a new key” and create a secret key, and then click the button “OK” .
We have just created a request to our certificate authority, which we see on the tab Certificate signing request . Click on it with the right mouse button and select Sign . In the window that appears in the Signing field, select Use this Certificate for signing . In the input field we see our root CA certificate, click "OK" . So, our client key and certificate are signed by a certificate authority.
In the same way we create a key and certificate for the Stunnel server.
We export the secret keys of the server and user in the PEM format. The user certificate is exported in the “PKCS # 12 with Certificate chain” format.
PKCS # 12 is one of the standards of the Public-Key Cryptography Standards (PKCS) family published by RSA Laboratories. It defines the file format used to store secret keys accompanied with certificates, protected with a password based symmetric key.
When exporting, the program will request a password for the file.
Feel free to drive the password invented. Next time we will be asked to enter it when importing the file into the user's browser, so we don’t forget the password.
The certificate of our certification center and server is exported to the “CRT” format.
A description of all other tabs and fields can be found in the program documentation.
As a result, we should have:
• CA.crt - Root Certificate Authority ;
• Server.crt - Server certificate;
• Server.pem - Server secret key;
• User.pkcs12 - secret key + client certificate.
Now set up the stunnel .
An example stunnel.conf configuration file :
; Certificate/key is needed in server mode and optional in client mode
;
cert = /usr/local/etc/stunnel/server.crt
key = /usr/local/etc/stunnel/server.pem

; Protocol version (all, SSLv2, SSLv3, TLSv1)
sslVersion = SSLv3

; Some security enhancements for UNIX systems - comment them out on Win32
chroot = /var/tmp/stunnel
setuid = stunnel
setgid = nogroup
pid = /stunnel.pid

; Some performance tunings
socket = l:TCP_NODELAY=1
socket = r:TCP_NODELAY=1

; Authentication stuff
verify = 2
; CApath is located inside chroot jail
CApath = /certs
; It's often easier to use CAfile
;
CAfile = /usr/local/etc/stunnel/ca.crt
; Some debugging stuff useful for troubleshooting
debug = 7
output = /var/log/stunnel.log

;
[https]
accept = 443
connect = 192.168.1.1:80
It remains to import User.pkcs12 and CA.crt into the user's browser. When importing User.pkcs12, we will be asked to enter a password, the same one that we specified when exporting from our certificate authority.
After all, we get a secure data channel between the browser and our resource on the local network.
References:
1. xca.sourceforge.net - The official site of the XCA program;
2. www.stunnel.org - The official site of the Stunnel program.
Source: https://habr.com/ru/post/122537/
All Articles