Memo to ssh users
 abstract: The article describes the advanced features of OpenSSH, which allow you to greatly simplify the life of system administrators and programmers who are not afraid of the shell. Unlike most manuals, which do not describe anything except the keys and the -L / D / R options, I tried to collect all the interesting features and conveniences that ssh carries with them.
Warning: the post is very voluminous, but for ease of use, I decided not to cut it apart.
Table of contents:
- key management
- copying files via ssh
- Forwarding I / O streams
- Mounting a remote FS via ssh
- Remote code execution
- Aliases and options for connections in .ssh / config
- Default options
- Forwarding the X server
- ssh as socks proxy
- Port forwarding - forward and reverse
- Reverse Sox Proxy
- tunneling L2 / L3 traffic
- Forwarding authorization agent
- Ssh tunneling through ssh through untrusted server ( you most likely do not know this )
Key management
Theory in a few words: ssh can log in not by password, but by key. The key consists of an open and closed part. Open is placed in the user's home directory, "who" go to the server, closed - in the user's home directory, which goes to a remote server. Halves are compared (I'm exaggerating) and if everything is ok, they let it go. Important: not only the client on the server is authorized, but also the server in relation to the client (that is, the server has its own key). The main feature of the key compared to the password is that it cannot be “stolen” by hacking the server - the key is not transferred from the client to the server, and during authorization the client proves to the server that he owns the key (the same cryptographic magic).
')
Key generation
You can generate your key using the ssh-keygen command. If you do not set the parameters, then it will save everything as it should.
The key can be locked with a password. This password (in regular graphical interfaces) is asked once and saved for a while. If the password is empty, it will not be asked for use. Recover a forgotten password is impossible.
You can change the password to the key using the ssh-keygen -p command.
Key structure
(if the question about the location was answered by default).
~ / .ssh / id_rsa.pub - public key. It is copied to the server where you want to access.
~ / .ssh / id_rsa - private key. It can not be shown to anyone. If you copy it to a letter / chat instead of pub, then you need to generate a new key. (I'm not kidding, about 10% of people who ask to give ssh-key post id_rsa, and of these ten percent of male 100%).
Copy key to server
In the directory of the user under which you want to log in, if you create a file ~ / .ssh / authorized_keys and put the public key there, then you can enter without a password. Please note that file permissions should not allow other users to write to this file, otherwise ssh will not accept it. In the key, the last field is user @ machine. It has no relation to authorization and serves only for convenience of determining where is whose key. Note that this field can be changed (or even deleted) without breaking the key structure.
If you know the user's password, the process can be simplified. The ssh-copy-id user @ server command allows you to copy the key without editing the files manually.
Note: Older ssh manuals mention about authorized_keys2. The reason: there was the first version of ssh, then the second (current) became, for it they made their own set of configs, everyone was very tired, and the second version had long since switched to the version without any “2”. That is always authorized_keys and not to think about different versions.
If you have ssh on a non-standard port, then ssh-copy-id requires special tricks to work with:
ssh-copy-id '-p 443 user@server' (focus on quotes).Server key
The first time you go to the server, ssh asks you if you trust the key. If you answer no, the connection is closed. If yes, the key is saved to the file ~ / .ssh / known_hosts . Find out where the key can not be (for nesekurno).
If the server key has changed (for example, the server has been reinstalled), ssh screams from a fake key. Please note, if the server was not touched, and ssh screams, it means you are not breaking into that server (for example, another computer with the same IP appeared on the network, all local networks with 192.168.1.1, of which there are several millions in the world) suffer . The “evil man in the middle attack” scenario is unlikely, more often just an error with IP, although if “everything is good” and the key has changed, this is a reason to raise the paranoia level by a couple of levels (and if you have authorization by key, and the server suddenly asked for a password - that paranoia can be turned on 100% and the password is not entered).
You can delete a known server key using the ssh-keygen -R server command. At the same time, you also need to delete the IP key (they are stored separately): ssh-keygen -R 127.0.0.1 .
The server key is stored in / etc / ssh / ssh_host_rsa_key and /etc/ssh/ssh_host_rsa_key.pub . They can be:
a) copy from the old server to the new one.
b) generate with ssh-keygen. No password is required (i.e. empty). The password with the password ssh-server can not use.
Note, if you are cloning a server (for example, in virtual machines), then the server's ssh-keys need to be regenerated.
It is better to remove old keys from know_hosts, otherwise ssh will swear at the duplicate key.
Copying files
Transferring files to the server can sometimes be tiring. In addition to messing with sftp and other strange things, ssh provides us with the scp command, which performs the copying of a file through an ssh session.
scp path/myfile user@8.8.8.8:/full/path/to/new/location/
You can also back:
scp user@8.8.8.8:/full/path/to/file /path/to/put/here
Fish warning: Despite the fact that mc can do a ssh connection, copying large files will be very painful, because fish (the mc module for working with ssh as with virtual fs) is very slow. 100-200kb - the limit, then begins the test of patience. (I remembered my very early youth, when not knowing about scp, I copied ~ 5GB via fish in mc, it took a little more than 12 hours on FastEthernet).
Ability to copy cool. But I want to “save as” - and immediately to the server. And in the graphic mode to copy not from a special program, but from any familiar one.
So, too, you can:
sshfs
Theory: the fuse module allows you to “export” file system requests from the kernel back to the userspace to the appropriate program. This makes it easy to implement pseudo-file systems. For example, we can provide access to a remote file system via ssh so that all local applications (with a few exceptions) will not suspect anything.
Actually, the exception: O_DIRECT is not supported, alas (this is not a sshfs problem, this is a fuse problem in general).
Usage: install the sshfs package (it will bring fuse itself).
Actually, an example of my script that mounts desunote.ru (located on my home computer - it shows pictures in this article) to my laptop:
 #! / bin / bash
 sshfs desunote.ru:/var/www/desunote.ru//media/desunote.ru -o reconnect
Make the file + x, call, go to any application, say save and see:

The sshfs options that may be important: -o reconnect (says trying to reconnect instead of errors).
If you work a lot with data from the root, you can (need) do an idmap:
-o idmap = user . It works as follows: if we connect as a pupkin @ server user, and locally work as a vasiliy user, then we say "assume that the pupkin files are the vasiliy files". well, or “root” if we connect as root.
In my case, idmap is not needed because the usernames (local and remote) are the same.
Note, it only works comfortably if we have an ssh-key (see the beginning of the article), if not - password authorization drives out a 2-3 connection.
You can disable it back with the fusermount -u / path command, however, if the connection is stuck (for example, there is no network), then you can / should do it from under the root: sudo umount -f / path.
Remote code execution
ssh can execute a command on a remote server and close the connection immediately. The simplest example is:
ssh user@server ls /etc/
Print the contents of / etc / to us on the server, and we will have a local command line.
Some applications want to have a controlling terminal. They should be run with the -t option:
ssh user@server -t remove_command
By the way, we can do something like this:
ssh user@server cat /some/file|awk '{print $2}' |local_app
This brings us to the following feature:
Forward stdin / out
Suppose we want to make a request to the program remotely, and then put its output in a local file
ssh user@8.8.8.8 command> my_file
Suppose we want to put a local output remotely
mycommand | scp - user@8.8.8.8: / path / remote_file
Let's complicate an example - we can transfer files from the server to the server: Make a chain to put stdin on 10.1.1.2, which is not available to us outside:
mycommand | ssh user@8.8.8.8 "scp - user@10.1.1.2: / path / to / file"
There is such a puzzling method of using pipe (kindly suggested in the comments in LJ):
tar -c * | ssh user@server "cd && tar -x"
Tar packs files by mask locally, writes them to stdout, from where ssh reads them, transfers to stdin on a remote server, where cd ignores them (does not read stdin), and tar reads and unpacks. So say the scp for the poor.
Aliases
Frankly, until recently, did not know and did not use. Turned out to be very comfortable.
In a more or less large company, it often happens that the server names look like this: spb-MX-i3.extrt.int.company.net. And the user there is not equal to the local one. That is, you need to log in as follows: ssh ivanov_i@spb-MX-i3.extrt.int.company.net. To print every time - tunnel syndromes will not get enough. In small companies, the problem is reversed - no one thinks about DNS, and a call to the server looks like this: ssh root@192.168.1.4. In short, but still annoying. Even more drama, if we have a non-standard port, and, for example, the first version of ssh (hello to tsiskam). Then everything looks like this: ssh -1 -p 334 vv_pupkin@spb-MX-i4.extrt.int.company.net. Strangle. I don’t even want to talk about drama with scp.
You can write system-wide alias on IP (/ etc / hosts), but this is a crooked way out (and the user and options print anyway). There is a shorter way.
The ~ / .ssh / config file allows you to set connection parameters, including special ones for servers, which is the most important, for each server. Here is an example config:
 Host ric
         Hostname ooo-horn-and-hoof.rf
         User Administrator
         ForwardX11 yes
         Compression yes
 Host home
         Hostname myhome.dyndns.org
         User vasya
         PasswordAuthentication no
All options available for use can be seen in man ssh_config (not to be confused with sshd_config).
Default options
At the prompt UUSER : you can specify default connection settings using the Host * construct, that is, for example:
 Host *
 User root
 Compression yes
The same can be done in / etc / ssh / ssh_config (not to be confused with / etc / ssh / ssh d _config), but this requires root rights and applies to all users.
Forwarding the X server
Actually, a little bit, I went through this part in the config example above. ForwardX11 is just that.
Theory: Graphic applications in Unix typically use an X server (wayland is on the way, but still not ready). This means that the application starts and connects to the X-server for drawing. In other words, if you have a bare server without Gui and there is a local x-server (in which you work), then you can allow applications from the server to draw on your desktop. Typically, connecting to a remote X server is not the most secure and trivial thing. SSH allows you to simplify this process and make it completely secure. And the ability to reap traffic also allows you to get by with less traffic (i.e., reduce channel utilization, that is, reduce ping (more precisely, latency), that is, reduce lags).
Keys: -X - probros X-server. -Y login authentication.
Just remember the ssh -XYC user @ SERVER combination.
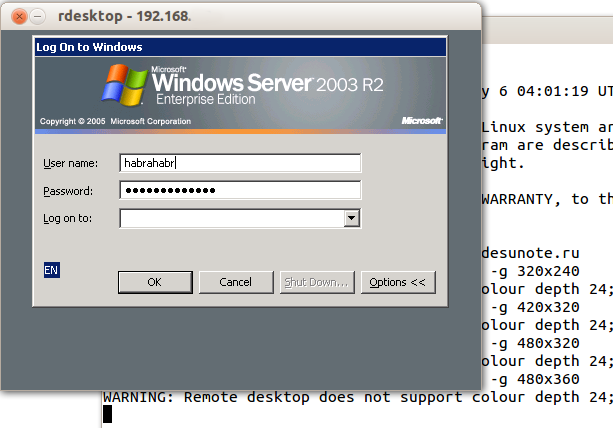
In the example above (fictitious company names), I connect to the ooo-horn-and-hoof.rf server for a reason, and in order to gain access to the windows-server. We all know the security of microsoft when working on the network, so it’s uncomfortable to expose a bare RDP. Instead, we connect to the server via ssh, and then run the rdesktop command there:
ssh ric
rdesktop -k en-us 192.168.1.1 -g 1900x1200
and a miracle, login window in windows on our desktop. Note, carefully encrypted and indistinguishable from normal ssh-traffic.
Socks proxy
When I find myself in another hotel (cafe, conference), then local wifi often turns out to be terrible - closed ports, what level of security is unknown. And there is not much confidence in other people's access points (this is not paranoia, I quite watched as passwords and cookies are taken away with the help of a banal laptop that distributes 3G to everyone with the name of a nearby cafe (and writes interesting in the process)).
Special problems deliver closed ports. That dzhabber will cover, then IMAP, then something else.
Regular VPN (pptp, l2tp, openvpn) does not work in such situations - they simply do not let it through. It is experimentally known that the 443rd port is most often left, and in the CONNECT mode, that is, they are passed "as is" (the usual http can still be wrapped transparently on the squid).
The solution is socks-proxy ssh mode. Its principle is: the ssh client connects to the server and listens locally. After receiving the request, he sends it (through an open connection) to the server, the server establishes the connection according to the request and sends all data back to the ssh client. And he responds to the applicant. To work, you need to tell applications to use socks-proxy. And specify the IP address of the proxy. In the case of ssh, this is most often localhost (so you don’t give your channel to strangers).
Connecting in sock-proxy mode looks like this:
ssh -D 8080 user @ server
Due to the fact that other people's wifi is often not only fig, but also laggy, it is not bad to turn on the -C option (compress traffic). It turns out almost opera turbo (only the pictures are not too tight). In real surfing on http, it’s about 2-3 times too tight (read - if you have a 64kbp accident, you’ll open megabyte pages not for two minutes, but for 40 seconds. That is not good, but it's better). But the main thing: no stolen cookies and overheard sessions.
I said for good reason about the closed ports. The 22nd port is closed exactly the same way as the “unnecessary” jabber port. The solution is to hang the server on port 443. You should not remove it from 22, sometimes there are systems with DPI (deep packet inspection) that your “pseudo-ssl” will not allow.
This is what my config looks like:
/ etc / ssh / sshd_config:
(fragment)
Port 22
Port 443
And here is a piece of ~ / .ssh / config from a laptop that describes vpn
 Host vpn
     Hostname desunote.ru
     User vasya
     Compression yes
     DynamicForward 127.1: 8080
     Port 443
(Pay attention to the “lazy” form of the localhost entry - 127.1, this is quite a legitimate method to write 127.0.0.1)
Port forwarding
We turn to the extremely difficult to understand part of the SSH functionality, which allows performing puzzling TCP tunneling operations “from the server” and “to the server”.
To understand the situation, all the examples below will refer to this scheme:

Comments: Two gray networks. The first network resembles a typical office network (NAT), the second is a “gateway”, that is, a server with a white interface and a gray one looking into its own private network. In further discussion, we assume that “our” laptop is A, and “server” is B.
Task : we have an application running locally, we need to enable another user (outside our network) to look at it.
Solution: forwarding the local port (127.0.0.1:80) to a publicly available address. Suppose our “publicly available” B has occupied port 80 with something useful, so we will be forwarding to a non-standard port (8080).
The final configuration: requests for 8.8.8.8:8080 will go to the localhost of notebook A.
ssh -R 127.1:80:8.8.8.8:8080 user@8.8.8.8
The -R option allows you to redirect the port to your (local) port from a remote ( R emote) server.
Important: if we want to use the address 8.8.8.8, then we need to enable GatewayPorts in the server B settings.
Task . On server “B” a certain demon is listening (say, an sql server). Our application is not compatible with the server (other bits, OS, evil admin, prohibiting and imposing limits, etc.). We want to locally access the remote localhost.
Final configuration: requests to localhost: 3333 to 'A' should be serviced by a daemon to localhost: 3128 'B'.
ssh -L 127.1:3333:127.1:3128 user@8.8.8.8
The -L option allows local calls ( L ocal) to be sent to a remote server.
Task : On server “B” on a gray interface, a certain service is listening and we want to enable a colleague (192.168.0.3) to look at this application.
Summary configuration: requests to our gray IP address (192.168.0.2) fall on the gray interface of server B.
ssh -L 192.168.0.2:8080:10.1.1.1:80 user@8.8.8.8
Nested tunnels
Of course, the tunnels can be redirected.
Let's complicate the task: now we want to show a colleague the application running on localhost on a server with the address 10.1.1.2 (on port 80).
The solution is difficult:
ssh -L 192.168.0.2:8080:127.1:9999 user@8.8.8.8 ssh -L 127.1:9999:127.1:80 user2@10.1.1.2
What's happening? We tell ssh to redirect local requests from our address to localhost of server B and immediately after connecting, start ssh (that is, ssh client) on server B with the option to listen to localhost and send requests to server 10.1.1.2 (where the client should connect). Port 9999 is chosen arbitrarily, as long as it matches the first call and the second one.
Reverse Sox Proxy
If the previous example seemed simple and obvious to you, then try to guess what this example will do:
ssh -D 8080 -R 127.1:8080:127.1:8080 user@8.8.8.8 ssh -R 127.1:8080:127.1:8080 user@10.1.1.2
If you are a security officer whose task is to prohibit the use of the Internet on the server 10.1.1.2, then you can start pulling out the hair on the pope, because this team organizes Internet access for the server 10.1.1.2 by means of a socks proxy running on computer "A". Traffic is completely encrypted and indistinguishable from any other SSH traffic. And outgoing traffic from the computer from the point of view of the “192.168.0 / 24” network is not distinguishable from the normal traffic of computer A.
Tunneling
If at this point the priest of the security department does not shine with a bald spot, and ssh is still not listed as the number one enemy of security enemies, here’s your ultimate killer of everything: IP tunneling or even ethernet. In the most radical cases, this allows dhcp tunneling, remote arp spoofing, wake up on lan, and other second-level disgraces.
Details are described here: www.khanh.net/blog/archives/51-using-openSSH-as-a-layer-2-ethernet-bridge-VPN.html
(I myself, alas, did not use this).
It is easy to understand that in such conditions it is impossible to catch such tunnels with any DPI (deep packet inspection) - either ssh is allowed (read - do what you want), or ssh is forbidden (and you can safely leave such a company of idiots without feeling the slightest regret).
Forward authorization
If you think that this is all, then ........ however, unlike the author, who has not yet written “below”, the reader sees in advance that there are a lot of letters below and intrigue does not work.
OpenSSH allows you to use servers as a springboard for connecting to other servers, even if these servers are untrusted and can be abused with anything they want.
For a start, about simple authentication authorization.
I repeat the picture:
Suppose we want to connect to the server 10.1.1.2, which is ready to accept our key. But we don’t want to copy it to 8.8.8.8, because there is a thoroughfare and half of the people there have sudo and can be searched through other directories. A compromise option would be to have a “different” ssh-key that would authorize user@8.8.8.8 to 10.1.1.2, but if we don’t want to let anyone get from 8.8.8.8 to 10.1.1.2, then this is not an option (much less that the key can not only be copied, but also copied to itself “for a rainy day”).
ssh offers the possibility of a forward ssh agent (this is a service that requests a password to the key). The ssh -A option forward authorization to a remote server.
The call looks like this:
ssh -A user@8.8.8.8 ssh user2@10.1.1.2
A remote ssh client (at 8.8.8.8) can prove 10.1.1.2 that we are we only if we are connected to this server and have given the ssh client access to its authorization agent (but not the key!).
In most cases, it rolls.
However, if the server is completely bad, then the root server can use a socket for impersonalization when we are connected.
There is an even more powerful method - it turns ssh into a simple pipe (in the sense of “pipe”) through which we work through a remote server.
The main advantage of this method is complete independence from the power of attorney of the intermediate server. He can use a fake ssh server, log all bytes and all actions, intercept any data and fake it as he wants - the interaction goes between the “final” server and the client. If the data of the terminal server is tampered with, then the signature will not converge. If the data is not tampered with, then the session is established in protected mode, so there is nothing to intercept.
I did not know this cool setting, and dug out its redrampage .
The configuration is tied to two ssh options: the -W option (which turns ssh into a pipe) and the ProxyCommand config option (command line options, it seems, no), which says "start the program and stick to its stdin / out". These options have appeared recently, so centos users are in flight.
It looks like this (tsiferki picture above):
.ssh / config:
 Host raep
      HostName 10.1.1.2
      User user2
      ProxyCommand ssh -W% h:% p user@8.8.8.8
Well, the connection is trivial:
ssh raep .I will repeat an important thought: the 8.8.8.8 server cannot intercept or forge traffic, use the user authorization agent or otherwise change the traffic. Prohibit - yes, it can. But if allowed - skip through itself without decoding or modification. For the configuration to work, you need to have your public key in authorized_keys for both user@8.8.8.8 and user2@10.1.1.2.
Of course, the connection can be equipped with all other baubles - port sweeping, file copying, sox proxy, L2 tunnels X servers, etc.
The final
Of course, in a post about tunnels there must be a tunnel, and in any successful article - the secret ingredient of universal popularity. Keep:

Source: https://habr.com/ru/post/122445/
All Articles