2d on unity3d
At one time, at the beginning of the development of a two-dimensional game on Unity3d, I had to search through a bunch of documentation, websites, read the answers.unity3d.com and forum.unity3d.com on the topic: how to make a 2d game on this 3d engine. The very first questions were: how to properly configure the camera, how to make a 2d sprite so that it displays the texture “pixel to pixel”. At that time, SpriteManager (hereinafter SM ) and even SM2 with its powerful editor support already existed. The fate was such that I could not buy it then, and there was no trial version either. As a result, I had to write some useful scripts for implementing 2d on Unity3d myself . How to do this will be discussed in this article.
 "
"
Immediately I will write about some useful information sources on Unity3d for those who are not familiar with the engine at all, or are just starting to get acquainted with it.
')
The version of the engine used is 3.3, all code is written in C # and will work on all Unity licenses. Just download the free version of Unity . Included is MonoDevelop - a free .NET development environment (in case you do not have Visual Studio ). The environment is easily customizable, it has everything you need for development, supports convenient features such as autocompletion, code substitution patterns, and much more. I myself use Visual Studio in conjunction with Resharper - it's more convenient. Unity Editor supports both environments.
I wrote the code from scratch right at the time of writing this article, so you should have no problems repeating my steps. The code can be freely used, edited, improved.
The condition is only one thing : when using a code (including a modified one) in a commercial project, you must specify a link to the author (that is, fischer - me).
The code of the example used in the article can be downloaded from here .
First, create an empty scene with no objects. Remove the default added MainCamera object.
You need to configure the camera so that it becomes "suitable" for 2d. In Unity, a camera is the class Camera . In order to use it, you need:
For 2d-graphics, the position of the sprites in space is not important. Much more important, how sprites overlap each other. The camera supports two modes (types of projection): perspective ( Perspective ) and orthogonal ( Orthographic ). The first is used in all 3d games: objects located farther from the camera look smaller. This is almost the way we see our world. We need the second mode, Orthographic - objects are always drawn real size and overlap depending on the distance to the camera. Perfect camera mode for 2d and isometric. In the Inspector window in the Camera component of the newly created object, in the Projection field, select Orthographic . However, some parameters (corresponding to the Perspective mode) will disappear, but the Size parameter will appear - the size of the orthogonal camera.

Now we will configure the camera so that each pixel on the screen corresponds to one unit (unit) of space in Unity. In the future, it will be convenient when moving sprites and setting their sizes in pixels. For this, the size of the orthogonal camera ( Size parameter) must be equal to half the height of the screen in pixels. For example, if this is an iPhone 3G screen in portrait mode, the screen resolution of which is 320x480, then Size = h / 2 = 480/2 = 240 .
In order not to do all this manually each time, we will write a script:
If you add this script to any game object ( GameObject ), then:
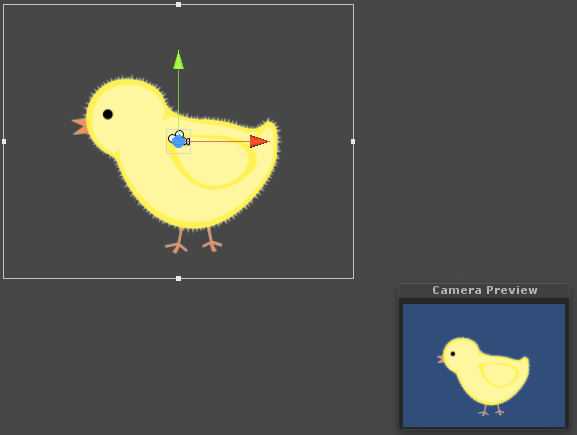
Sprite - a rectangle with a texture superimposed on it. We agree that it will by default be located in the XOY plane. Then for the mutual arrangement of the sprites (layers) will be responsible for the Z coordinate.
Hint : in order to make it easier to see the sprites, you can rotate the coordinate axis by clicking on the axes of the scene, in the upper right, until they take their proper form (in our case, the position is Back ).

The sprite will be set by several parameters:
Decipher them:
Given the parameters of the sprite mentioned above, an object of the Mesh class will be created as follows:
To draw a mesh, you need the MeshRenderer and MeshFilter components . The first component contains links to the material textures for the sprite. The second one contains the MeshFilter.mesh object, which it draws. To change the sprite, you need to change this object accordingly. The sprite itself is implemented through the SampleSprite component. In order for the sprite to always have these two components, add the corresponding RequireComponent attributes to it :
The AddComponentMenu attribute adds Sprites-> Sample Sprite to the Component menu of the editor. Using it you can add our SampleSprite component to any Unity object.

In order to be able to see the sprite during editing, the ExecuteInEditMode attribute allows you to call the Awake and Start functions of the SampleSprite class directly in the editor. A mesh is created inside these functions:
When initializing the mesh, the pixelCorrect flag must be taken into account. Check how many times the screen height differs from the size of the camera — we need to increase the mesh so many times, considering that in the normal version (the screen height is twice the size of the orthogonal camera), the mesh size is equal to the size of the texture area for the sprite:
NonNormalizedTextureCoords - texture coordinates in pixels. Determined by the normalized texture coordinates (sprite parameter) and the size of the textureSize itself :
Notice that the mesh is initialized in the Start function, because when it is initialized, information from the camera is used, and it is initialized by us in Awake , i.e. in Start, such information is already available for other objects (in Unity, all Awake is called first, then all Start , but the order of calling the same function for different objects is not defined). Also in this example, Camera.main is used - the main camera on the scene. Those. Our camera should be tagged with MainCamera .

In principle, at this stage it is already possible to work with the sprite. To do this, you need to attach a SampleSprite component to any object (for example, through the Component menu or by dragging a script file to it). MeshFilter and MeshRenderer components will automatically be added to it. Now if you drag a texture material (or texture, and the material is created automatically) to this object, and adjust the parameters, then you can see the finished 2D image.

To correctly display the sprite, you need to change the following parameters in the texture properties:

Usually lighting is not used in 2d games. These effects are predefined by texture artists, particle systems, and other means. In addition, the lighting affects the rendering speed. Therefore, in the case of sprites for the materials used, you must select the appropriate shader:
Unity allows you to extend the editor. For this purpose, for example:
You can allow the user to set some parameters of the sprite in more convenient units and immediately see the result. For example, the zero point is best kept normalized, because if the size of the object on the texture changes, then it will not need to be corrected with pens. But it is more convenient to set it in the editor in pixels in order to represent how it will be located relative to the size of the sprite. For all these needs, this is the implementation of the Editor class:
The CustomEditor attribute says that this class will be used in the Component Inspector as an editor for the SampleSprite component class . The Target property is entered for easy reference to the fields of the edited object, since the default target object is of type Object . In the overridden OnInspectorGUI function, a list of SampleSprite component parameters is displayed that are displayed in the Inspector . If at least one of these parameters changes ( GUI.changed ), the sprite will be updated, and we will see the result of the change on the screen, and the modified parameters of the sprite will be saved ( EditorUtility.SetDirty ).
Editable parameters will be added to the SampleSprite class and we will make them conditionally compiled (so that this code does not get into the final product, but only works in the editor):
In this case, the Zero parameter is measured in the same units as size , and TextureCoords is measured in pixels of the texture.
There are several ways to do this.
How to make full sprite animations can be seen on the example of SpriteManager .
There were no sprite animations in our game Papa Penguin . Instead, for example, the penguin was fastened from the parts at the zero points of the sprites, and the movement of these parts was carried out using the Animation component. That was enough. Unity is a very powerful tool. In the animation, for example, you can even insert function calls from scripts.

You can attach a Collider component to any sprite: Component-> Physics-> BoxCollider for rectangular objects and Component-> Physics-> SphereCollider for spherical objects. These components can be used for two purposes:

Physics Unity3d also offers other rich features: forces applied to specific points of an object, gravity, and fixed points ( Fixed Joint , Spring Joint ). Using all this, you can create a good game based on physics.
All that I have written about is quite enough for writing my 2d system and its subsequent use in creating a two-dimensional game. The three-dimensionality of the engine and the support of physics offer us new rich possibilities, and the high speed of development at Unity (which is a great advantage of the engine) will reduce costs.
PS Who cares, read my previous posts: Playing for two days and How to make a promo video of the game with small forces . My next article will be about optimization in Unity . When developing games for Unity, I have repeatedly encountered the need for optimization and want to share with you my experience in this matter.
"Information sources
Immediately I will write about some useful information sources on Unity3d for those who are not familiar with the engine at all, or are just starting to get acquainted with it.
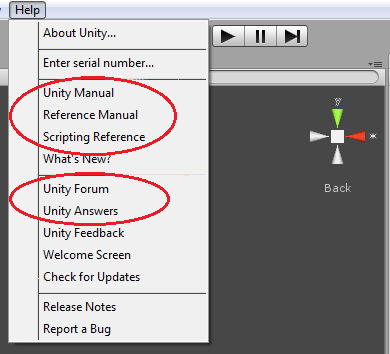
- Unity3d.com - the official website of the engine. Here pages will be useful:
- Unity User Manual - the official user manual. Start exploring here.
- Unity Reference Manual - more in-depth study.
- Scripting Reference - here everything is in the Unity3d library for all three supported languages (Boo, JavaScript and C #).
- Unity Resources - here you can find video tutorials, examples, presentations.
- Unity Answers - here they will answer your questions, or you can find a ready answer. Often used this resource.
- Unity Community - forum.
- Unity3d in Russian - site of Unity3d developers in Russian. If you do not care with English, there are manuals in Russian, and on the forum you can get answers to your questions.
- The Unity3d Wiki is a very useful resource. There are many recommendations, free useful scripts.
')
What is needed
The version of the engine used is 3.3, all code is written in C # and will work on all Unity licenses. Just download the free version of Unity . Included is MonoDevelop - a free .NET development environment (in case you do not have Visual Studio ). The environment is easily customizable, it has everything you need for development, supports convenient features such as autocompletion, code substitution patterns, and much more. I myself use Visual Studio in conjunction with Resharper - it's more convenient. Unity Editor supports both environments.
Code Terms
I wrote the code from scratch right at the time of writing this article, so you should have no problems repeating my steps. The code can be freely used, edited, improved.
The condition is only one thing : when using a code (including a modified one) in a commercial project, you must specify a link to the author (that is, fischer - me).
The code of the example used in the article can be downloaded from here .
Camera setup
First, create an empty scene with no objects. Remove the default added MainCamera object.
You need to configure the camera so that it becomes "suitable" for 2d. In Unity, a camera is the class Camera . In order to use it, you need:
- Create an empty object ( GameObject -> Create Empty ).
- Select it and add a Camera component to it ( Component -> Rendering -> Camera ).
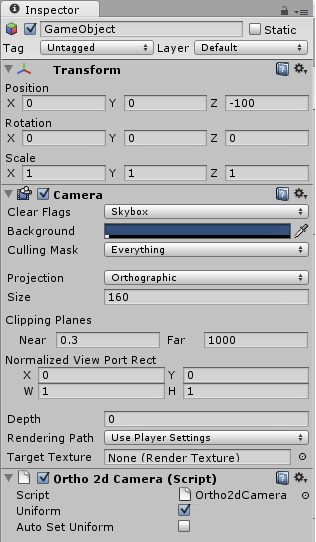
For 2d-graphics, the position of the sprites in space is not important. Much more important, how sprites overlap each other. The camera supports two modes (types of projection): perspective ( Perspective ) and orthogonal ( Orthographic ). The first is used in all 3d games: objects located farther from the camera look smaller. This is almost the way we see our world. We need the second mode, Orthographic - objects are always drawn real size and overlap depending on the distance to the camera. Perfect camera mode for 2d and isometric. In the Inspector window in the Camera component of the newly created object, in the Projection field, select Orthographic . However, some parameters (corresponding to the Perspective mode) will disappear, but the Size parameter will appear - the size of the orthogonal camera.
Now we will configure the camera so that each pixel on the screen corresponds to one unit (unit) of space in Unity. In the future, it will be convenient when moving sprites and setting their sizes in pixels. For this, the size of the orthogonal camera ( Size parameter) must be equal to half the height of the screen in pixels. For example, if this is an iPhone 3G screen in portrait mode, the screen resolution of which is 320x480, then Size = h / 2 = 480/2 = 240 .
In order not to do all this manually each time, we will write a script:
using UnityEngine; [ExecuteInEditMode] [RequireComponent(typeof(Camera))] internal class Ortho2dCamera : MonoBehaviour { [SerializeField] private bool uniform = true; [SerializeField] private bool autoSetUniform = false; private void Awake() { camera.orthographic = true; if (uniform) SetUniform(); } private void LateUpdate() { if (autoSetUniform && uniform) SetUniform(); } private void SetUniform() { float orthographicSize = camera.pixelHeight/2; if (orthographicSize != camera.orthographicSize) camera.orthographicSize = orthographicSize; } } If you add this script to any game object ( GameObject ), then:
- Automatically this object will be added to the Camera component. The RequireComponent attribute is responsible for this.
- The Awake function will execute. The attribute responsible for this is the ExecuteInEditMode attribute, which forces the execution of scripts directly in the editor.
- As a result of calling this function, the camera will become orthogonal.
- Its size will be set so that one pixel on the screen corresponds to one Unity unit (a call to the SetUniform function). This will be done automatically for any screen.
Improvements
- If the screen size can change at run time (rotate the screen of the smartphone, change the resolution of the user), it would be nice to automatically resize the camera. This can be done in the LateUpdate function.
- If the lighting will not be used (as happens in most 2d games), I recommend setting the Rendering Path parameter to Vertex Lit in the settings of the project ( File-> Build Settings-> Player Settings-> Other Settings ). This is the easiest way to draw objects (each object in one step for all light sources), supported by most devices. In my case for iOS devices, this gave a performance leap. The same can be done for a particular camera. By default, the camera uses the value from the Player Settings .
Sprite
Sprite - a rectangle with a texture superimposed on it. We agree that it will by default be located in the XOY plane. Then for the mutual arrangement of the sprites (layers) will be responsible for the Z coordinate.
Hint : in order to make it easier to see the sprites, you can rotate the coordinate axis by clicking on the axes of the scene, in the upper right, until they take their proper form (in our case, the position is Back ).
The sprite will be set by several parameters:
[SerializeField] private Vector2 size = Vector2.one; [SerializeField] private Vector2 zero = Vector2.one / 2; [SerializeField] private Rect textureCoords = Rect.MinMaxRect(0, 0, 1, 1); [SerializeField] private bool pixelCorrect = true; Decipher them:
- zero - the position of the zero point of the sprite relative to its lower left corner. Measured in fractions of a sprite, i.e. (0.5, 0.5) is the center of the sprite. It is necessary for the correct displacement of the sprite, regardless of how it is located on the texture.
Hint : in order to see the rotation / movement axes on the sprite in the editor at the zero point, and not in the center (by default), you need to select Pivot on the Transform Gizmo Toggles control toolbar.
- textureCoords - texture coordinates. These are the coordinates of the upper left corner and the size of the area on the texture. Measured in the same way as in OpenGL - in fractions of texture. For each texture, a parameter is set that indicates whether the coordinates will be trimmed when exiting the [0, 1] segment, or the texture will be repeated (texture import parameter Wrap Mode ).
- pixelCorrect - a boolean value, means whether the sprite will be displayed “pixel to pixel”, so that each pixel on the sprite corresponds to a pixel on the screen.
- list of vertices
- a list of indexes of the vertices that make up the vertices of the triangles that make up the rectangle,
- a list of texture coordinates corresponding to the vertices.
Given the parameters of the sprite mentioned above, an object of the Mesh class will be created as follows:
private static Mesh CreateMesh(Vector2 size, Vector2 zero, Rect textureCoords) { var vertices = new[] { new Vector3(0, 0, 0), // 1 ___ 2 new Vector3(0, size.y, 0), // | | new Vector3(size.x, size.y, 0),// | | new Vector3(size.x, 0, 0) // 0 ---- 3 }; Vector3 shift = Vector2.Scale(zero, size); for (int i = 0; i < vertices.Length; i++) { vertices[i] -= shift; } var uv = new[] { new Vector2(textureCoords.xMin, 1 - textureCoords.yMax), new Vector2(textureCoords.xMin, 1 - textureCoords.yMin), new Vector2(textureCoords.xMax, 1 - textureCoords.yMin), new Vector2(textureCoords.xMax, 1 - textureCoords.yMax) }; var triangles = new[] { 0, 1, 2, 0, 2, 3 }; return new Mesh { vertices = vertices, uv = uv, triangles = triangles }; } To draw a mesh, you need the MeshRenderer and MeshFilter components . The first component contains links to the material textures for the sprite. The second one contains the MeshFilter.mesh object, which it draws. To change the sprite, you need to change this object accordingly. The sprite itself is implemented through the SampleSprite component. In order for the sprite to always have these two components, add the corresponding RequireComponent attributes to it :
using UnityEngine; [ExecuteInEditMode] [AddComponentMenu("Sprites/Sample Sprite")] [RequireComponent (typeof(MeshFilter))] [RequireComponent (typeof(MeshRenderer))] public class SampleSprite : MonoBehaviour { … } The AddComponentMenu attribute adds Sprites-> Sample Sprite to the Component menu of the editor. Using it you can add our SampleSprite component to any Unity object.
In order to be able to see the sprite during editing, the ExecuteInEditMode attribute allows you to call the Awake and Start functions of the SampleSprite class directly in the editor. A mesh is created inside these functions:
private MeshFilter meshFilter; private MeshRenderer meshRenderer; #region Unity messages // Use this for initialization private void Awake() { meshFilter = GetComponent<MeshFilter>(); meshRenderer = GetComponent<MeshRenderer>(); } private void Start() { // NOTE: initializing mesh here because our camera is initialized in Awake() InitializeMesh(); } #endregion When initializing the mesh, the pixelCorrect flag must be taken into account. Check how many times the screen height differs from the size of the camera — we need to increase the mesh so many times, considering that in the normal version (the screen height is twice the size of the orthogonal camera), the mesh size is equal to the size of the texture area for the sprite:
private void InitializeMesh() { Camera cam = Camera.main; if (pixelCorrect && cam != null) { float ratio = cam.pixelHeight / (2 * cam.orthographicSize); size.x = NonNormalizedTextureCoords.width * ratio; size.y = NonNormalizedTextureCoords.height * ratio; } meshFilter.mesh = CreateMesh(size, zero, textureCoords); } NonNormalizedTextureCoords - texture coordinates in pixels. Determined by the normalized texture coordinates (sprite parameter) and the size of the textureSize itself :
private Rect NonNormalizedTextureCoords { get { Rect coords = textureCoords; Vector2 texSize = TextureSize; if (texSize != Vector2.zero) { coords.xMin *= texSize.x; coords.xMax *= texSize.x; coords.yMin *= texSize.y; coords.yMax *= texSize.y; } return coords; } } private Vector2 TextureSize { get { if (meshRenderer == null) return Vector2.zero; Material mat = meshRenderer.sharedMaterial; if (mat == null) return Vector2.zero; Texture tex = mat.mainTexture; if (tex == null) return Vector2.zero; return new Vector2(tex.width, tex.height); } } Notice that the mesh is initialized in the Start function, because when it is initialized, information from the camera is used, and it is initialized by us in Awake , i.e. in Start, such information is already available for other objects (in Unity, all Awake is called first, then all Start , but the order of calling the same function for different objects is not defined). Also in this example, Camera.main is used - the main camera on the scene. Those. Our camera should be tagged with MainCamera .
In principle, at this stage it is already possible to work with the sprite. To do this, you need to attach a SampleSprite component to any object (for example, through the Component menu or by dragging a script file to it). MeshFilter and MeshRenderer components will automatically be added to it. Now if you drag a texture material (or texture, and the material is created automatically) to this object, and adjust the parameters, then you can see the finished 2D image.
Texture Settings
To correctly display the sprite, you need to change the following parameters in the texture properties:
- to make the sprite's movement smooth, so that when resizing the sprite looks smooth, you need to set the texture export parameter Filter Mode to Bilinear or Trilinear );
- set Texture Type to GUI ;
- do not forget to remove compression by setting the value of the Format parameter to Truecolor .
Lighting
Usually lighting is not used in 2d games. These effects are predefined by texture artists, particle systems, and other means. In addition, the lighting affects the rendering speed. Therefore, in the case of sprites for the materials used, you must select the appropriate shader:
- In version 3.3 there is a group of Unlit shaders with disabled lighting. For sprites with transparency, the Unlit-> Transparent shader is suitable ; for the background, Unlit-> Texture .
- In older versions of Unity, you can use the Transparent-> Diffuse shader. But then you need not to forget in Edit-> Render Settings to put down Ambient Light in white so that all the sprites are of natural color. Otherwise they will be blacked out, because by default Ambient Light has a shade of gray.
- You can write your shader in which the lighting will be turned off. How to do this can be found in the official manual on Unity shaders .
Using editor features
Unity allows you to extend the editor. For this purpose, for example:
- EditorOnly tag.
- Creating game object editors in the Component Inspector by inheriting from the Editor class.
- Creating editor windows by inheriting from the class EditorWindow .
You can allow the user to set some parameters of the sprite in more convenient units and immediately see the result. For example, the zero point is best kept normalized, because if the size of the object on the texture changes, then it will not need to be corrected with pens. But it is more convenient to set it in the editor in pixels in order to represent how it will be located relative to the size of the sprite. For all these needs, this is the implementation of the Editor class:
using UnityEditor; using UnityEngine; [CustomEditor(typeof(SampleSprite))] public class SampleSpriteEditor : Editor { public override void OnInspectorGUI() { Target.Size = EditorGUILayout.Vector2Field("Size", Target.Size); Target.Zero = EditorGUILayout.Vector2Field("Zero Point", Target.Zero); Target.TextureCoords = EditorGUILayout.RectField("Texture Coordinates", Target.TextureCoords); Target.PixelCorrect = EditorGUILayout.Toggle("Pixel Correct", Target.PixelCorrect); if (GUI.changed) { Target.UpdateMesh(); EditorUtility.SetDirty(target); } } private SampleSprite Target { get { return target as SampleSprite; } } [MenuItem("Sprites/Create/Sample")] private static void CreateSprite() { var gameObject = new GameObject("New Sample Sprite"); gameObject.AddComponent<SampleSprite>(); Selection.activeObject = gameObject; } } Note : all scripts associated with the editor should be located in the Assets / Editor folder.The CustomEditor attribute says that this class will be used in the Component Inspector as an editor for the SampleSprite component class . The Target property is entered for easy reference to the fields of the edited object, since the default target object is of type Object . In the overridden OnInspectorGUI function, a list of SampleSprite component parameters is displayed that are displayed in the Inspector . If at least one of these parameters changes ( GUI.changed ), the sprite will be updated, and we will see the result of the change on the screen, and the modified parameters of the sprite will be saved ( EditorUtility.SetDirty ).
Editable parameters will be added to the SampleSprite class and we will make them conditionally compiled (so that this code does not get into the final product, but only works in the editor):
#if UNITY_EDITOR public Vector2 Size { get { return size; } set { size = value; } } public Vector2 Zero { get { return Vector2.Scale(zero, size); } set { if (size.x != 0 && size.y != 0) { zero = new Vector2(value.x / size.x, value.y / size.y); } } } public Rect TextureCoords { get { return NonNormalizedTextureCoords; } set { textureCoords = value; Vector2 texSize = TextureSize; if (texSize != Vector2.zero) { textureCoords.xMin /= texSize.x; textureCoords.xMax /= texSize.x; textureCoords.yMin /= texSize.y; textureCoords.yMax /= texSize.y; } } } public bool PixelCorrect { get { return pixelCorrect; } set { pixelCorrect = value; } } public void UpdateMesh() { InitializeMesh(); } #endif In this case, the Zero parameter is measured in the same units as size , and TextureCoords is measured in pixels of the texture.
Optimization, improvements and more
Reduce Draw Calls
There are several ways to do this.
- Static batching . If the object never changes, then it can be marked as static (the Static checkbox in the Inspector ). All such objects will be combined into one large and will be drawn for one Draw Call. Unfortunately, the static batching feature is only available in the Unity Pro version.
- Dynamic batching . If several objects use the same material, Unity combines them into one before drawing, and all of them will be drawn in one Draw Call. To achieve this effect, textures need to be combined into an atlas — one large texture. Use atlases - they allow you to reduce both the amount of Draw Call (due to dynamic batching ) and the amount of memory occupied by textures (which is very important for mobile platforms).
Tip : enabling / disabling batching views for some platforms is done in File-> Build Settings-> Player Settings . - Sprite manager. One of the implementations is SpriteManager . The sprite is added to the sprite manager, which uses one atlas texture (in the MeshRenderer component), and creates a mesh (in the MeshFilter component) for the sprites, consisting of many rectangles, one for each sprite (for this implementation, the author screwed the convenience of the editor and got SM2 ). You can also improve the sprite manager by setting the sprite to refer to the material used, store all materials in the MeshRenderer component of the sprites manager, and draw the mesh as a collection of smaller meshes (one per material) using the capabilities of Mesh.CombineMeshes , Mesh.SetTriangles , Mesh. GetTriangles , Mesh.subMeshCount . This will allow not to start for each material on the manager of the sprites.
Some code improvements
- Of course, it is better to get rid of the constant call to the CreateMesh function, which leads to the creation of a new mesh (in this case, this is not essential, since everything happens in the editor, but in a real application a sprite will be created once and will not change anymore). Instead, it is enough to change the parameters Mesh.vertices , Mesh.uv , Mesh.triangles . Do not forget to call mesh.RecalculateBounds () if the vertices vertices array has been modified. If the triangles array is changed, this function will be called automatically.
- Instead of Camera.main, it is better to set the camera as a script parameter.
How to do animations
How to make full sprite animations can be seen on the example of SpriteManager .
There were no sprite animations in our game Papa Penguin . Instead, for example, the penguin was fastened from the parts at the zero points of the sprites, and the movement of these parts was carried out using the Animation component. That was enough. Unity is a very powerful tool. In the animation, for example, you can even insert function calls from scripts.
2d physics
You can attach a Collider component to any sprite: Component-> Physics-> BoxCollider for rectangular objects and Component-> Physics-> SphereCollider for spherical objects. These components can be used for two purposes:
- Make an object a trigger (checkbox Is Trigger ).
- Allow the object to be physically affected. To do this, you can additionally attach the Component-> Physics-> Rigidbody component to the object.
Physics Unity3d also offers other rich features: forces applied to specific points of an object, gravity, and fixed points ( Fixed Joint , Spring Joint ). Using all this, you can create a good game based on physics.
Alternatives
- EZSprite is a simple paid system for creating 2d animations in Unity (at the time of this writing, the plugin was $ 35).
- SpriteManager - class system for creating sprite animations. Supports drawing sprites for one Draw Call, the manager of sprites, animations and atlases. Pretty inconvenient to set up, but if the budget is limited, it is quite suitable for use.
- SM2 (Sprite Manager 2) - paid sprite manager with editor support. It supports many useful features in addition to the free version: creating atlases, using the features of the editor to highlight the texture area, automatically creating animations, and more. If you do not want to implement sprites manually, then SM2, in my opinion, is the best choice. Worth $ 150 with a 60-day opportunity to get money back if you don't like it.
- RageSpline , $ 50. This plugin is not really sprite, but rather a vector. The plugin has many interesting features:
- creating 2d meshes and lines based on Bezier curves;
- contours of objects of various widths;
- single color fill / gradient;
- textured objects;
- and much more.
Conclusion
All that I have written about is quite enough for writing my 2d system and its subsequent use in creating a two-dimensional game. The three-dimensionality of the engine and the support of physics offer us new rich possibilities, and the high speed of development at Unity (which is a great advantage of the engine) will reduce costs.
PS Who cares, read my previous posts: Playing for two days and How to make a promo video of the game with small forces . My next article will be about optimization in Unity . When developing games for Unity, I have repeatedly encountered the need for optimization and want to share with you my experience in this matter.
Source: https://habr.com/ru/post/122197/
All Articles