Using Macros in LibreOffice
Habravchane, I want to present you a translation from the user rze . It is not yet on Habrahabr, but he would not have refused to invite. You can send to mail@worze.org.
ADF: thanks Mithgol , an invite has been received. :)
Hello, habrazhiteli!
Today I want to tell you about the use of macros in LibreOffice.
')
Foreword
Every day at home and at work, we use office applications to perform any tasks. It often happens that you specialize in the same work and as a result perform the same tasks: insert the same text, format it using a large number of hot keys. In all these cases, you can save your valuable working time by automating some of your work.
Further in the article I will tell you about the use of macros in LibreOffice.
What are macros and why are they?
A macro is a sequence of specific actions that can be recorded using a regular menu. When you select a macro record, the actions you perform are automatically saved as script code. And in your future work, it will already be performed independently, exactly repeating your actions in the program. A macro can be both simple and very difficult - it all depends on what you need to achieve results. The main criteria that apply to macros is to be powerful and at the same time easy to use. The macros of the LibreOffice package meet exactly these requirements. Let's try it in practice.
To use the LibreOffice package , you need to have a pre-installed Linux operating system, Windows or MacOS, as well as the installed LibreOffice package (you can install it, for example, from ppa-repositories, as described in this topic)
Macro Management
Before we start creating our own macro, we need to get acquainted with the macro management tool. Go to Tools - Macros - Organize Macros - LibreOffice Basic Macros (Service - Macros - Manage Macros - LibreOffice Basic Macros):
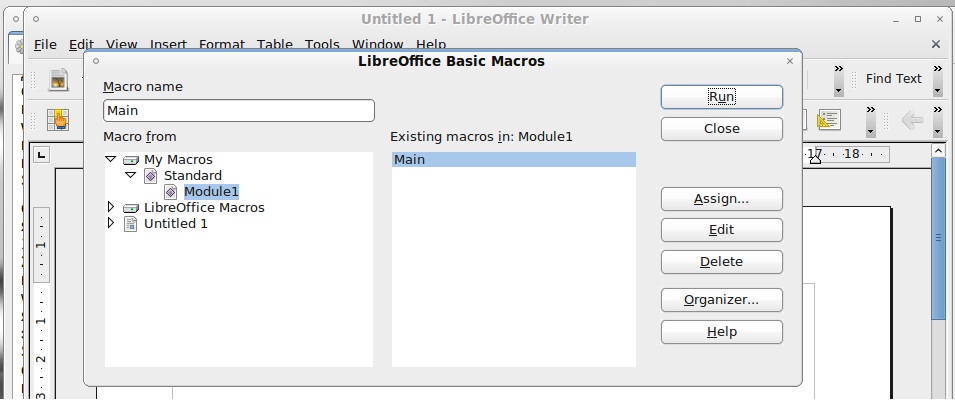
In the left column of the window we can see the list of installed macros by default. By clicking on any of them, you can edit it or delete it.
The main task of the window is to select the macro you need, assign a button on the toolbar to it or link it to an event. Assigning a button to a macro allows you to quickly execute the most frequently used ones.
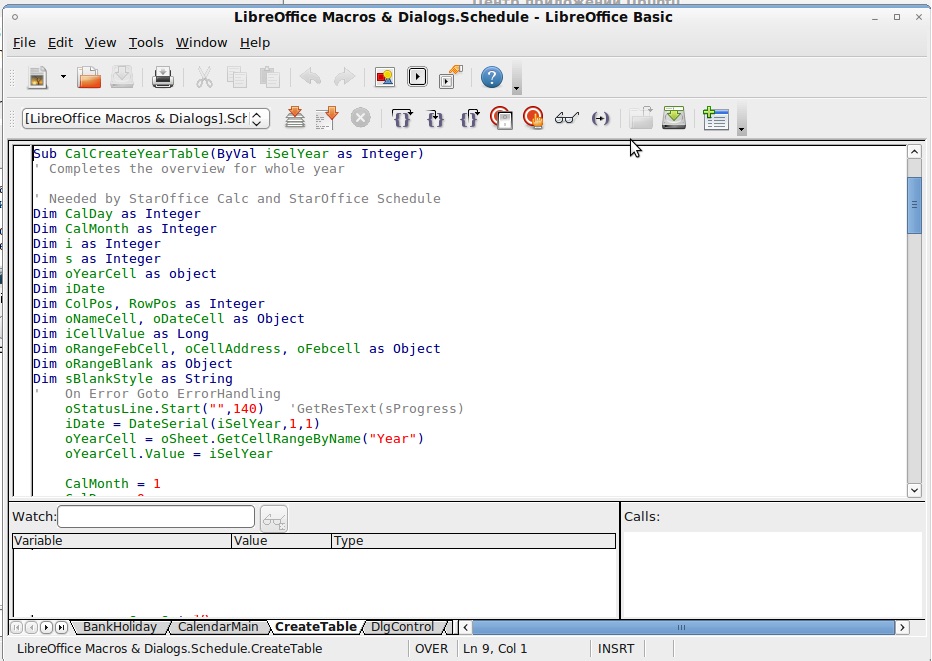
I want to note that creating a macro in automatic mode (recording) implies at least a little knowledge of the macro language, since sometimes we will need to edit it. In order to see what a macro looks like, select the macro we need and click Edit . Below is an example of what the macro looks like in the source code:
Next, consider the macro record
Take a simple example. We have some text already inserted in the document and we need to make a title for it, since our text will be used in business correspondence.
Our future macro will have to be able to:
- put the text at the top center of the page;
- enter the text that will be used as the title.
After we create a macro, we will assign a button on the toolbar to it. After one click is enough to insert the title into the document.
Perform a sequence of steps.
Step 1.
Open the text document. Let's go to Tools - Macros - Record Macro . A small “Record Macro” window will appear with a single “ Stop Recording Macro” button:
Step 2.
Create a text header. Click on the “Center alignment” button, so that our future text is exactly in the center of the document. Now we write the title text itself. You should not set different formats for it (font or bold / italic / underlined), since the macro does not remember such actions.
Step 3.
After the creation of the title is complete, click on the “End Macro” button in the “Record Macro” window. Immediately the Organizer Macros window will appear. Specify a name for the new macro (for example, PostHead). Now you can save it to the place where you would like (for example, the folder " My Macro ").
Step 4.
Now we have to add a button on the toolbar for the PostHead macro. This process is not as simple as it would seem at first glance.
Open LibreOffice Basic Macros, click " Assign " ("Assign"). The following Customize window will appear, in which we should go to the Toolbars tab and make sure that the “Toolbar” field is “Standard”.
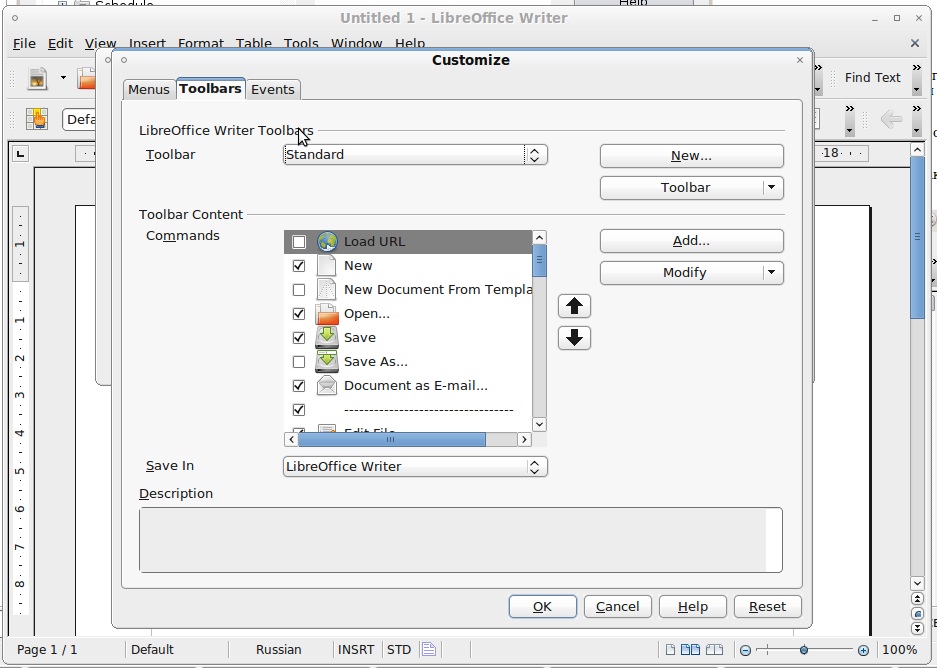
Click in the window Add button ( Add ). Another window will appear - “Add commands”.
In the list of the left Category window ( Category ) we find " LibreOffice Macros " (at the very bottom of the list). Open it and get to our macro. Once found, it remains to perform the last and easiest step. Drag the Letterhead macro to the place of the toolbar where we would like it to be.
Everything coped with the task.
Now all we have to do is use the PostHead button that we added to the panel. For example, open a new document and press the PostHead button. Our macro will create a heading, with exactly the text that we “assigned” to it and place it at the top of the document exactly in the center.
Really convenient?
Total
Of course, in my example we created a very simple macro. But using the above tools, you can create very complex macros. And not only in Writer , but in all other applications of the LibreOffice package (Spreadsheet, Presentations, etc.). Now that you know how to create macros, you can easily create your own, in order to facilitate your work.
The purpose of this article is to learn the basics of working with a macro recording tool.
ADF: thanks Mithgol , an invite has been received. :)
Hello, habrazhiteli!
Today I want to tell you about the use of macros in LibreOffice.
')
Foreword
Every day at home and at work, we use office applications to perform any tasks. It often happens that you specialize in the same work and as a result perform the same tasks: insert the same text, format it using a large number of hot keys. In all these cases, you can save your valuable working time by automating some of your work.
Further in the article I will tell you about the use of macros in LibreOffice.
What are macros and why are they?
A macro is a sequence of specific actions that can be recorded using a regular menu. When you select a macro record, the actions you perform are automatically saved as script code. And in your future work, it will already be performed independently, exactly repeating your actions in the program. A macro can be both simple and very difficult - it all depends on what you need to achieve results. The main criteria that apply to macros is to be powerful and at the same time easy to use. The macros of the LibreOffice package meet exactly these requirements. Let's try it in practice.
To use the LibreOffice package , you need to have a pre-installed Linux operating system, Windows or MacOS, as well as the installed LibreOffice package (you can install it, for example, from ppa-repositories, as described in this topic)
Macro Management
Before we start creating our own macro, we need to get acquainted with the macro management tool. Go to Tools - Macros - Organize Macros - LibreOffice Basic Macros (Service - Macros - Manage Macros - LibreOffice Basic Macros):
In the left column of the window we can see the list of installed macros by default. By clicking on any of them, you can edit it or delete it.
The main task of the window is to select the macro you need, assign a button on the toolbar to it or link it to an event. Assigning a button to a macro allows you to quickly execute the most frequently used ones.
I want to note that creating a macro in automatic mode (recording) implies at least a little knowledge of the macro language, since sometimes we will need to edit it. In order to see what a macro looks like, select the macro we need and click Edit . Below is an example of what the macro looks like in the source code:
Next, consider the macro record
Take a simple example. We have some text already inserted in the document and we need to make a title for it, since our text will be used in business correspondence.
Our future macro will have to be able to:
- put the text at the top center of the page;
- enter the text that will be used as the title.
After we create a macro, we will assign a button on the toolbar to it. After one click is enough to insert the title into the document.
Perform a sequence of steps.
Step 1.
Open the text document. Let's go to Tools - Macros - Record Macro . A small “Record Macro” window will appear with a single “ Stop Recording Macro” button:
Step 2.
Create a text header. Click on the “Center alignment” button, so that our future text is exactly in the center of the document. Now we write the title text itself. You should not set different formats for it (font or bold / italic / underlined), since the macro does not remember such actions.
Step 3.
After the creation of the title is complete, click on the “End Macro” button in the “Record Macro” window. Immediately the Organizer Macros window will appear. Specify a name for the new macro (for example, PostHead). Now you can save it to the place where you would like (for example, the folder " My Macro ").
Step 4.
Now we have to add a button on the toolbar for the PostHead macro. This process is not as simple as it would seem at first glance.
Open LibreOffice Basic Macros, click " Assign " ("Assign"). The following Customize window will appear, in which we should go to the Toolbars tab and make sure that the “Toolbar” field is “Standard”.
Click in the window Add button ( Add ). Another window will appear - “Add commands”.
In the list of the left Category window ( Category ) we find " LibreOffice Macros " (at the very bottom of the list). Open it and get to our macro. Once found, it remains to perform the last and easiest step. Drag the Letterhead macro to the place of the toolbar where we would like it to be.
Everything coped with the task.
Now all we have to do is use the PostHead button that we added to the panel. For example, open a new document and press the PostHead button. Our macro will create a heading, with exactly the text that we “assigned” to it and place it at the top of the document exactly in the center.
Really convenient?
Total
Of course, in my example we created a very simple macro. But using the above tools, you can create very complex macros. And not only in Writer , but in all other applications of the LibreOffice package (Spreadsheet, Presentations, etc.). Now that you know how to create macros, you can easily create your own, in order to facilitate your work.
The purpose of this article is to learn the basics of working with a macro recording tool.
Source: https://habr.com/ru/post/121149/
All Articles