Scanning electron microscopy of a fly's eye in artificial colors
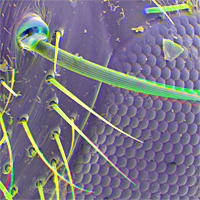
Good day to all. I would like to share one, in my opinion, an interesting picture that I made in one of the laboratories of our university. This is the eye of a fly captured in an electron microscope and then translated into an artificial color. Below, I will briefly explain what scanning electron microscopy is and how this image was obtained. The picture is large, so I put it under the cat, leaving only a fragment here.

To begin with, what is SEM - Scanning Electron Microscopy. If you want to read in detail, then on Russian Wikipedia is a pretty good article on this topic, in addition to this, it would be nice to see the English article . But if in brief, then Scanning Electron Microscopy, or, as it probably would have been more correct to call it, Raster Electron Microscopy is relatively simple. A beam of electrons focused by an electromagnetic lens scans a sample, just like a screen coated with phosphor was scanned in ancient CRT televisions. Due to high voltages - (working voltages of the order of 1-30 kV) electrons have high energy, and when a sample is bombarded - a lot of things happen there. But the most important thing is two things: secondary electrons are knocked out and those that you bombard are reflected - they are called backscattered electrons. Secondary electrons are those that woke into the sample in the conduction band and, in general, it was not difficult to knock them out. Due to the fact that their energy is not so high, but they are knocked out over the entire volume where the scanning electron beam reaches - only those that are in the surface layer are selected from the sample. Hence the information about the topography of the sample surface. Inversely reflected - they have higher energies, and, as a rule, their number depends on the scattering centers - the heavier / larger the core, the better it reflects. Therefore, the back-reflected electrons carry as a whole information about the mass contrast of materials (I am not sure that this is the correct Russian-language term). In other words, this is Z-contrast, where Z is the atomic number / mass of the nucleus.
')
Since the energy of backscattered electrons is greater, they come out of the entire volume, which is under the influence of a scanning beam, giving a lower resolution than that of secondary electrons.
Then all these electrons are collected by a particular detector, which for each scanned point gives information about the intensity of the electrons. It goes without saying that the resulting image is black and white.
Now the question is - how can you decorate such an image? Of course, you can manually in Photoshop, as fantasy allows, or just turn the image into a color monochrome, but there are better ways.
This photo above is actually a combination of three shots. These images were taken at different accelerating voltages - 10, 20, 30 kV. In this case, the scattering and reflective characteristics of the materials are slightly different. That is, combining images, we not only get data on topography, but also see where we have slightly different materials - this is not quite Z-contrast, because the same materials in different phases can produce different images, but yet…
Then everything is simple - each black and white image was used as one of the RGB channels to create a color image. If you notice - the antennas of the fly at different accelerating voltages are deflected at different angles, causing colored artifacts.
Another way to get different contrast of different parts of the sample is to use a back-reflected electron detector, one that has sectors that can be turned on in any order. By combining the signal from the detectors of the back-reflected and secondary electrons, you can also create images in artificial colors. I will try to take a few more pictures using these features as soon as I get the appropriate clearance.
A little bit about how the sample was prepared - we often take some kind of insect for demonstration and training purposes, stick it on carbon adhesive tape (by the way, it is visible in the lower right corner), cover it with a thin layer of metal and use it as a cat. which you can train. Such pictures do not carry special scientific value, but you can show students on an excursion or hang them on a wall.
Why cover with metal? Well, the fly is non-conductive. And imagine how many electrons it pours into it every second - they need to be removed somewhere, and they are covered with a thin (~ 5nm) layer of gold or platinum.
This concludes the brief excursion - if you have questions, write.
You can see the pictures that I post on my university blog , but they are not as interesting as those on Wikipedia .
PS Photo in full size, shows horribly - you can open the full size in a new window.
Source: https://habr.com/ru/post/120131/
All Articles