Introduction to Gestures
or interpretation of gestures :)
Now we are working on a military example with gestures in the Android environment. The application will be a client of the Astronomy website Picture of the Day by NASA. Every day on this site guys post some wonderful picture related to astronomy. With gestures we will walk forward / backward and call the date selection dialog. And to make it even more interesting, we will write it for Honeycomb.
')
The article consists of two parts: the first one will show how to create gestures using the Gestures Builder application and download them from the emulator to a separate binary file. In the second part, we will load it into our application and start using it.
The android.gesture package appeared in API version 1.6 and is designed to significantly simplify the processing of gestures and reduce the amount of code that programmers will write. At the same time, the pre-installed Gestures Builder application appeared in the emulator version 1.6 and higher, with its help we can create a set of prepared gestures and add them as a binary resource to our application. To do this, we will make an emulator with a built-in image of an SD card, where the gesture file will be saved (without the Gestures Builder card, it will say that it has nowhere to record gestures)
Step 1. Create an img SD card image using mksdcard . This utility can be found in the folder <path where android-sdk is installed> \ tools. The gesture file will weigh a little, but the android emulator has a limit on the minimum card size of something around 8-9 megabytes. Therefore, we will create with a margin and some even size, for example, 64 MB. We write:
mksdcard -l mySdCard 64M gestures.img
Step 2. Make the emulator run it with the gestures.img image. We act as in the picture:
To start the emulator with the image, go to <path where android-sdk is installed> \ tools and execute:
emulator -avd avd30 -sdcard gestures.img
Step 3. The emulator is running and we need to make our gestures. To do this, open Gestures Builder, click Add gesture and the gesture editor opens in front of us. Let's draw a gesture from left to right while holding down the left mouse button and at the top give it the name - prev . Done Then, by analogy (in the other direction), we create the next gesture and, as the last, write something similar to Latin D and call it date . In the pictures below - how we do it (clickable):


Step 4. We run a binary resource with gestures from the running emulator by running the tools directory:
adb pull / sdcard / gestures gestures
After which the file gestures should appear. We will put it in your project along the path res \ raw \ gestures.
Our application will be called ApodGestures. In the second part I will touch only those related to gestures. You can take the entire program code on code.google.com from the Mercurial repository, either run the hg clone pyJIoH@apod-gestures.googlecode.com/hg apod-gestures console, or download the archive in the Downloads tab.
ApodGestures will connect to the APOD site, download the astronomical image in a separate stream and upload it to ImageView. With the help of gestures, we will make the navigation: forward, backward and a dialog for choosing any date.
In principle, there are no special features from Honeycomb here, therefore, having reduced the version, we will run the application on the phones without any problems. Restrictions rather imposed Honeycomb himself, because From this version on, the policy of what can be done in the main thread has been tightened. Here I encountered an example of NetworkOnMainThreadException when working in the main HttpClient thread. You can read here .
Having created a project, we put our binary resource along the path apod-gestures \ res \ raw \ gestures .
The imageView in the xml layout will be placed on android.gesture.GestureOverlayView, which is a transparent overlay that can detect gesture input. The code will be:
Next, add a field to ApodGestures activity: private GestureLibrary mGestureLib;
We will load our gestures from the raw resource into it:
To start tracking the gestures entered, we implement our activity OnGesturePerformedListener and implement the onGesturePerformed method:
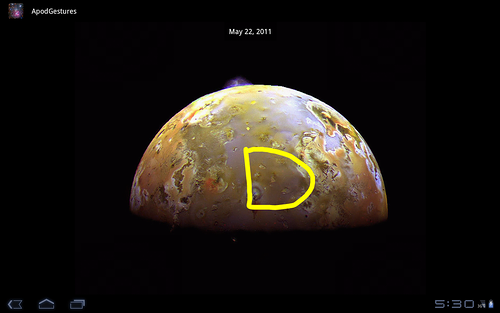
As you can see, the name we entered in the Gestures Builder application is a gesture identifier. Gestures is our class with constants where names are clogged fixed. If someone is strained by fat yellow lines, we can set any color in xml for GestureOverlayView, properties android: gestureColor and android: uncertainGestureColor. UncertainGestureColor is a color drawn on the view when there is no certainty that this is a gesture.
You can make the colors gray and transparent:
An example of what happened in the end (still clickable).


Hope you enjoyed it.
UPD. Added apk file to the Download tab. Installation requires Android 3.0 and higher.
Now we are working on a military example with gestures in the Android environment. The application will be a client of the Astronomy website Picture of the Day by NASA. Every day on this site guys post some wonderful picture related to astronomy. With gestures we will walk forward / backward and call the date selection dialog. And to make it even more interesting, we will write it for Honeycomb.
')
The article consists of two parts: the first one will show how to create gestures using the Gestures Builder application and download them from the emulator to a separate binary file. In the second part, we will load it into our application and start using it.
Making gestures
The android.gesture package appeared in API version 1.6 and is designed to significantly simplify the processing of gestures and reduce the amount of code that programmers will write. At the same time, the pre-installed Gestures Builder application appeared in the emulator version 1.6 and higher, with its help we can create a set of prepared gestures and add them as a binary resource to our application. To do this, we will make an emulator with a built-in image of an SD card, where the gesture file will be saved (without the Gestures Builder card, it will say that it has nowhere to record gestures)
Step 1. Create an img SD card image using mksdcard . This utility can be found in the folder <path where android-sdk is installed> \ tools. The gesture file will weigh a little, but the android emulator has a limit on the minimum card size of something around 8-9 megabytes. Therefore, we will create with a margin and some even size, for example, 64 MB. We write:
mksdcard -l mySdCard 64M gestures.img
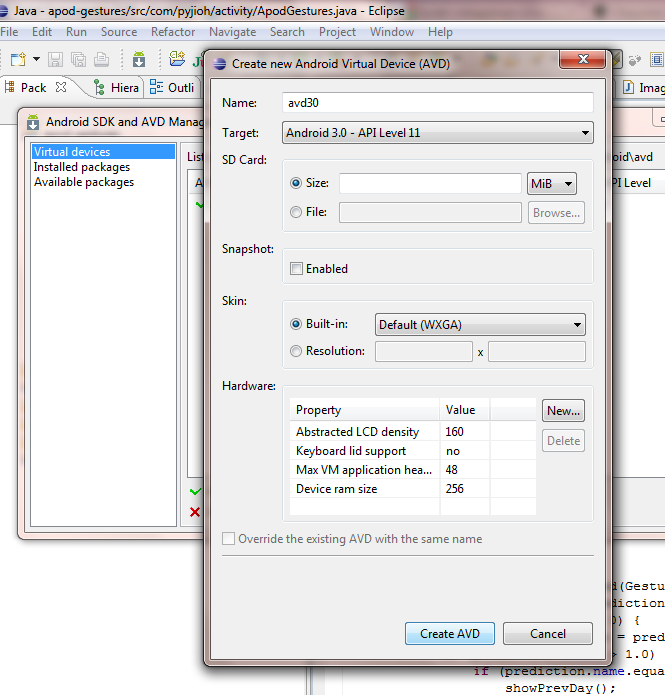
Step 2. Make the emulator run it with the gestures.img image. We act as in the picture:
To start the emulator with the image, go to <path where android-sdk is installed> \ tools and execute:
emulator -avd avd30 -sdcard gestures.img
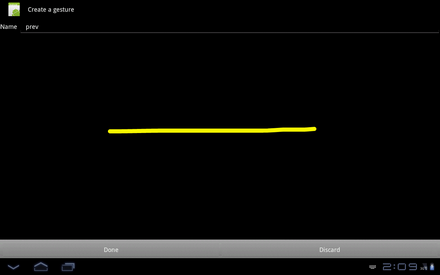
Step 3. The emulator is running and we need to make our gestures. To do this, open Gestures Builder, click Add gesture and the gesture editor opens in front of us. Let's draw a gesture from left to right while holding down the left mouse button and at the top give it the name - prev . Done Then, by analogy (in the other direction), we create the next gesture and, as the last, write something similar to Latin D and call it date . In the pictures below - how we do it (clickable):
Step 4. We run a binary resource with gestures from the running emulator by running the tools directory:
adb pull / sdcard / gestures gestures
After which the file gestures should appear. We will put it in your project along the path res \ raw \ gestures.
Using gestures
Our application will be called ApodGestures. In the second part I will touch only those related to gestures. You can take the entire program code on code.google.com from the Mercurial repository, either run the hg clone pyJIoH@apod-gestures.googlecode.com/hg apod-gestures console, or download the archive in the Downloads tab.
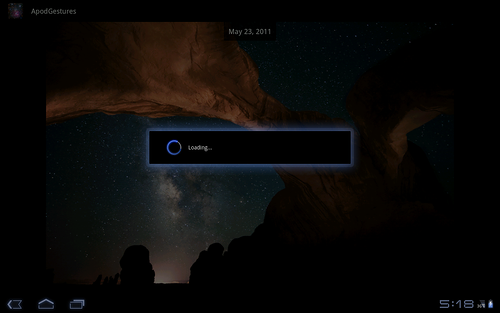
ApodGestures will connect to the APOD site, download the astronomical image in a separate stream and upload it to ImageView. With the help of gestures, we will make the navigation: forward, backward and a dialog for choosing any date.
In principle, there are no special features from Honeycomb here, therefore, having reduced the version, we will run the application on the phones without any problems. Restrictions rather imposed Honeycomb himself, because From this version on, the policy of what can be done in the main thread has been tightened. Here I encountered an example of NetworkOnMainThreadException when working in the main HttpClient thread. You can read here .
Having created a project, we put our binary resource along the path apod-gestures \ res \ raw \ gestures .
The imageView in the xml layout will be placed on android.gesture.GestureOverlayView, which is a transparent overlay that can detect gesture input. The code will be:
<?xml version="1.0" encoding="utf-8"?> <FrameLayout xmlns:android="http://schemas.android.com/apk/res/android" android:layout_width="fill_parent" android:layout_height="fill_parent"> <android.gesture.GestureOverlayView android:id="@+id/gestures" android:layout_width="fill_parent" android:layout_height="fill_parent" android:layout_weight="1.0"> <ImageView android:layout_gravity="center_vertical" android:id="@+id/ImageView" android:layout_width="fill_parent" android:layout_height="fill_parent" /> <Button android:id="@+id/button_select_date" android:layout_width="wrap_content" android:layout_height="wrap_content" android:layout_gravity="center_horizontal|top" android:padding="12dip" android:background="#AA000000" android:textColor="#ffffffff" android:text="Feb 10, 2011" /> </android.gesture.GestureOverlayView> </FrameLayout> Next, add a field to ApodGestures activity: private GestureLibrary mGestureLib;
We will load our gestures from the raw resource into it:
@Override public void onCreate(Bundle savedInstanceState) { super.onCreate(savedInstanceState); setContentView(R.layout.main); mGestureLib = GestureLibraries.fromRawResource(this, R.raw.gestures); if (!mGestureLib.load()) { finish(); } GestureOverlayView gestures = (GestureOverlayView) findViewById(R.id.gestures); gestures.addOnGesturePerformedListener(this); refreshActivity(); } To start tracking the gestures entered, we implement our activity OnGesturePerformedListener and implement the onGesturePerformed method:
public void onGesturePerformed(GestureOverlayView overlay, Gesture gesture) { ArrayList<Prediction> predictions = mGestureLib.recognize(gesture); if (predictions.size() > 0) { Prediction prediction = predictions.get(0); if (prediction.score > 1.0) { if (prediction.name.equals(Gestures.prev)) showPrevDay(); else if (prediction.name.equals(Gestures.next)) showNextDay(); else if (prediction.name.equals(Gestures.date)) showSelectDateDialog(); } } } As you can see, the name we entered in the Gestures Builder application is a gesture identifier. Gestures is our class with constants where names are clogged fixed. If someone is strained by fat yellow lines, we can set any color in xml for GestureOverlayView, properties android: gestureColor and android: uncertainGestureColor. UncertainGestureColor is a color drawn on the view when there is no certainty that this is a gesture.
You can make the colors gray and transparent:
android:gestureColor="#AA000000" android:uncertainGestureColor="#AA000000"> An example of what happened in the end (still clickable).
Hope you enjoyed it.
UPD. Added apk file to the Download tab. Installation requires Android 3.0 and higher.
Source: https://habr.com/ru/post/120016/
All Articles