Detailed installation guide for Android x86
The emulator that comes with the Android SDK is not very smart.
The basic idea is to use VirtualBox + Android X86 to overcome performance problems.
What we need:
Eclipse + Android SDK development environment here ,
as well as VirtualBox .
Under the cat a lot of pictures, and the installation process, as well as some useful tips.
Create a virtual machine:
Name: Android 2.2-Generic
Operating system: Linux
Version: Linux 2.6
Memory: 512 MB
Hard Drive: 3GB
')
In the machine settings:
Properties-> Network
Adapter 1 - NAT (in the virtual machine will be visible as eth0, for the Internet).
Adapter 2 - Virtual host adapter (in a virtual machine it will be visible as eth1, for managing ADB).
Download the image from the link android-x86-2.2-generic.iso .
Connect the image to the virtual machine.
And so check what the parameters of the machine.

We start the virtual machine
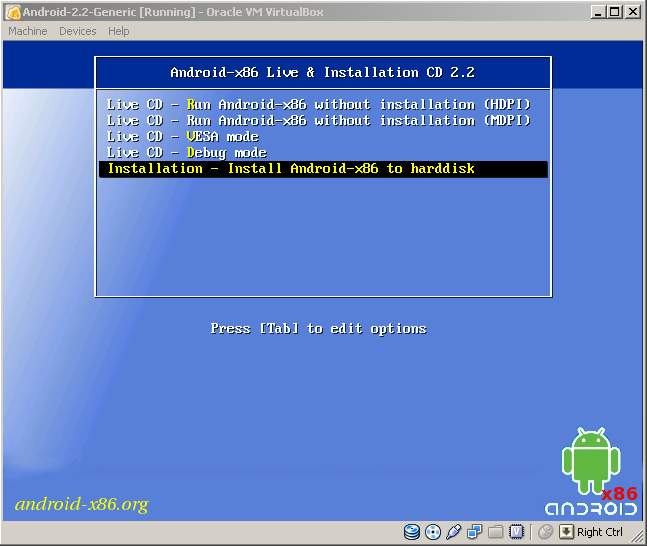
Control is made by arrows left, right, up, down
Step by step how to install Linux:
In the loader, select the menu item
1. Installation - Install Android-x86 to harddisk
Create partitions .
2. Create / Modify partitions
Select [New] -> [Primary] -> Size (in MB) 3216 press [ok]
Select [Bootable]
Select [Write] confirm write changes yes
Quit Out
Choose a partition to install
3. Select partitions to install Android-X86
[sda1 Linux VBOX HARDDISK]
File system selection
4. Please select a filesystem to format sda1
[ext3]
Confirm formatting Yes
Installing the GRUB bootloader
5. Do you want install boot loader GRUB?
Verify Yes
You want to do / system to read and write
6. Do you want to install / system directory as read-write?
Confirm Yes
In this image there are many examples of Snake, NotePad from Eclipse will not be possible to install your own, at the very bottom of the article there is a utility for solving this problem.
The installation process is complete
7. Android-x86 is installed successfully.
Create an SD card
[Create a fake SD Card]
size 2000 MB
disable CD-ROM
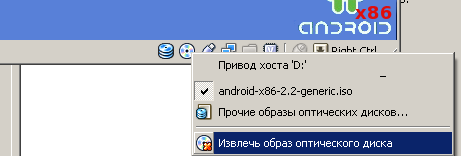
Reboot the system
Reboot
Hotkeys:
If you do not work the mouse cursor .
Go to Machine-> Disable host + i mouse integration (default host key right ctrl).

Unlock the screen by pulling the up arrow
Network configuration
By default, the emulator cannot work with two network adapters — no problem. We need an Internet + internal address for debugging.
We go to launch applications
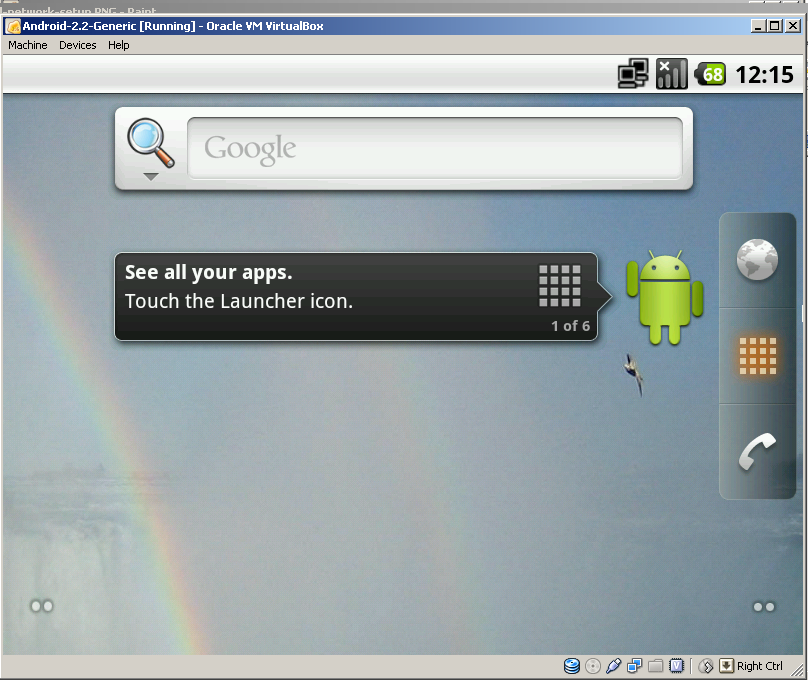
Choose an application
Settings -> Configure Ethernet
We put eth0 dhcp and choose save.

Reboot the Emulator.
When the machine boots, we switch to the text console alt + f1
Magical order
root @ android: / #
# netcfg
# netcfg eth1 down
# netcfg eth1 dhcp
* action 'dhcp' failed (invalid argument) *
* without this command, no address was altogether *
# netcfg eth1 up
# netcfg
Everything looks approximately like this.

Remember the address eth1 it will be needed for adb.
Steps to configure the network with the console unfortunately must be done every time the emulator starts on a new one .
Now on the computer, go to the folder where the Android-SDK is, another folder may be on your system
C: \ Program Files \ Android \ android-sdk \ platform-tools \
We use the adb eth1 address command, I had 192.168.56.101
The output will be similar:
C: \ Program Files \ Android \ android-sdk \ platform-tools> adb connect 192.168.56.101
* daemon not running. starting it now on port 5037 *
* daemon started successfully *
connected to 192.168.56.101,5555
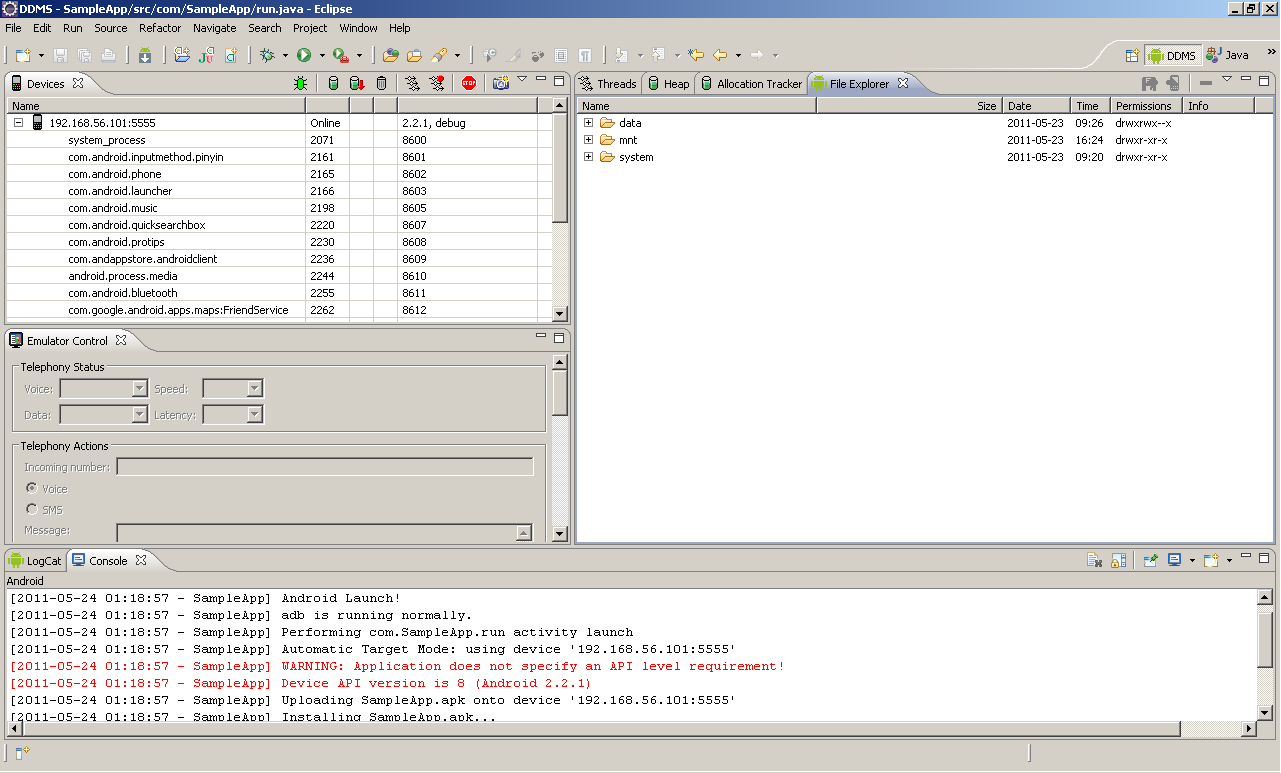
Run Eclipse.
An example of a running application.

How to be if I want to put NotePad, Snake and other examples
You can put this utility SystemApp_Remover_4_19.ap .
The installation process will look something like this.
C: \ Program Files \ Android \ android-sdk \ platform-tools> adb install c: \ temp \ SystemApp_Remover_4.19.apk
Then delete from the list of system applications with what Eclipse conflicts
p / s Switch video modes.
In the boot menu, press e
Another menu will appear.
kernel /android-2.2/kernel / quiet root ....
Press e again and add vga = ask at the end of the line, separated by a space.
To boot press enter b , and then select the desired mode from the list.
p / p / s This is my first post on Habré, do not judge strictly.
The basic idea is to use VirtualBox + Android X86 to overcome performance problems.
What we need:
Eclipse + Android SDK development environment here ,
as well as VirtualBox .
Under the cat a lot of pictures, and the installation process, as well as some useful tips.
Create a virtual machine:
Name: Android 2.2-Generic
Operating system: Linux
Version: Linux 2.6
Memory: 512 MB
Hard Drive: 3GB
')
In the machine settings:
Properties-> Network
Adapter 1 - NAT (in the virtual machine will be visible as eth0, for the Internet).
Adapter 2 - Virtual host adapter (in a virtual machine it will be visible as eth1, for managing ADB).
Download the image from the link android-x86-2.2-generic.iso .
Connect the image to the virtual machine.
And so check what the parameters of the machine.
We start the virtual machine
Control is made by arrows left, right, up, down
Step by step how to install Linux:
In the loader, select the menu item
1. Installation - Install Android-x86 to harddisk
Create partitions .
2. Create / Modify partitions
Select [New] -> [Primary] -> Size (in MB) 3216 press [ok]
Select [Bootable]
Select [Write] confirm write changes yes
Quit Out
Choose a partition to install
3. Select partitions to install Android-X86
[sda1 Linux VBOX HARDDISK]
File system selection
4. Please select a filesystem to format sda1
[ext3]
Confirm formatting Yes
Installing the GRUB bootloader
5. Do you want install boot loader GRUB?
Verify Yes
You want to do / system to read and write
6. Do you want to install / system directory as read-write?
Confirm Yes
In this image there are many examples of Snake, NotePad from Eclipse will not be possible to install your own, at the very bottom of the article there is a utility for solving this problem.
The installation process is complete
7. Android-x86 is installed successfully.
Create an SD card
[Create a fake SD Card]
size 2000 MB
disable CD-ROM
Reboot the system
Reboot
Hotkeys:
- esc, right mouse button back
- the menu button between the right ctrl and alt, on some laptops is missing
- alt + f1 , alt + f7 switch between consoles
- alt + cursor left , alt + cursor right
- f6 mode selection, air mode, shutdown
overload - win home key
If you do not work the mouse cursor .
Go to Machine-> Disable host + i mouse integration (default host key right ctrl).
Unlock the screen by pulling the up arrow
Network configuration
By default, the emulator cannot work with two network adapters — no problem. We need an Internet + internal address for debugging.
We go to launch applications
Choose an application
Settings -> Configure Ethernet
We put eth0 dhcp and choose save.
Reboot the Emulator.
When the machine boots, we switch to the text console alt + f1
Magical order
root @ android: / #
# netcfg
# netcfg eth1 down
# netcfg eth1 dhcp
* action 'dhcp' failed (invalid argument) *
* without this command, no address was altogether *
# netcfg eth1 up
# netcfg
Everything looks approximately like this.
Remember the address eth1 it will be needed for adb.
Steps to configure the network with the console unfortunately must be done every time the emulator starts on a new one .
Now on the computer, go to the folder where the Android-SDK is, another folder may be on your system
C: \ Program Files \ Android \ android-sdk \ platform-tools \
We use the adb eth1 address command, I had 192.168.56.101
The output will be similar:
C: \ Program Files \ Android \ android-sdk \ platform-tools> adb connect 192.168.56.101
* daemon not running. starting it now on port 5037 *
* daemon started successfully *
connected to 192.168.56.101,5555
Run Eclipse.
An example of a running application.
How to be if I want to put NotePad, Snake and other examples
You can put this utility SystemApp_Remover_4_19.ap .
The installation process will look something like this.
C: \ Program Files \ Android \ android-sdk \ platform-tools> adb install c: \ temp \ SystemApp_Remover_4.19.apk
Then delete from the list of system applications with what Eclipse conflicts
p / s Switch video modes.
In the boot menu, press e
Another menu will appear.
kernel /android-2.2/kernel / quiet root ....
Press e again and add vga = ask at the end of the line, separated by a space.
To boot press enter b , and then select the desired mode from the list.
p / p / s This is my first post on Habré, do not judge strictly.
Source: https://habr.com/ru/post/119931/
All Articles