Optimize PNG and JPEG without losing quality. Part 1
Introduction
I offer you a review dedicated to the optimization of PNG and JPEG images without loss of quality. By “no loss of quality” is meant that visually original and optimized images will not differ in any way. I read quite a few articles on Habré devoted to this issue, but I’ll say, most of it is complete nonsense, they state facts and not reasons. This review focuses on people who have a basic understanding of image optimization.
PNG
And so, how is the optimization going? Let's take a look at the order, mainly due to several reasons, and now we will consider them.
Non-interlaced or Interlaced
There are two methods for displaying images in the browser at startup:
- Non-interlaced - browsers download them sequentially, top to bottom, as information arrives from the network.
- Interlaced - until the file is fully downloaded, the image in the browser is displayed in low resolution. those. first you will see a low-quality image, then, as graphic information becomes available, the image quality will gradually improve. Interlaced display allows you to reduce the subjective loading time and show users that the image is loaded, but interlaced display also increases the file size.
ColorType and BitDepth
ColorType is needed to optimize the number of colors in an image. According to this criterion, the following PNG formats are available:
- Grayscale;
- Grayscale + alpha;
- Palette (256 colors);
- RGB;
- RGB + alpha.
')
PNG RGB + alpha - 17,853 bytes

PNG Palette - 13,446 bytes

The difference in size is 4407 bytes (24%), while the visual images have not changed. If you see a different image, then this is an optical illusion.
BitDepth - bit depth, there are two types:
- 1-bit;
- 2-bit;
- 4-bit;
- 8-bit;
- 16-bit.
Here is an example of the work of this technology (to be honest, the images were optimized using the same algorithm):
PNG 4-bit - 6 253 bytes

PNG 8-bit - 5,921 bytes

The difference in size is 332 bytes (5.3%), while the visual images did not change. If you see a different image, then this is an optical illusion.
Both technologies support almost all image editors that can save in PNG, but few people know about it, and for this reason, developers of PNG optimizers have to take care of it.
Chunks
If someone

There are programs like TweakPNG, but it is the best and most convenient. I will tell you about the rest of the programs in conclusion.
As can be seen from the above figure, there are two types of Chunk (Attributes column):
- Critical chunks are present in any PNG image ( IHDR , PLTE for PNG Palette, one or more IDAT and IEND ).
- Ancillary chunks are additional chunks, removing one or another chunks allows you to reduce the size of the image, but not by much.
Palette optimization
Can only be implemented in PNG Palette, a technology based on optimizing PLTE chunks, can reduce image size, although not by much. In my opinion, this technology is better implemented in Color Quantizer , one of its algorithms was implemented in TruePNG .
Alpha channel optimization
I learned about this technology from Sergey Chikuenok ( About PNG. Part 3 ). Now this technology is developed, and very much is used and gives a significant increase in optimization. The main disadvantage is that the technology introduces changes in the image itself (in the Chunks IDAT), and not in the structure, however, the image will not change visually. I can give an example of two programs:
- TruePNG by Color Quantizer;
- CryoPNG is a more advanced optimization technology and requires more time, can increase the degree of compression.
Original image. The size is 214,903 bytes.


CryoPNG (-f0 option). The size is 107,806 bytes.


CryoPNG (-f1 option). The size is 105 625 bytes.


CryoPNG (-f2 option). The size is 107,743 bytes.


CryoPNG (-f3 option). The size is 114,604 bytes.


CryoPNG (-f4 option). The size is 109,053 bytes.


The disadvantage of CryoPNG is that optimization of all five images is required to identify the best result, and this in turn requires a lot of time.
TruePNG works in this regard, similarly to CryoPNG -f0, in turn, CryoPNG -f0 is optimal in terms of PNG optimization (as they say, this is just an experience). According to my observations, CryoPNG -f1 and CryoPNG -f4 are much more likely to optimize PNG better than CryoPNG -f0, compared to CryoPNG -f2 and CryoPNG -f3.
Deflate compression algorithm + String filtering
As we said, PNG consists of Chunks, in this case, we are interested in Chunks - IDAT. For its compression, two factors mainly play, the string filtering and the Deflate compression algorithm. Let's talk about this in more detail.
String filtering
Filters that are used in PNG are needed to prepare the data for compression and thus increase its degree. The filter processes each line in such a way that it is not the byte values themselves that have to be encoded, but the difference between the current and the previous one. From the filter depends on what is considered the previous one.
- None - no filter;
- Sub looks for bytes in the same line;
- Up - with the same number as the current one in the previous one;
- Average takes both and calculates arithmetic average from them;
- Paeth looks at the byte before the byte in the previous line, compares the difference and encodes the smallest.
PNGOut does not create such filters, but the new version adds support for built-in filters. This was done at my request.
Deflate compression algorithm
Today there are several libraries based on the Deflate compression algorithm :
| Library Deflate | Speed work | Power compression | Programs | Note |
| Zlib | High | Low | TruePNG OptiPNG PNGWolf | Due to the high speed of work, it can quickly sort out a large number of parameter values and select the optimal ones. |
| 7-zip | Average | Average | Adfdef PNGWolf | Not always selected values of parameters in Zlib are optimal for them (close to optimal). The enumeration of parameter values will take a large amount of time and almost always the time spent does not justify the result obtained. |
| Kzip | Low | High | PNGOut |
Important : all these programs complement each other, and they are strong when they are united. This is the biggest problem when they are used separately, and then compare the results. First you need to use Zlib, and then 7-zip and / or Kzip.
In the next part, we will talk about these programs in more detail, as well as construct three PNG optimization algorithms (taking into account the optimization of the alpha channel) according to the degree of compression and elapsed time. Below is a conditional graph of the degree of compression versus elapsed time for optimizing IDAT Chunks.

As can be seen from the graph, the greater the degree of compression, the more time is required.
And a bit more...
Here we talk about two programs:
I recommend using them at the very end of PNG optimization and in the order that I wrote above. They can reduce the size of PNG by several tens of bytes, while the speed of work is very high.
Jpeg
So, we turn to JPEG, everything is much simpler, and so on. But before that, I will say that JPEG cannot be re-saved without losing quality, even with a quality level of 100 (this is not the maximum quality, but the mathematical limit of optimization). Consider the following example (to be honest, the images were optimized using the same algorithm).
The original image is 52,917 bytes.

New image (saved via Adobe Photoshop CS5, Save for Web 100) - 53,767 bytes

We build diff-difference images.
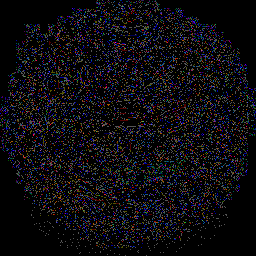
This is how the pictures have changed a lot, yes, visually nothing is noticeable. As you can see the size of the picture has increased. This is due to the specifics of the library that creates the JPEG, let's talk about the libraries a little later.
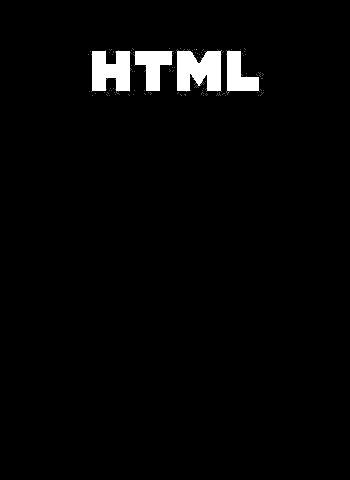
There is only one program that allows you to resave images in JPEG without losing quality - BetterJPEG (there is a plugin for Adobe Photoshop). If I am not mistaken, the program is free for residents of CIS countries for non-commercial use. Personally, I use BetterJPEG when there is no source and minor editing of the image is required. Consider the example of BetterJPEG.
Original image.

New image (complicate the situation, add the inscription "HTML").

We build diff-difference images.
Markers
JPEG, unlike PNG, consists of markers. I recommend reading the article “File Structure, Markers” , I also recommend that you look at the site itself. The most powerful program for studying the structure of JPEG is JPEGsnoop . There are more programs, but I will tell you about them in conclusion. To study the structure of JPEG, I recommend the following image - PhotoME .
Removing some markers (APP0-APP15, COM), can significantly reduce the size of the image. I like the most for this program - Jhead , the most simple and convenient.
Progressive and Optimized
There are three methods for displaying images in the browser at startup.
- Standard. Now almost not used, similar to the optimized method (the compression ratio is worse).
- Optimized — Creates an enhanced JPEG file with a smaller file size. Browsers download them sequentially, top to bottom, as information arrives from the network.
- Progressive - the image is displayed as a sequence of overlays, which allows you to display a low-resolution image before it is fully loaded, i.e. first you will see a low-quality image, then, as graphic information becomes available, the image quality will gradually improve. Internet Explorer, including the eighth version, does not support progressive JPEG download, it shows it only after a full download of the file, which is very different from the behavior of the "traditional" JPEG when the image is displayed from top to bottom as it downloads.
Jpeg library
And here the most interesting begins. Nobody thought about how to create a jpeg? It turns out that there are libraries, and there are not so many of them, consider some of them:
- Adobe uses its own libraries, there are several of them at all, for example, Adobe Photoshop, Save for web - used to save to WEB.
- LibJPEG . I use almost all programs that can save to JPEG, including Adobe Fireworks. The library LibJPEG has a very interesting program - JPEGTran (optimizes the image, without loss of quality). It makes sense to use if you create JPEG images through Photoshop or Illustrator and optimize via JPEGTran, then you get the maximum optimization effect, because it turns out that two libraries are used. Unfortunately, I never managed to force Photoshop to save to JPEG, without losing quality.
Say which of the two libraries optimizes better, the question is very complex and not straightforward, but because of the very high speed of JPEGTran, you just do not notice its work, just do not forget to check the image size, increased or not, all this can be done through bat . Remember, JPEGTran can transfer JPEG from Progressive to Optimized and vice versa, without changing the picture itself.
Conclusion
This is of course all the reasons, but the most significant. I communicated with almost all the authors of the above program, and they are all very talented people. I wanted to thank x128 for the great help in studying image optimization.
More information about how to display images in the browser when downloading can be read:
To make sure that the above methods really optimize without loss of quality, I suggest to look at how to create diff-difference images .
For a more complete picture of optimization, I recommend reading the following articles:
Additionally, the software that I recommend to use when studying the structure of images and not only:
- PhotoME is a very convenient program for studying the structure of PNG and JPEG, not as powerful as the ones described above, I use it as the main one.
- ExifTool is a very powerful program for studying the structure of PNG and JPEG. Works through the command line, there is an online version - Jeffrey's Exif Viewer
- 010 Editor - Hex-editor, but has an add-on ( JPEG , PNG + Chunks ), which helps to study the structure of PNG and JPEG, sometimes simply not replaceable.
To be continued...
Source: https://habr.com/ru/post/119009/
All Articles