NetPing: designer for administrator and leisure for programmer
Judging by how popular the DIY blog is, many of us love to invent. Probably everyone met a person who was able to solder, program, debug something for days without noticing anything around. Here are some fresh examples .
In this article I will talk about the device, which is able to provide inventors with leisure for a very long time. These are, on the one hand, commercially available devices. But they are made in the form of designers, so their use is limited only by your imagination.
')
We will talk about devices NetPing. This Russian development is periodically mentioned in Habré, but I haven’t met with a detailed story. Let this article be a continuation of the series “Russian-made equipment”. I got the most versatile device lineup - UniPing RS-232 . The main scope of its application is remote monitoring and control of multiple devices in an apartment, home, office. Of course, the concept of “smart home” has long existed, but, as a rule, it is presented as an option for wealthy people, although they receive a black box with a rigidly defined, albeit large, set of functions. However, you can collect and program everything yourself!
For the seed, I will list only the standard tasks that can be solved with the help of NetPing devices:
- remote power management with forced reboot;
- control of access to a remote object - sensors for opening / closing doors, movement, impact, anti-vandal systems, control of surveillance cameras;
- tracking the indoor climate - temperature sensors, humidity, air speed, air conditioning control through the IR;
- tracking various emergency situations - smoke detectors, water leaks;
- PBX control via RS-232 port;
- remote change of system settings depending on the situation;
- remote access to servers through the console - for example, installing an operating system without the presence of an administrator;
- Receive instant notifications with fixing the time of failures and other important events through multiple channels: SMS, mail, Jabber;
- access to all parameters of the observed system in real time via HTTP or SNMP;
- management of on / off light and any other devices on a schedule;
- remote control of communication channels.

You can use all this in a regular apartment, in a country house, in a garage, in remote server rooms, in payment terminals, ATMs, etc. It is clear that this can not be limited and find a bunch of other interesting applications. On this occasion, I strongly advise you to read this .
We select the desired set
But let's finally see how it all looks and how it works. The device is quite simple, although when connecting sensors you need to be careful and do everything according to the instructions: since this is essentially a constructor, you can insert sensor wiring anywhere, and the consequences can be very different.
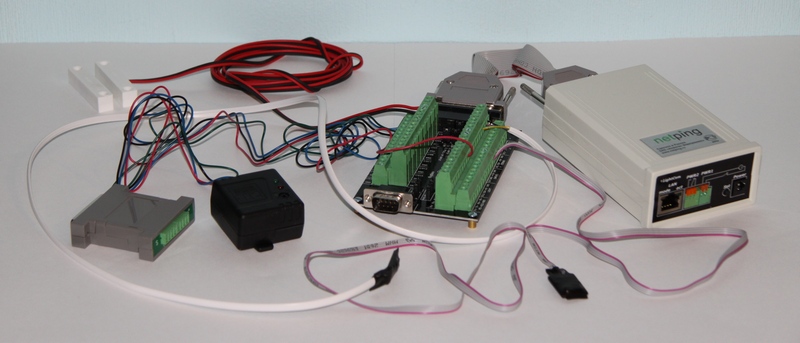
All parts of the complex are sold separately. The box contains only a device with a power supply and a DHS-44 connector for sensors, as well as a piece of paper with an IP address.

Next, you select the desired sensors and peripherals. Alentis Electronics (manufacturer NetPing) currently offers 17 types of sensors :
- 220V availability sensor
- Humidity sensor
- TS thermal sensor (used indoors)
- WT thermal sensor (external waterproof)
- Smoke detector
- Glass break sensor
- Sensor type "dry contact" (for example, an alarm about the fact of opening / closing the door)
- Shock sensor
- Pressure meter
- Light sensor
- Fluid leak sensor
- Motion Sensor
- Passive infrared detector
- Infrared receiver transmitter
- SMS-gate (for sending SMS messages about sensors and other events)
- Siren
- Electricity meter (you can remotely control the flow)
For some types of sensors, UniPing supports connecting up to 8 or 16 pieces per device. I must say that you can also use different sensors from other manufacturers and other types, as long as they are compatible with the signals. 16 sensors of the “dry contact” type are supported - inputs that accept a logical signal: closed - opened.
In my kit on the picture above are temperature sensors, humidity, door opening and shock sensor.
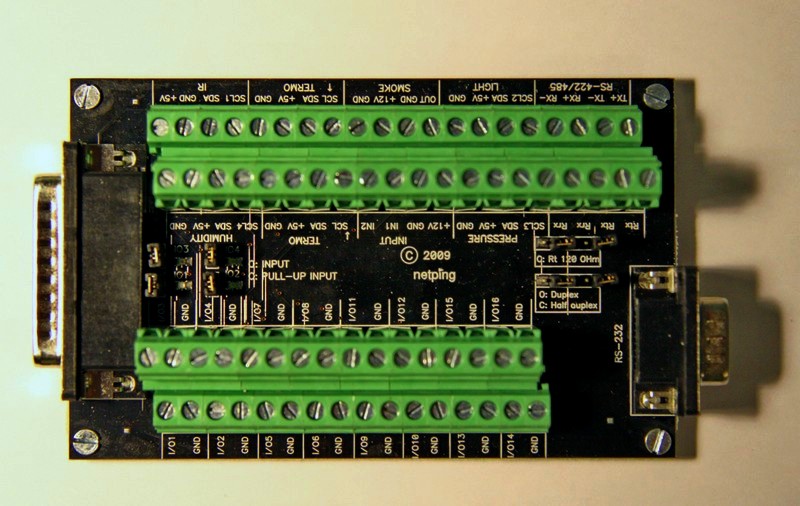
In the photo you can see another board connected to NetPing. This is a NetPing Connection Board, designed to simplify the connection of external sensors.
In principle, you can do without it, but then you have to independently solder the wires under the 44-pin connector, and this requires certain skills. But I liked the fact that no unnecessary details are imposed without need.
I did not go inside the NetPing box, but I think that everything is simple there: some specialized microprocessor, RAM and a body kit from a miniature periphery.
We collect
Now how to collect all this. Very simple. We take in hand a screwdriver, a switching board, sensors and instructions (download from the site). And then just find the section about the desired sensor, insert the wiring into the correct terminals and press the top with a screw.

In the place of the manufacturer, I would still not make bare wires, but something like connectors on the motherboard:

Although, apparently, they also have such options:

Guidance on the assembly and configuration in some cases involves an understanding of the basics of circuitry. Sometimes there are such passages: “If the line configured at the input is not pulled to + 5V and is not connected to the source of information, then it is a high-resistance input”. However, for the rest, everything is described no more difficultly than in the manual for the motherboard.
Enable and configure
Now the fun begins. After all, to complete the work, NetPing connects to a computer, after which you can customize sensors and monitor all parameters in convenient programs and, more importantly for us, program any non-standard work scenarios.
So, we connect NetPing to the free port of the router and plug it into the outlet.

By default, the device’s IP address is set to 192.168.0.100, so if you have a different subnet configured, you may need to change the NetPing address. This is done in the program NPConf. This program is also used to download new firmware. There is also the ability to configure via Telnet, but I did not need it.

NetPing has a built-in web server that can be accessed via HTTP at the device address.

I will tell you about its capabilities a little lower.
We program
Full functionality of the device for the programmer is available via the SNMP protocol. HTTP is just an add-on.
SNMP is useful when you need to receive data from a large number of devices, using any automation scripts, or to display data in existing network monitoring programs. Data acquisition via the SNMP protocol is reduced to reading / writing special addresses inside the device, called OID (object identifier). Addresses supported by the devices can be found in the MIB files (Management Information Base). The MIB file must match the device and firmware version. Variables inside a MIB file are organized in hierarchies, and it is convenient to view them with special programs, for example, there is a free MIB Browser . Here you can also change the values of variables. It looks like this:

Here is an example completely.
The MIB file itself can be opened as ASCII text. Here, for example, the description of the humidity sensor:
npRelHumSensorValueH OBJECT-TYPE
SYNTAX INTEGER (0..100)
MAX-ACCESS read-only
STATUS current
DESCRIPTION "Relative humidity value, %"
::= { npRelHumSensor 2 }
In fact, the SNMP protocol is quite simple, although the notation requires some getting used to. The management system can obtain information from the device via the GET, GETNEXT and GETBULK commands. So you can read information from sensors. The agent (on the device side) can independently send data without a request using the TRAP or INFORM protocol operation. Management systems can also send configuration updates or monitoring requests using the SET operation. That's all.
How it looks from the point of view of the programmer. A couple of examples in PHP:
Getting the temperature value from the sensor.
$t = snmpget( "192.168.0.100" , "SWITCH" , " .1.3.6.1.4.1.25728.8900.1.1.3.2" );
echo 'Current temperature: ' .$t;
Turn on / off relay: write to its address (OID) 1 to turn on, and 0 to turn off.
$result = snmpset( "192.168.0.100" , "SWITCH" , " .1.3.6.1.4.1.25728.8900.1.1.3.1" ,”i”, "1" );The first parameter of the function is the IP address of the device. The second (the word "SWITCH") is the so-called community, a special code word that must be specified in any SNMP request. It is set on the web page of the NetPing device settings. Next is the OID, which we read or write. The snmpset command has 2 more parameters: the value type (in our case integer) and the value itself.
And here is a Perl sensor poll. Or simply from the command line (using free utilities NET-SNMP ).
If only reading of sensor readings is required, then this can be done via HTTP by a simple GET request.
We try ready-made monitoring programs
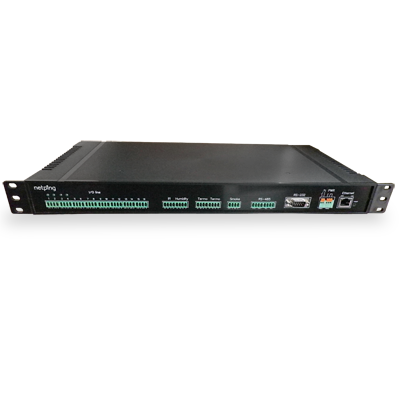
Of course, there have been many monitoring programs for a long time in which it is possible to work, including with NetPing devices. Experienced administrators are probably familiar with one of them. By the way, for server rooms there is even a specialized device UniPing server solution:
I tried PRTG Network Monitor , which is recommended by the manufacturer NetPing - Alentis Electronics. When using 10 sensors the program is free. If you need more, you will have to pay $ 380, but for serious tasks it is worth it.

In the next section, I will show this program in work, and here I will also mention other monitoring systems: Zabbix and Nagios .
Experimenting
Unfortunately, I have not had time to tinker with all the functions and program it.
At first I connected the simplest - humidity and temperature sensors. Thermal sensors can connect up to 8 pieces.
Everything worked right away. For example, I did a little climate research: I put the humidity sensor on the floor in the room.

Humidity was only 25% (this was when the heating worked). In my opinion, the climate is completely unhealthy in our apartments ... Then I wiped the floor around the sensor with a wet rag. As you can see, the humidity has risen to as much as 67% and lasted as long as 5 minutes :) Comfort turned out to be fleeting vision. It's a pity. It will be necessary to think seriously about room moistening. And this, by the way, is still with a constantly open window. It is terrible to imagine what we breathe in the winter behind a closed glass unit.
The humidity sensor also shows the temperature in combination. Everything is simple here.

Note (if it is possible on such a screenshot), the program has tabs for a month and for 365 days, so that, having a constantly on server, you can build beautiful climate pictures. One would add a barometer - there will be a full-fledged weather station.
I played a little with the impact sensor, I made sure that it worked, but did not set up TRAP messages.

The green light (high sensitivity) lights up when there is a slight jolt, and the red one does so with a large one. Sensitivity is adjustable. This sensor is universal. It can be used anywhere, including in a car with some kind of alarm.
The door opening / closing sensor is also very simple.

The halves were disconnected - the signal level moved from “0” to “1”, connected - returned to “0” again. It was visible on the switching board - the green LED turned on or turned off:

Still a couple of words on how to configure TRAP. Because this is the only way to initiate the sending of messages from sensors in case of some important events. They can also be configured in the embedded web server, but it is more convenient to observe in PRTG Monitor.

On this page, the IP address is set to which TRAP packets will be sent via the SNMP protocol. The events on which these packets will be sent are set on other pages of the device web-interface.
Then you can, for example, configure the temperature sensor to generate a TRAP when the specified temperature is exceeded.

Of course, the scripts can significantly expand opportunities. For example, send SMS alerts on certain events.
Wires for some sensors were quite short. As I later read, the length of the wires depends on the type of sensor. The peculiarity of “current sensors” (smoke sensor, motion sensor, presence sensor, alarm loop with integrity monitoring, etc.) is that their status is signaled not by voltage, but by current, because of this they are much less susceptible Electromagnetic interference and allow long stubs. I think that with good shielding any sensor can be hung on a long cable. Because it is difficult to use them otherwise, for example, in a large server room.
The Web interface also has a Journal, in which important events occurring in the device are recorded in chronological order.

Since the device does not contain a built-in non-volatile clock, the time in the log is counted from the moment of switching on, which is taken to be 01/01/1970.0: 00. If the IP address of the NTP server is specified in the settings, the device shortly after turning on the power will try to set its clock on the time server.
Interesting application examples
The scope of the device does not end with the monitoring of sensors, but on the contrary is just beginning.
Here I will provide links to other interesting examples of application.
- Remote control of the RESET button

- Turn on the fan in the office by a shortcut from the desktop

- Remote control of lighting in porches using PRTG monitor

- Sending SMS alerts using the MC35i gate

- Remote metering of electricity, UniPing and power meter

- Automatic temperature controller
A couple of examples from here (by the way, the article itself is very interesting).
- You can make a small and simple climate control in the garage: turn on the fan heater on the thresholds of temperature. Internet is generally not necessary. It is enough to set the boundary conditions through the web-interface and leave it together with a temperature sensor in the garage. When necessary - came with a laptop, rearranged the values.
- The simplest alarm system at home with the output to the Internet or further - via SMS gateway to the owner's cell phone.
- On the site Alentis found a funny case. During testing of the system, the employee did not turn on the cooling system, but merely a LED, and at some point a simple flasher was created, based on the following script:
#!/bin/sh
while true ; do
snmpset -v 1 -c SWITCH 192.168.2.10 1.3.6.1.4.1.25728.50.8.116 integer 1;
sleep 1;
snmpset -v 1 -c SWITCH 192.168.2.10 1.3.6.1.4.1.25728.50.8.116 integer 0;
sleep 1;
done
What prompted the following idea: to the device you can connect a garland of glowing lamps or LEDs and make it blink. Since there are four relays on the board, you can connect four different garlands and use simple scripts to switch them creating a “running fire” effect and more complex effects.
I will give some more links to articles of inventions on Habré where NetPing could be used:
- Arduino Ethernet Thermometer
- Creating gsmrozetka.ru
- iRemo Tap: management of sockets through the Internet
- Hardware and software tool to automatically restart a hung computer
- A cheaper replacement for APC temperature and humidity sensors
- New look at remote computer management - five hundred kilometers and not a single error
As you can see, the ideas of applying the sea.
Comparison of devices and prices
The NetPing device line is quite large and the functionality often overlaps. Therefore, it is not always easy to figure out which device is better suited for a particular task. I found a link to the feature comparison table .
And the DigiPing test board can also be useful - it is convenient to debug control scripts on it.
As for prices. Since this is a constructor, the cost for each solution may vary. But in general, in my opinion, not at all expensive. For example, a small complex for monitoring equipment in an organization with component prices:

findings
If you are a system administrator, then NetPing devices may well save you time and money to manage equipment in your organization.
But I think that just people with an inventive streak will find many interesting applications. Some I tried to describe in the article.
There are, of course, those who are interested only in ready-made solutions that perform a strictly specified set of functions.
On the other hand, there are situations when a box with one button is preferable to a complex and flexible device. I liked the example in one of the articles to which I referred above: “My grandmother’s Skype desktop videophone. How much I suffered, trying to set up autopilot pilots with a camera for her, and still there is no place to put problems. And the box works great. ”
In general, it is hardly worth thinking that everything was invented before us. Success in creative work!
Source: https://habr.com/ru/post/118817/
All Articles